Reviewing historical versions of the project
Historical project versions are all versions of a project that were committed before the latest version. These versions are also referred to as project history. You can review the history of a project or its branch in one of the following ways:
- The History dialog - displays all historical versions of a project or project branch, including details such as the commit date, author, comment, and version tags.
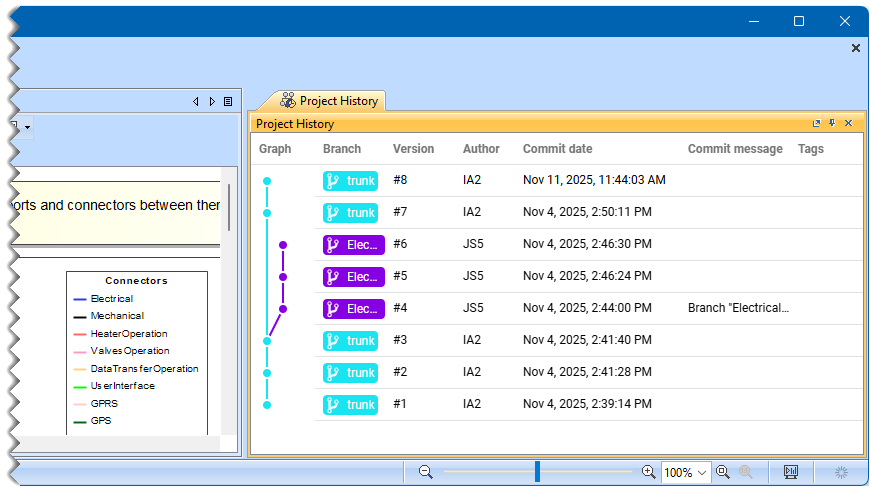
- The Project History panel - displays all historical versions of the open project and its branch structure. The panel also includes details such as the commit date, author, message, and version tags.
Using the History dialog
To review the history of the selected project
- In the main menu, select Collaborate > Projects or Open Server Project.
- In the open dialog, select the project whose historical versions you want to review.
- Do one of the following:
- In the dialog toolbar, click
 .
. - Right-click the selected project and select Project History.
- In the dialog toolbar, click
In the History dialog, review all versions of the selected project. If a version has tags, they are displayed next to the version number.
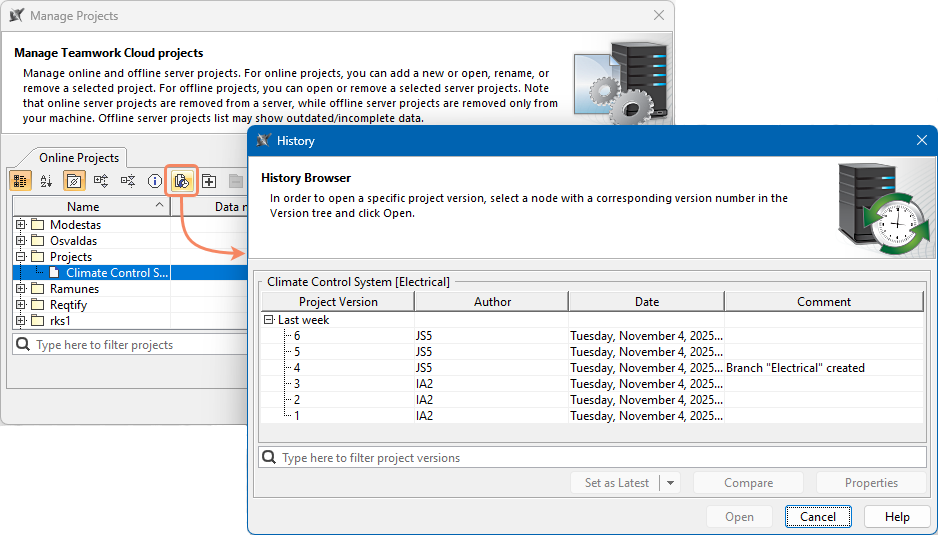
Opening the History dialog.
Use the search bar to filter project versions according to:
- Project version (together with the commit tags)
- Author
- Comment
The following table describes the user interface elements of the History dialog.
Column name | Description |
|---|---|
| Project version | The version number of a project. |
| Author | The name of the user who created the project version. |
| Date | The date and time when the project version was created. |
| Comment | The description of changes in the version. You can make a version comment when committing a project. |
| Button | Description |
| Set As Latest | Sets the selected project version as the latest version of the project or project branch. You must have the read-write permission for the branch in which you set the selected project version as the latest version. |
| Set As Latest > Select Branch | Sets the selected version as the latest in a specific branch. To use this feature, click the drop-down arrow next to the Set As Latest button, click Select Branch, then select a branch and click OK. |
| Compare | Compares two selected project versions. The differences between the selected versions are displayed in the Difference Viewer dialog. The button is available only when two project versions are selected (use the SHIFT or CTRL keys). |
| Properties | Opens the Version Properties dialog. |
| Open | Opens the selected version of the project. You can make changes only to the latest version of the project. Historical versions are read-only. |
| Cancel | Closes the dialog. |
| Help | Opens the related documentation page. |
The History dialig allows you to review the properties of the selected project version and add version tags.
To review the properties of a project version
- In the History dialog, select a project version whose properties you want to review.
- Click the Properties button.
- In the Version Properties dialog, do the following:
- In the Comments tab, review the comment of the selected project version.
- In the Tags tab, you can:
- Review the tags of the selected version.
- Edit a tag by selecting it and clicking the Edit button.
- Add a new tag by clicking the Add button.
- Mark the version as major by selecting the Major version check box.
- In the Used Projects tab, review the projects used by the selected project version.
- In the Meta information tab, review the metadata of the selected project version.
Using the Project History panel
To review the history and branch structure of the open project
- In the main menu, select Window > Project History.
- In the open Project History panel, review all versions of the open project, its branch structure, and other details, such as the author, commit date, commit message, and version tags.