Migrating projects and standard profiles
After upgrading your modeling tool, you need to migrate the projects and standard profiles stored in the 3DEXPERIENCE platform to the new version as well. You can do this in several different methods which are described below.
Prerequisites
- To migrate standard profiles, you need to have write permissions in the collaborative space where profiles are stored.
- To migrate a project, you need to have write permissions on its branch/revision and maturity to allow iterations to be created.
When migrating standard profiles, a revision is created for each profile that is migrated.
- When migrating standard profiles, an intermediate profile version can be committed in certain cases. This is a normal part of the migration process and is not a cause for concern. For example, when migrating from UAF 1.2 to 1.3, you may see an intermediate version such as 1.B (1) (UAF 1.2 -> 1.3).
When migrating projects, an iteration is created for each branch/revision of a migrated project.
- If the 3DEXPERIENCE platform is upgraded, but you still use the same version of a modeling tool, standard profiles do not change, and you do not need to migrate them.
- You can only migrate projects to the version of your modeling tool.
- You can migrate projects partially to allow users to work on both an earlier version and the version you are migrating to. However, if you start working and creating projects on a later version, you cannot migrate or add projects to an earlier version.
Migrating all projects and standard profiles at once
You can migrate projects and standard profiles all at once.
To migrate all projects and standard profiles at once
- In the main menu, select Collaborate > Migrate Projects to Version <version number>.
In the Show drop-down menu of the open dialog, select All Projects. It will display all projects and standard profiles on the server.
- Click
 on the left side of the dialog to select all projects and standard profiles.
- Click OK.
Migrating standard profiles
To migrate projects separately from standard profiles, you must first migrate the standard profiles.
To migrate standard profiles
- Log in to the 3DEXPERIENCE platform.
- Select the collaborative space dedicated for standard profiles:

It is highly recommended to store standard profiles in a public collaborative space. To learn how to create a collaborative space, see Creating public collaborative spaces.
- In the main menu, select 3DEXPERIENCE > Switch Platform/Credentials.
- In the Credentials drop-down box of the open dialog, select the collaborative space.
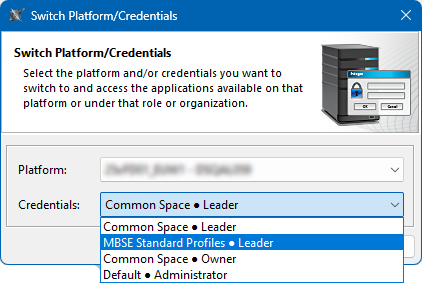
- Click OK.
- In the main menu, select Collaborate > Migrate Projects to Version <version number>.
In the Show drop-down menu of the open dialog, select Standard Profiles. It will display all standard profiles on the server.
- Select the standard profiles you want to migrate or click on the left side of the dialog to select all standard profiles.
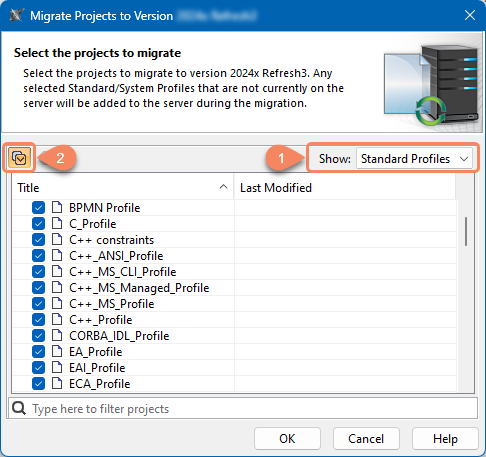
- Click OK.
Migrating projects
You can migrate projects either automatically through the dedicated dialog or manually by opening a project that has not yet been migrated. Please note that for either of these methods to work you have to migrate standard profiles beforehand.
Migrating projects automatically
If you migrate projects automatically through the dedicated dialog, all branches of the projects are migrated as well.
To migrate projects automatically
- In the main menu, select Collaborate > Migrate Projects to Version <version number>.
In the Show drop-down menu of the open dialog, select Projects. It will display all projects on the server.
- Select the projects you want to migrate or click on the left side of the dialog to select all projects.
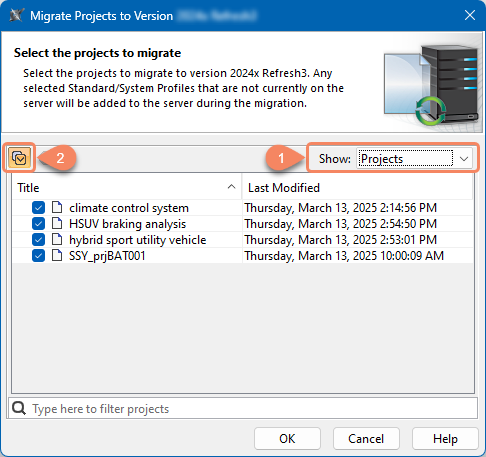
- Click OK.
Migrating projects manually
To migrate a project manually
- On the main menu, click Collaborate > Projects.
- In the Manage projects dialog, select a project and click Open. A dialog opens telling you to update the System/Standard Profiles in the project.
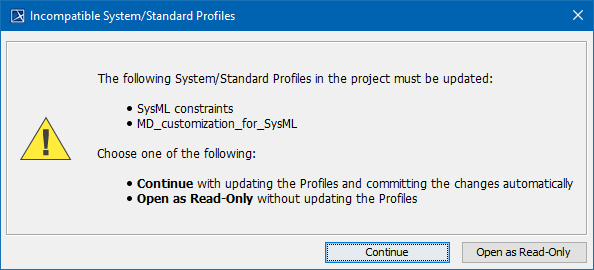
- Click Continue.
After the System/Standard Profiles are updated, you get a notification saying that the model was successfully updated.