Deployment example on Kubernetes
This deployment example is not intended for production use. Use it for testing purposes only.
The versions of all
Teamwork Cloud and services
components used in this deployment are listed on the Third-Party Component Compatibility page. Before you begin, verify that you are using compatible versions of all required components. Using versions not listed on that page is not tested and may result in unexpected behavior.
This chapter provides information on how to deploy the product for testing purposes. Keep in mind that the guidelines provided below are not considered the best practices and do not take into account security settings and password encryption. This deployment has been tested with a specific Kubernetes version, CNI, container runtime, and OS. If you use other solutions, use them at your own risk.
Prerequisites
- Kubernetes cluster (for more information, refer to https://kubernetes.io/):
- 1 virtual machine used as the control plane node and 3 nodes used as worker nodes

The names of worker nodes must match their FQDN.
- Control plane node: 4 CPU cores, 8GB RAM
- Worker node: 16 CPU cores, at least 64GB RAM (depends on your deployment size)
- 1 virtual machine used as the control plane node and 3 nodes used as worker nodes
- Kubernetes version: v1.35.4 or later
- Container runtime: Containerd (for more information, refer to https://containerd.io/)
- CNI: Calico
- Load Balancer: MetalLB (the configuration instructions are provided later in this chapter)
Most cloud providers do not support MetalLB.
- IP: 1 additional IP address with the DNS A record that points to this IP (IP from your network that is not used by your cluster nodes).
- Ingress: HAProxy Kubernetes Ingress Controller (with sticky session support).
- A Host with Docker or Podman to build images and push them to the image registry.
- An image registry (repository) such as Harbor, Sonatype Nexus, Gitlab, or Docker registry server to push and pull the images you will build.
- The applications needed to run Teamwork Cloud and services (the installation steps are described below.):
- Zookeeper (for more information, refer to https://zookeeper.apache.org/)
- Apache Artemis MQ (for more information, refer to https://activemq.apache.org/components/artemis/)
- Keda CRD (deployed with the Simulation web application)
- MetalLB
- HAProxy Ingress
- Cassandra
See the compatible versions of the applications on the Third-Party Component Compatibility page.
The following figure displays the environment used in this deployment example.
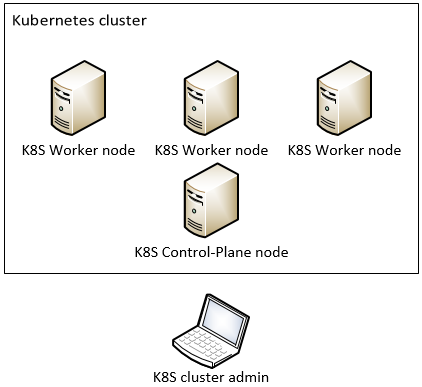
In this environment, the K8S cluster admin host (Linux virtual machine) is used to build images, run the image repository, and manage the Kubernetes cluster.
In the workflow below:
- admin.example.com refers to the K8S cluster admin host and should be changed to your K8S cluster admin FQDN.
- ingress.example.com refers to the domain name through which Web Application Platform will be accessible.
- All the steps are performed on the K8S cluster admin host.
- All commands are prepared to work in the user's home folder. If needed, adapt the commands to meet your needs.
To deploy the product for testing purposes
- Install kubectl as described in https://kubernetes.io/docs/tasks/tools/install-kubectl-linux/.
- Install the helm to the K8S cluster admin host as described in https://helm.sh/docs/intro/install.
Use the following command (or another way) to copy cluster config files to the K8S cluster admin host:
scp -r <user@control_plane_address>:.kube ~BASHThen open to edit ~/.kube/config and replace the localhost IP address with your control plane IP address or hostname, e.g., https://127.0.0.1:6443.
Prepare the required files and directories:
- Download and extract the twc-services-charts-2026xHF1.zip file.
- Download the installation package for your product version. For more information, refer to Downloading installation files.
Extract the packaged files, and inside the ~/twc-services-charts directory (where you extracted the twc-services-charts.zip file) do the following:
Extract the twcloud_<version>_no_install_linux64.zip file. After extracting the files, you should have the following folder structure: ~/twc-services-charts/CATIANoMagicServices/TeamworkCloud/.
- Extract the Web_Application_Platform_<version>_war_files.zip file.

You will find all files mentioned in this chapter in twcloud_<version>_no_install_linux64.zip and Web_Application_Platform_<version>_war_files.zip, or on the software download website (except for Teamwork Cloud keystore and SSL certificate):
- The ~/twc-services-charts/CATIANoMagicServices/WebAppPlatform/conf directory contains server.xml.
- The ~/twc-services-charts/CATIANoMagicServices/WebAppPlatform/shared/conf directory contains other configuration files.
- The ~/twc-services-charts/CATIANoMagicServices/WebAppPlatform/shared/conf/data directory contains files for Cameo Collaborator and document-exporter.
- The ~/twc-services-charts/CATIANoMagicServices/TeamworkCloud/configuration directory contains Teamwork Cloud configuration files.
- The ~/twc-services-charts/CATIANoMagicServices/Utilities/Cassandra contains the .jar file for Cassandra's communication with Zookeeper.
- The ~/twc-services-charts/CATIANoMagicServices/WebAppPlatform/webapps directory contains application .war files.
- Go to the ~/twc-services-charts directory and execute the following command to generate a private key and self-signed certificate. Change the command by entering your DN identifiers.
openssl req -new -newkey rsa:2048 -days 365 -nodes -x509 -keyout tls.key -out tls.crt -subj "/C=LT/ST=State/L=City/O=Organization/OU=Department/CN=example.com"BASH - Execute the following command to create a PKCS#12 keystore. If you change the name or password, do not forget to change them in the configuration files. For more information about the CA certificate and P12 or PFX files, see Managing SSL certificate.
openssl pkcs12 -export -name teamworkcloud -in tls.crt -inkey tls.key -out keystore.p12 -password pass:nomagicBASH
The tls.crt and tls.key files will be used for HAProxy Ingress Controller, so file names in HAProxy Ingress Controller must be the same. Execute the following commands to prepare the helm-charts root directory:
cd ~/twc-services-charts/helm-charts mkdir -p configs/{auth,cassandra,ssl,tomcat,twcloud,wap} configs/twcloud/sslBASH- Copy the generated certificate files to the appropriate locations by executing the following commands:
cd ~/twc-services-charts
cp tls.crt tls.key ~/twc-services-charts/helm-charts/configs/ssl
cp keystore.p12 ~/twc-services-charts/helm-charts/configs/twcloud/ssl
BASH - Download the Apache Cassandra files to the twc-services-charts directory. You can find the compatible Cassandra version for this release on the Third-Party Component Compatibility page.
Execute the following commands to extract the Cassandra .tar file:
tar xzf apache-cassandra-<version>-bin.tar.gz cd ~/twc-services-charts/apache-cassandra-<version>/confBASHIn the cassandra.yaml file edit Cassandra settings as shown below.
sed -i "s/# commitlog_total_space:.*/commitlog_total_space: 8192MiB/g" ./cassandra.yaml sed -i "s/commitlog_total_space:.*/commitlog_total_space: 8192MiB/g" ./cassandra.yaml sed -i "s/^rpc_address:.*/rpc_address: 0.0.0.0/g" ./cassandra.yaml sed -i "s/commitlog_segment_size:.*/commitlog_segment_size: 192MiB/g" ./cassandra.yaml sed -i "s/read_request_timeout:.*/read_request_timeout: 1800000ms/g" ./cassandra.yaml sed -i "s/range_request_timeout:.*/range_request_timeout: 1800000ms/g" ./cassandra.yaml sed -i "s/^write_request_timeout:.*/write_request_timeout: 1800000ms/g" ./cassandra.yaml sed -i "s/cas_contention_timeout:.*/cas_contention_timeout: 1000ms/g" ./cassandra.yaml sed -i "s/truncate_request_timeout:.*/truncate_request_timeout: 1800000ms/g" ./cassandra.yaml sed -i "s/request_timeout:.*/request_timeout: 1800000ms/g" ./cassandra.yaml sed -i "s/batch_size_warn_threshold:.*/batch_size_warn_threshold: 3000KiB/g" ./cassandra.yaml sed -i "s/batch_size_fail_threshold:.*/batch_size_fail_threshold: 5000KiB/g" ./cassandra.yaml sed -i "s|compaction_throughput:.*|compaction_throughput: 512MiB/s|g" ./cassandra.yaml sed -i "s/memtable_heap_space:.*/memtable_heap_space: 4092MiB/g" ./cassandra.yaml sed -i "s/key_cache_size:.*/key_cache_size: 200MiB/g" ./cassandra.yaml sed -i "s/# file_cache_size: 512MiB/file_cache_size: 3072MiB/g" ./cassandra.yaml sed -i "s/internode_compression: dc/internode_compression: all/g" ./cassandra.yaml sed -i "s/concurrent_reads: 32/concurrent_reads: 64/g" ./cassandra.yaml sed -i "s/concurrent_writes: 32/concurrent_writes: 64/g" ./cassandra.yaml sed -i "s/concurrent_counter_writes: 32/concurrent_counter_writes: 64/g" ./cassandra.yaml sed -i "s|# stream_throughput_outbound: 24MiB/s|stream_throughput_outbound: 4096MiB/s|g" ./cassandra.yaml sed -i "s/#concurrent_compactors: 1/concurrent_compactors: 1/g" ./cassandra.yamlCODEExecute the following command to copy files to the twc-services-charts/helm-charts/configs/cassandra directory:
cp cassandra.yaml logback.xml ~/twc-services-charts/helm-charts/configs/cassandraBASH- Execute the following command to copy the Authserver file to the appropriate location:
cp ~/twc-services-charts/CATIANoMagicServices/WebAppPlatform/shared/conf/authserver.properties ~/twc-services-charts/helm-charts/configs/authBASH - Execute the following commands to copy the Tomcat's file to the appropriate location:
cp ~/twc-services-charts/CATIANoMagicServices/WebAppPlatform/conf/catalina.properties ~/twc-services-charts/helm-charts/configs/tomcat
cp ~/twc-services-charts/CATIANoMagicServices/WebAppPlatform/conf/server.xml ~/twc-services-charts/helm-charts/configs/tomcat
sed -i "s|../Certs/keystore.p12|./shared/conf/keystore.p12|g" ~/twc-services-charts/helm-charts/configs/tomcat/server.xml
BASH - Edit the application.conf file as shown below.
cp ~/twc-services-charts/CATIANoMagicServices/TeamworkCloud/configuration/application.conf ~/twc-services-charts/helm-charts/configs/twcloud/
cp ~/twc-services-charts/CATIANoMagicServices/TeamworkCloud/configuration/logback.xml ~/twc-services-charts/helm-charts/configs/twcloud/
sed -i 's/contact-points.*/contact-points = [${?CASSANDRA_SEED0}][${?CASSANDRA_SEED1}][${?CASSANDRA_SEED2}]/g' ~/twc-services-charts/helm-charts/configs/twcloud/application.conf
sed -i "s/local.size.*/local.size = 3/g" ~/twc-services-charts/helm-charts/configs/twcloud/application.conf
sed -i "s/remote.size.*/remote.size = 3/g" ~/twc-services-charts/helm-charts/configs/twcloud/application.conf
sed -i "s/replication-factor.*/replication-factor = 3/g" ~/twc-services-charts/helm-charts/configs/twcloud/application.conf
CODE - Execute the following commands to edit the jvm.options file:
cp ~/twc-services-charts/CATIANoMagicServices/TeamworkCloud/jvm.options ~/twc-services-charts/helm-charts/configs/twcloud/
sed -i 's/-Xmx.*/-Xmx${TWC_XMX}/g' ~/twc-services-charts/helm-charts/configs/twcloud/jvm.options
BASH - Execute the following commands to copy Web Application Platform files to the appropriate location:
cd ~/twc-services-charts/CATIANoMagicServices/WebAppPlatform/shared/conf
cp revision.txt log4j2*.properties webappplatform.properties ~/twc-services-charts/helm-charts/configs/wap/
BASH - Ensure all files listed below exist in their directories:
auth - authserver.properties
cassandra - cassandra.yaml
- logback.xml
ssl - tls.crt
- tls.key
tomcat - catalina.properties
- server.xml
twcloud - application.conf
- logback.xml
- jvm.options
twcloud/ssl - keystore.p12
web - revision.txt
- log4j2.properties
- log4j2simulation.properties
- webappplatform.properties
Execute the following command to create a directory for each application you are going to use:
cp -r ~/twc-services-charts/dockerfiles ~/twc-services-charts/imagebuildBASH- Copy all files listed below to their directories (except the artemis directory):
admin-console - admin.war
- Dockerfile
- ROOT (The directory is located in ~/twc-services-charts/CATIANoMagicServices/WebAppPlatform/webapps.)
authentication - authentication.war
- Dockerfile
- ROOT (The directory is located in ~/twc-services-charts/CATIANoMagicServices/WebAppPlatform/webapps.)
collaborator - collaborator.war
- Dockerfile
- data (The directory is located in ~/twc-services-charts/CATIANoMagicServices/WebAppPlatform/shared/conf/. Remove the document-exporter directory from the data directory after copying.)
- ROOT (The directory is located in ~/twc-services-charts/CATIANoMagicServices/WebAppPlatform/webapps.)
document-exporter - document-exporter.war
- Dockerfile
- data (This directory is located in <webapp-charts_root>/CATIANoMagicServices/WebAppPlatform/shared/conf/. Remove the collaborator directory from the data directory after copying.)
- ROOT (The directory is located in ~/twc-services-charts/CATIANoMagicServices/WebAppPlatform/webapps.)
magiclab - magiclab.war
- Dockerfile
- ROOT (The directory is located in ~/twc-services-charts/CATIANoMagicServices/WebAppPlatform/webapps.)
magiclabcollab - magiclab-collaborator.war
- Dockerfile
- ROOT (The directory is located in ~/twc-services-charts/CATIANoMagicServices/WebAppPlatform/webapps.)
oslc - oslc.war
- Dockerfile
- ROOT (The directory is located in ~/twc-services-charts/CATIANoMagicServices/WebAppPlatform/webapps.)
reports - reports.war
- Dockerfile
- ROOT (The directory is located in ~/twc-services-charts/CATIANoMagicServices/WebAppPlatform/webapps.)
resource-usage-map - resource-usage-map.war
- Dockerfile
- ROOT (The directory is located in ~/twc-services-charts/CATIANoMagicServices/WebAppPlatform/webapps.)
resources - resources.war
- Dockerfile
- ROOT (The directory is located in ~/twc-services-charts/CATIANoMagicServices/WebAppPlatform/webapps.)
sgi-crawler - sgi-crawler.war
- Dockerfile
- ROOT (The directory is located in ~/twc-services-charts/CATIANoMagicServices/WebAppPlatform/webapps.)
simulation - simulation.war
- Dockerfile
- ROOT (The directory is located in ~/twc-services-charts/CATIANoMagicServices/WebAppPlatform/webapps.)
sysmlv2-api - sysmlv2-api.war
- Dockerfile
- ROOT (The directory is located in ~/twc-services-charts/CATIANoMagicServices/WebAppPlatform/webapps.)
webapp - webapp.war
- Dockerfile
- ROOT (The directory is located in ~/twc-services-charts/CATIANoMagicServices/WebAppPlatform/webapps.)
twcloud - Dockerfile
- TeamworkCloud (The directory is located in ~/twc-services-charts/CATIANoMagicServices.)
Execute the following command to start the local Docker registry:
docker run -d -p 5000:5000 --restart=always --name registry registry:2BASH
In this case, a local Docker registry is run on the K8S cluster admin host. It uses port 5000, so make sure this port is open on your host firewall and accessible to your Kubernetes cluster.
This local Docker registry should be used for testing purposes only and is not considered production-ready. In the production environment, run the image registry with TLS and authentication.- Add your repo URL (FQDN of the K8S cluster admin host) to the Docker /etc/docker/daemon.json file.
If the daemon.json file does not exist, create it. Assuming there are no other settings in the file, it should have the following content:
{ "insecure-registries": ["admin.example.com:5000"] }CODEExecute the following command to restart the Docker service:
sudo systemctl restart dockerBASHExecute the commands below for each service that you want to build images for inside their own directories, as shown in the examples in substeps a, b, and c.
docker build -f Dockerfile -t {APP_NAME} .
docker tag {APP_NAME}:{VERSION} {IMAGE_REPO_URL}:5000/{APP_NAME}:{VERSION}
docker push {IMAGE_REPO_URL}/{APP_NAME}:{VERSION}
BASH
- {IMAGE_REPO_URL} - your image repository URL. It can differ depending on the image registry provider.
- {APP_NAME} - application name.
- {VERSION} - version to be used for the tag.
The following command example builds images for Admin Console:
cd imagebuild/admin-console docker build -f Dockerfile -t admin .BASHThe following command example tags the built image:
docker tag admin:latest admin.example.com:5000/admin:latestBASHThe following command example pushes the image to the registry:
docker push admin.example.com:5000/admin:latestBASH
Check the names of the local repositories after Docker images are pushed.
curl -s http://admin.example.com:5000/v2/_catalog
curl -s http://admin.example.com:5000/v2/<repository_name>/tags/list
Example:
curl -s http://admin.example.com:5000/v2/webapp/tags/list
REGISTRY_URL="http://admin.example.com:5000:5000/v2"; curl -s $REGISTRY_URL/_catalog | jq -r '.repositories[]' | xargs -I {} sh -c 'echo "Repository: {}"; curl -s '"$REGISTRY_URL"'/{}/tags/list | jq -r ".tags[]"'
- To be able to pull images to your Kubernetes cluster nodes, add your image repository to the Containerd configuration on all cluster nodes:
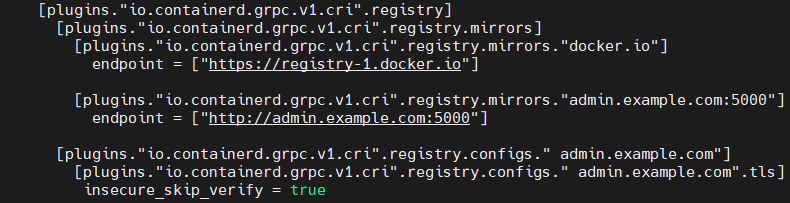
Edit the /etc/containerd/config.toml file by adding the following lines to the "mirrors" part:
[plugins."io.containerd.grpc.v1.cri".registry.mirrors."admin.exmple.com:5000"]
              endpoint = ["http://admin.example.com:5000"]

      [plugins."io.containerd.grpc.v1.cri".registry.configs." admin.example.com"]
        [plugins."io.containerd.grpc.v1.cri".registry.configs." admin.example.com".tls]
         insecure_skip_verify = true
CODE
Keep in mind that alignment is very important, as shown in the example below.
Execute the following command to restart Containerd services on all cluster nodes:
sudo systemctl restart containerdBASH
Execute the following commands to add dependency repos:
helm repo add kedacore https://kedacore.github.io/charts helm repo add metallb https://metallb.github.io/metallb helm repo add haproxy-ingress https://haproxytech.github.io/helm-charts helm repo update cd ~/twc-services-charts/helm-chartsBASHExecute the following command to update chart dependencies:
helm dependency updateBASHExecute the following command to install Custom Resource Definitions (CRD). This will create all services and deployments.
helm install keda kedacore/keda --namespace keda --create-namespace --wait --version 2.19.0BASH
You can check the status of the services and pods with this command: kubectl get all -n keda
Keda and MetalLB should be added as separate resources.
Since CRDs (being a globally shared resource) are fragile, you have to assume that once a CRD is installed, it is shared across multiple namespaces and groups of users. For that reason, installing, modifying, and deleting CRDs is a process that has ramifications for all users and systems of that cluster.
Execute the following command to deploy MetalLB (skip this step if MetalLB is already deployed and configured):
helm install metallb metallb/metallb --namespace metallb-system --create-namespaceBASHTo check the MetalLB deployment status, execute the following command on the control plane node or the K8S cluster admin host:
kubectl get -n metallb-system allBASHYou should see an output similar to this:
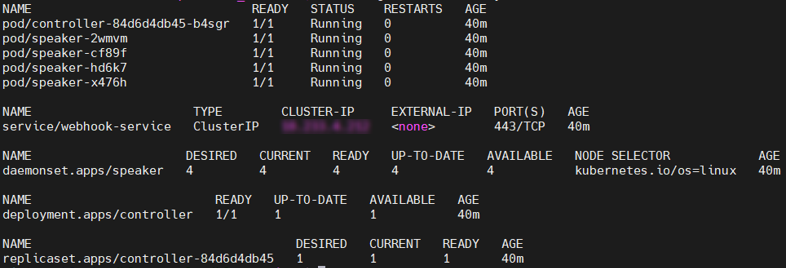
If you see that the MetalLB status is 'Running,' but READY is 0/1, give it some time to start and repeat the command.
Create configuration files for MetalLB as instructed below. Make sure to complete all the substeps of this step to create and apply both configurations. Otherwise, the product will not work properly.
-
- Your IT department should give you a reserved IP address or a range of IP addresses (depending on your needs) with a DNS A record that points to this IP address.
- At least one IP address with a domain name should be reserved for Ingress.
- Configuration files should be formatted in "yaml".
- The first IP address configured in metallb_ipaddresspool.yaml will be assigned for Ingress.
Edit the ~/twc-services-charts/helm-charts/crd/metalLB/metallb_ipaddresspool.yaml file as shown below:
apiVersion: metallb.io/v1beta1
kind: IPAddressPool
metadata:
  name: first-pool
  namespace: metallb-system
spec:
  addresses:
  - 192.168.1.1/32
  #- 192.168.10.0/24
  #- 192.168.9.1-192.168.9.5
  #- fc00:f853:0ccd:e799::/124
CODE - Your IT department should give you a reserved IP address or a range of IP addresses (depending on your needs) with a DNS A record that points to this IP address.
Edit (if necessary) the ~/twc-services-charts/helm-charts/crd/metalLB/l2advertisement.yaml file as shown below. You can change the metadata name as needed. Keep in mind that the ipAddressPool name should match the specifications.
apiVersion: metallb.io/v1beta1 kind: L2Advertisement metadata: name: example namespace: metallb-system spec: ipAddressPools: - first-poolCODEExecute the following command to apply the MetalLB configuration:
kubectl apply -f ~/twc-services-charts/helm-charts/crd/metalLB/metallb_ipaddresspool.yamlBASHExecute the following command to check the applied configuration:
kubectl describe ipaddresspools.metallb.io first-pool -n metallb-systemBASHExecute the following command to create the MetalLB advertisement:
kubectl apply -f ~/twc-services-charts/helm-charts/crd/metalLB/l2advertisement.yamlBASHExecute the following command to check the advertisement configuration:
kubectl describe l2advertisements.metallb.io example -n metallb-systemBASH
- Install HAProxy CRD
kubectl apply -f https://raw.githubusercontent.com/haproxytech/kubernetes-ingress/master/crs/definition/ingress.v3.haproxy.org_tcps.yamlBASH
- Find the values.yaml file in the parent helm chart ( ~/twc-services-charts/helm-charts/values.yaml ) and provide the values of the parameters in the file to enable or disable specific applications or parts of the configuration.
All parameters marked with the MANDATORY comment in the values.yaml file must be configured before deployment. Parameters without this marker are optional and may be modified as needed to customize the deployment.
When configuring parameters, follow the guidelines below:
Image repositories — Set the repository name for each application image to match exactly the name registered in your image registry. To verify the available repository names, query your registry catalog:Image tags — Tag names are set to
curl -s http://admin.example.com:5000/v2/_catalog
Use the names returned by this command as the repository values in values.yaml. Names are case-sensitive and must match exactly.latestby default. If you used a different tag when pushing images to the registry (see Step 25), set the tag to match. To verify which tags are available for a given repository, run:Ingress host — If ingress is enabled in values.yaml, theExample:
curl -s http://ingress.example.com:5000/v2/webapp/tags/listSHELLhostfield must be set to the fully qualified domain name (FQDN) that resolves to your Ingress external IP address (the DNS A record configured earlier, e.g., ingress.example.com). Leaving this field empty or incorrectly set will prevent routing to the web applications. Do one of the following:
To deploy services to the default namespace, execute this command in the helm parent chart directory (you can change "twc" to any release name):
cd helm-charts helm install twc .BASHTo create a namespace and deploy services in this namespace, execute this command in the helm parent chart directory :
helm install twc . --namespace=twc --create-namespace --waitBASH
This helm chart includes Zookeeper and HAProxy ingress as dependencies. They will be deployed automatically.
After all web applications are deployed, execute the following command to check their status:
kubectl get allBASH
- All pods should be READY:1/1, STATUS:Running.
- The HAProxy Ingress Controller service should be Type:LoadBalancer.
- EXTERNAL-IP should match the address that you provided in the MetalLB configuration.
- If pods do not run, check for problems by executing this command:
kubectl describe pod pod_name
Execute the following command to check Ingress rules:
kubectl describe ingressBASHYou should get an output similar to this:
Name: webapp-tcas-ingress Labels: app=tcas app.kubernetes.io/managed-by=Helm app.kubernetes.io/version=2026xRefresh1 helm.sh/chart=tcas-0.1.5 project=tcas Namespace: wap Address: ***.***.***.*** Ingress Class: haproxy Default backend: <default> TLS: tls-secret terminates insgress.example.com Rules: Host Path Backends ---- ---- -------- nm-wap10639.dsone.3ds.com /admin webapp-adminconsole:8443 (10.233.88.83:8443) /authentication webapp-authentication:8443 (10.233.88.84:8443) /collaborator webapp-collaborator:8443 (10.233.73.213:8443) /document-exporter webapp-docexporter:8443 (10.233.88.86:8443) /reports webapp-reports:8443 (10.233.88.88:8443) /resources webapp-resources:8443 (10.233.73.217:8443) /magiclab webapp-magiclab:8443 (10.233.73.215:8443) /magiclab-collaborator webapp-magiclabcollab:8443 (10.233.105.15:8443,10.233.73.216:8443,10.233.88.89:8443) /webapp webapp-webapp:8443 (10.233.73.218:8443) Annotations: haproxy.org/cookie-persistence: rtns-cookie haproxy.org/server-ssl: true haproxy.org/timeout-tunnel: 3600s meta.helm.sh/release-name: webapp meta.helm.sh/release-namespace: wap Events: <none>CODE- Test the product deployment:
In an internet browser, go to https://ingress.example.com/webapp (the DNS A record that points to the Ingress external IP reserved earlier).
If you added a DNS record to bind the domain name to the IP address, you can use the domain name instead of the IP. The browser should show a warning because of the self-signed certificate. Accept it to proceed, and you will be redirected to the Teamwork Cloud Authentication web page.
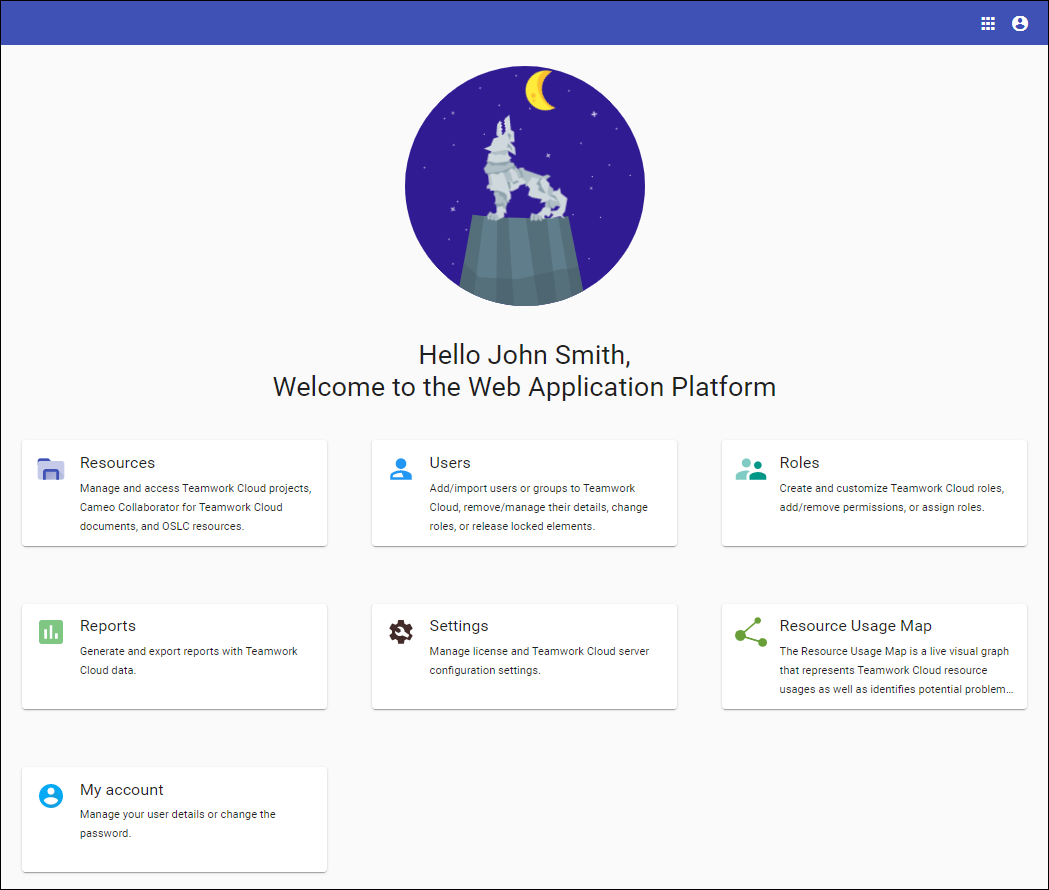
- Log in with your credentials, and you will be redirected back to Web Application Platform.