Displaying evaluation information
Displaying runtime values
In views, runtime values are displayed in blue. After evaluation, these runtime values replace the default values and are displayed next to:
- Attributes
- References
- Satisfy requirements
Attributes or references that contain expressions may display calculated values. During the evaluation, views do not display types; only the current runtime values are shown. This reduces visual complexity and improves view readability.
Displaying unit symbols
When units are assigned directly to literal values, unit symbols are displayed next to runtime values in model views during evaluation. You can assign units using square brackets on literals. For example:
attribute 'Mass : MassValue' default := 500 [SI::kg];
You can also modify runtime values directly in views and watch as the evaluation results are automatically recalculated.
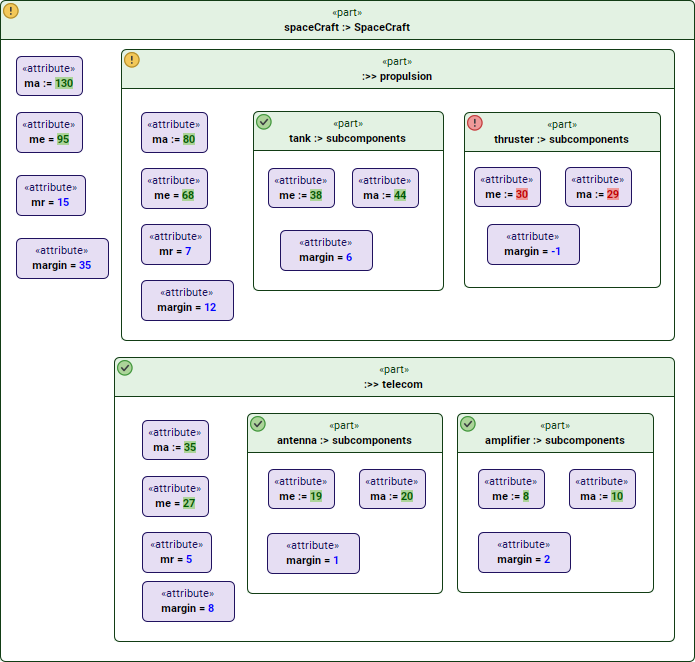
A sample view displaying the evaluation results.
Annotating requirement and constraint verification results
Using views is the quickest way to evaluate multiple requirements and constraints at once. After evaluation, passing and failing values are highlighted in green and red, respectively. In addition, element shapes display specific icons to indicate whether the related requirements and constraints are satisfied.
To evaluate requirements and constraints in views
- Open the view that displays elements with related requirements and constraints that you want to evaluate.
- Click
 in the view toolbar.
- To evaluate a single element, select the element shape or an attribute in the shape compartment before completing this step.
- To evaluate an individual satisfy requirement or assert constraint, select the element shape before completing this step. The evaluation result is true or false.
The view shapes are highlighted, indicating whether related system requirements and constraints pass or fail.
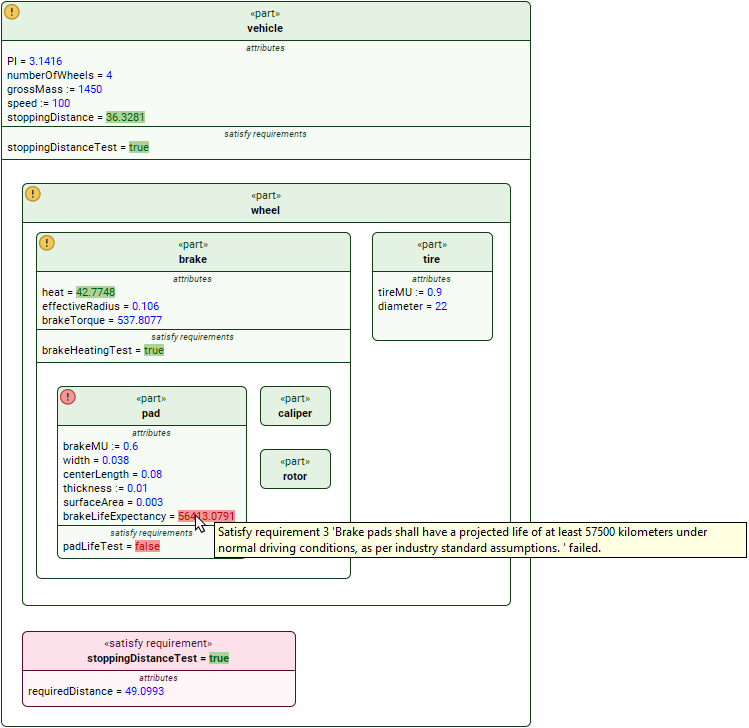
A view with annotated requirement verification results. Hovering over a failing value shows the text of the failing requirement.
The following table explains the annotations of requirement and constraint verification results displayed in views.
| Annotation | Description | Tooltip |
|---|---|---|
OR A shape or its header is colored in green | The annotated elements satisfy related system requirements or constraints. | N/A |
OR A shape or its header is colored in yellow | The annotated elements indirectly fail related system requirements or constraints. This means that system requirements or constraints are failed by inner parts of the annotated element. | Hover over the icon to see which inner elements fail system requirements or constraints. |
OR A shape or its header is colored in red | The annotated elements fail related system requirements or constraints. | Hover over the icon to see which requirement or constraint failed. |
| The annotated values satisfy related system requirements or constraints. | N/A |
| The annotated values fail related system requirements or constraints. | Hover over the value to see the text of the failing requirement. |


Customizing the visual representation of verification results
You can customize how requirement and constraint verification results are annotated in views.
To customize the visual representation of the requirement and constraint verification results
- In the main menu, select Options > Project.
- In the Project Options dialog, select the Evaluation option group.
- Specify the following options:
- Display Verification Results As - Select Display Icons to add icons to shape headers. Select Paint Headers to color shapes or their headers.
- Propagate Deep Nested Failures - Set to true to indicate nested requirement and constraint failures. Set to false to only highlight the shapes of the elements that directly fail a requirement or constraint.
- Click OK to close the Project Options dialog.
Clearing evaluation results in views
To clear the evaluation results in a view
- In the view toolbar, click an arrow next to and select Clear Values.