Metadata
Metadata allows extending model elements by adding various attributes, semantics, and notation. It can be used to customize various models for specific domains or purposes. Metadata can be applied to any element. Metadata usage annotates its containing element; otherwise, an annotation relationship can be specified using the about syntax.
Semantic vs Non-Semantic Metadata
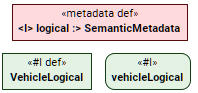
Semantic metadata refers to a metadata definition element that specializes the SemanticMetadata metaclass (e.g., <moe> MeasureOfEffectiveness, <derive> DerivedRequirementMetadata, etc.). There are several key differences in how elements are displayed in the Containment tree, Specification panel, symbols on views, and any other UI instances, depending on the kind of metadata applied to them:
If an element has at least one semantic metadata applied to it:
- The element's metaclass keyword (e.g., part) is not displayed.
- The applied semantic metadata name is displayed with the # sign within guillemets « ». The def keyword is appended for definition elements.
If an element has only non-semantic metadata applied to it:
- The applied semantic metadata name is not displayed; thus, the element representation remains essentially unchanged. The element only displays metadata-related information in the metadata compartment and a metadata annotation.
Creating metadata definition elements
Creating metadata definition elements via the Textual Editor
To create metadata definition elements via the Textual Editor
- In the Textual Editor, place the cursor where you want to create the element and declare the metadata def keyword.
- Name the element.
- Specify the metadata attributes in the element body.
Click the Synchronize button.
metadata def Approval {
attribute approved : Boolean;
attribute approver : String;
}
Creating metadata definition elements via the Create Element command
To create metadata definition elements via the Create Element command
In the Containment tree, right-click an element, and in the shortcut menu, click Create Element.
- In the Create Element dialog, select the metadata def element.
- Name the element.
- Specify the metadata attributes.
Creating metadata definition elements via the view palette
To create metadata definition elements via the view palette
- In the view palette, under the Items/Parts/Attributes group, click the metadata def button to create a metadata definition element.
- Click in the view pane where you want to create the element.
- Specify the metadata attributes.
Applying metadata to an element
Applying metadata with attributes to an element via the Textual Editor
To apply metadata with attributes to an element via the Textual Editor
In the Textual Editor, within the body of the element for which you want to apply metadata, do one of the following:
- For unnamed metadata usage, do one of the following:
- Declare the @ symbol followed by the metadata definition element name.
- Declare the keyword metadata followed by the metadata definition name.

The notational difference between using the textual symbol @ or the keyword metadata depends on the Display Metadata as Keywords environment option. By default, it is set to false, thus the notational representation of metadata in the textual notation is set to the textual symbol @. Even if you use a different notation, once the Textual Editor is reopened, the notational representation is changed to the one corresponding to the environment option. Set the environment option to true to use the keyword metadata notational representation instead.
For a named metadata usage element:
- Declare the @ symbol followed by the element name, and then define it by the metadata definition.
- Declare the keyword metadata, specify the element name, and then define it by the metadata definition.
- For unnamed metadata usage, do one of the following:
- Specify the metadata attribute values in the element body.
Click the Synchronize button.
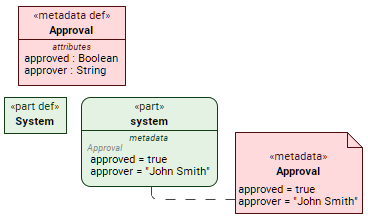
// unnamed metadata usage defined by metadata definition:
part system {
@Approval { // the at sign @ symbol followed by the metadata definition element name (step 1.a.i)
approved = true;
approver = "John Smith";
}
/* or */
metadata Approval { // the keyword metadata followed by the metadata definition name (step 1.a.ii)
approved = true;
approver = "John Smith";
}
}// named metadata usage defined by metadata definition:
part system {
@approvalSystem : Approval { // the at sign @ symbol followed by the metadata usage name, defined by the metadata definition (step 1.a.i)
approved = true;
approver = "John Smith";
}
metadata approvalSystem : Approval { // the keyword metadata followed by the metadata usage name, defined by metadata definition (step 1.b.ii)
approved = true;
approver = "John Smith";
}
}
Applying metadata without attributes to an element via the Textual Editor
Using the following notation applies the metadata to an element without the possibility of specifying the metadata attributes.
To apply metadata without attributes to an element via the Textual Editor
In the Textual Editor, prior to the element keyword of the element you want to apply the metadata to, type the hash sign # followed by the metadata definition element name.
Click the Synchronize button.
#Approval part system;
Applying metadata to an element via the Drag and Drop handler in a view
To apply metadata to an element via the Drag and Drop handler in a view using
- Drag and drop a metadata element from the Containment tree or use its symbol's Drag and Drop handler on an element symbol executing the Apply Metadata command.
Applying annotation metadata to an element via the Textual Editor
For other element annotation options, see the Annotations page.
To apply annotation metadata to an element via the Textual Editor
Whether you want to apply annotation metadata with or without attributes, the overall procedure is generally the same as for:
However, in this case:
- The element to which the annotation metadata is applied must be declared separately.
- The applied metadata keyword is followed by the keyword about and the name of the element to which the annotation metadata is to be applied.
part system; // element declaration
@Approval about system { // annotation metadata applied to the element 'system' using the 'about' syntax
approved = true;
approver = "John Smith";
}
/* or */
metadata Approval about system { // annotation metadata applied to the element 'system' using the 'about' syntax
approved = true;
approver = "John Smith";
}