Time Periods dialog
In the UPDM plugin, time periods are used to specify resources for the architecture against a timeline indicating when they are expected to be in use. The Time Periods dialog is essential when defining time periods for the forecast of the resources. When specifying time periods, you need to select a pre-existing timeline or create a new one, specify different time period types, and provide additional required data.
The Time Periods dialog consists of three areas:
Toolbar - This area allows you to control how properties are displayed in the dialog.
Properties - Provides the list of all properties that are available to specify.
- Properties value cells - The spaces where you can set values for the properties.

Time periods can be defined when the subjects, or resources, of the forecast are already added in the table. In other words, the Technology area column must be filled in with resources before adding a specific time period. Now, it is possible to use the Time Periods dialog.

The steps below show you how to work with the Time Periods dialog by explaining all properties that should have values defined, and by showing you how to specify those values.
To specify time periods using the Time Periods dialog
- Open the Time Periods dialog, click
 on the table toolbar.
- (Optional) If you want to modify the view of listed properties, enable the buttons from the Time Periods dialog toolbar:
- Click
 to group properties by the categories.
 - Click
 to list properties alphabetically.
 - Click
 to expand all collapsed categories.
 - Click
 to collapse all expanded categories.
- Click
- Specify the Timeline property:
Select a preexisting Timeline element.
Click on the Timeline property value box, and do one of the following:
- Click , or press Alt+Down.
- Click , and select it from the opened Select Timeline dialog.
Create a new Timeline element via the dialog.
a) Click on the Timeline property value box.
b) Select to open the Select Timeline dialog.
c) Ensure that element Creation Mode is turned on.
d) Select the appropriate package from the list in which you want to store a new Timeline element.
e) Click the Create button, or, from the shortcut menu of the selected package, select Create > Timeline. The Specification window of the newly created Timeline opens automatically.
f) Type the name of the new Timeline, and click Close.

g) In the Select Timeline dialog, select the newly created Timeline, and click OK.
The timeline is now selected as a Timeline property value.
- Select one of three Forecast Kinds as property values:
- Periodic - to divide the forecast into equal periods.
- Specified Dates - to divide the forecast into specific dates.
- Specified Periods - to divide the forecast into specific time periods.

- Specify other properties from the selected Forecast Kind value:
If you selected the Periodic type, you need to define those active properties:
- From Date property. To select the date on which the forecast will begin, use one of the following ways:
- Click or Press Alt+Down ,and select already existing date from the list.
- Click, and select it from the opened Date and Time Settings dialog.
- Number of Periods property. Type the number of forecast periods.
- Period Length property. Type a number specifying the length of the forecast according to Length Unit property.
- Length Unit property. Select the unit to use when measuring the length of a forecast: Years, Months, or Days.

All data defined in the Time Periods dialog is displayed automatically in columns by diving periods.

If you selected the Specified Dates type, you only need to define the Forecast Dates property value.
a) Click
to edit the value cell. The Select ISO8601 Date Time dialog opens. for the forecast can be defined in this property value box.")
b) Select the existing ISO8601DateTime element (date) from the List , or create a new one.a. In the Select ISO8601 Date Time dialog, ensure that element Creation Mode is turned on.
b. Select the appropriate package from the list in which you want to store a new ISO8601DateTime element (date).
c. Click the Create button, or, from the shortcut menu of the selected package, select Create > ISO8601DateTime. The Specification window of the newly created ISO8601DateTime element opens automatically., turn on the creation mode (a.), and click the Create button (c.).")
d. Specify the Value property by clicking the , and selecting an appropriate date from the Date and Time Settings dialog.
e. Click Close, or create more dates by repeating steps c. and d.
c) Click OK.

All data defined in the Time Periods dialog are displayed in columns in the table. In this case, three dates (2016-09-23, 2017-09-23, and 2018-03-23) were automatically divided into two columns (from 2016-09-23 to 2017-09-23, and from 2017-09-23 to 2018-03-23).

If you selected Specified Periods type, you only need to define the Time Periods property value.
a) Select the Time Periods property value box.
b) Click to edit the value cell.
c) In the Select Time Period dialog you can:
- Double-click to select existing Time Periods ( ) one by one from the List tab.
- Expand an existing Timeline element ( ) with time periods defined in the Tree tab, and double-click on Time Periods to choose them one by one.
- Create a new Timeline element with Time Periods .a. Ensure that element Creation Mode is turned on.
b. Select the appropriate package from the list in which you want to store a new Timeline element.
c. Click the Create button, or, from the shortcut menu of selected package, select Create > Timeline. The Specification window of the newly created Timeline opens automatically.
d. Type a name for the new Timeline, and click Close.
e. Select the newly created Timeline element.
f. Click the Create button, and select Time Period, or, from the shortcut menu of the selected Timeline, select Create > Time Period. The Specification window of the newly created Time Period opens automatically.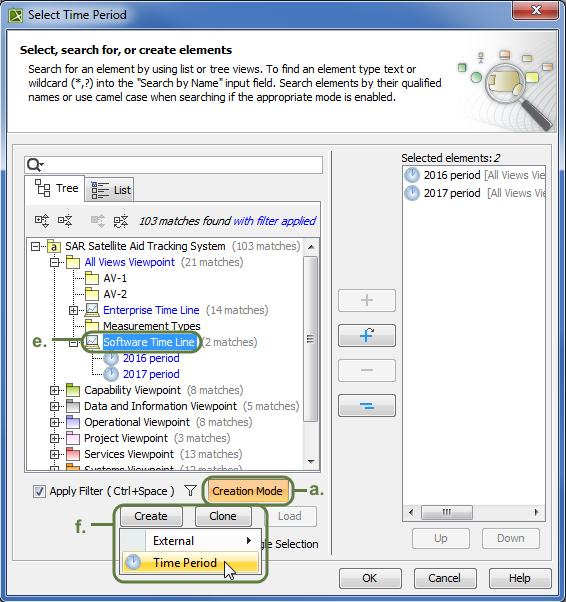
g. Type a name for the newly created Time Period. Specify its Start Date and End Date properties.
h. Click Close.
All time periods defined in the Time Periods dialog are displayed in the table as columns. In this case, three periods (2016 period, 2017 period, and 2018 period) with their specific start and end dates were defined and displayed as columns in the SV-9 table.

- Click OK.
After specifying all required data in this dialog, the new columns appear in the table as time periods. The forecast of resources is now planned and divided into required periods. The following figure illustrates the results in a forecast table after specifying periodical time periods in the Time Periods dialog.
Use Time Periods dialog to specify Forecast dates and time periods.

To open Time Periods dialog
- Click
 in the toolbar. The Time Periods dialog opens.