On this page
Creating AcV-2 diagram
When you choose to create AcV-2 diagram, AcV-2 Creation Wizard opens by default.
To create an AcV-2 diagram from the wizard
- From the Diagrams menu, select Create Diagram.
- Click AcV-2 Project Timeliness.
- In the AcV-2 Project Timeliness dialog, click Add. AcV-2 Creation Wizard opens.
- Specify the diagram name and create or select the owner for the diagram. Click Next.
- Add the project(s). Click Next.
- Set the chart properties.
Click Finish.
If you do not wish to use the AcV-2 Creation Wizard next time, clear the check box near “Show the wizard next time, when I create AcV-2”.
Also you can disable the wizard. Go to Options > Environment. In the Environment Options dialog go to UAF tab. In the General properties, set Show PV-2 / AcV-2 / NPV-1 Creation Wizard each Time Creating New Chart to False.
To create an AcV-2 diagram manually
- From the Diagrams menu, select Create Diagram.
- Click AcV-2 Project Timeliness.
- In the AcV-2 Project Timeliness dialog click Add.
- Specify the diagram name and create or select the owner of the diagram.
- Click OK. The blank AcV-2 diagram is created.
Adding actual projects to AcV-2 diagram
You can add a new or an existing actual project to the AcV-2 diagram.
To add a new actual project
- On the AcV-2 diagram toolbar, click Add New > Actual Project. On the diagram pane, an empty line for the newly created actual project appears.
- Specify a time frame for the actual project.
To add a new actual sub project
- Select the actual project for which you want to create an actual sub project.
- Do one of the following:
- On the AcV-2 diagram toolbar, click Add New > Actual Sub Project.
- On the shortcut menu of the selected actual project, click Add new Actual Sub Project.
- Specify a time frame for the actual sub project.
To add an existing actual project
- On the AcV-2 diagram toolbar, click Add Existing. The Select Element dialog opens.
- In the dialog, select an Actual project (or several actual projects) and click the + button.
- Click OK when you are done.
Deleting actual projects from AcV-2 diagram
To delete an actual project from the chart
- Select an actual project.
On the diagram toolbar, click Delete From Chart.
Actual Sub Projects can only be deleted from the model.
To delete an actual project from the model
1. Select an actual project.
2. On the diagram toolbar, click Delete.
Relating actual projects in AcV-2 diagram
You can relate actual projects to a sequence using the following relation types:
- Finish to Start. Target actual project cannot start earlier than the source actual project finishes.
- Start to Start. The target actual project cannot start earlier than the source actual project starts.
- Finish to Finish. The target actual project cannot finish earlier than the source actual project finishes.
- Start to Finish. The target actual project cannot finish earlier than the source actual project starts.
You can change actual project dates by moving an actual project across the timeline. The Actual Project Sequence validation rule is executed while changing the related project dates. If dates in the project sequence violate the rule, the relation is highlighted in red.
To relate actual projects
- Select two actual projects.
- On the diagram toolbar, click Relate.
- Select one of the available relation types:
- Finish to Start
- Start to Start
- Finish to Finish
- Start to Finish
To remove the relation between actual projects
- Select two related actual projects.
- On the diagram toolbar, click Relate.
- Select None.
To resolve the incorrect actual project sequence
- On the highlighted relation shortcut menu, click Validate.
- Select one of the suggested solutions.
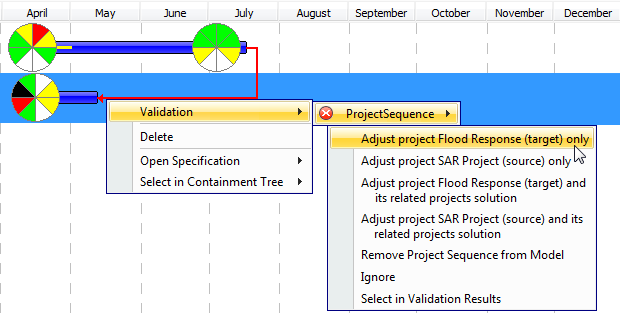
Available validation suggestions
If you change dates of an actual project containing actual sub projects, actual sub project dates change correspondingly.
Adding Milestones in AcV-2 diagram
To add a milestone
- Select an actual project.
- Do one of the following:
- On the diagram toolbar, click Add New > Milestone.
- On the selected actual project shortcut menu, click Add new Actual Project Milestone.
- Select one of the available milestone kind.
- The Actual Project Milestone Creation Wizard opens.
- Specify milestone settings in the following wizard steps and click Finish when you are done.
Deleting milestones in AcV-2 diagram
To delete a milestone
- Select a milestone.
- From the milestone shortcut menu, select Delete.
Applying actual project status in AcV-2 diagram
To apply the actual project status to a new milestone
- From the milestone shortcut menu, select Apply Status.
- Specify the actual project status by following steps of the Project Status Application Wizard.
To edit the actual project status
- From the milestone shortcut menu, select Edit Status.
- Edit the actual project status by following the steps of the Project Status Application Wizard.
Removing actual project status in AcV-2 diagram
To remove the project status
- From the milestone shortcut menu, select Edit Status.
- In the opened Project Status Application Wizard, click the Remove project status indicator mark button.
- Click Finish when you are done.