The Hiding packages utility lets you specify which model Packages, elements within the model packages, and Used projects should be hidden. Once specified, the public version of a model will be created by cutting/deleting the hidden parts. You can strip your project to reuse only a particular part of the project in another project. To strip your project, you must hide packages you do not want to share.
Anchor
Hide_package
Hide_package
To hide packages
Open a server project.
Do one of the following:
Right-click the package you want to hide. On the shortcut menu, click Project Usages > Hide Packages.
On the main menu, click Collaborate > Hidden packages.
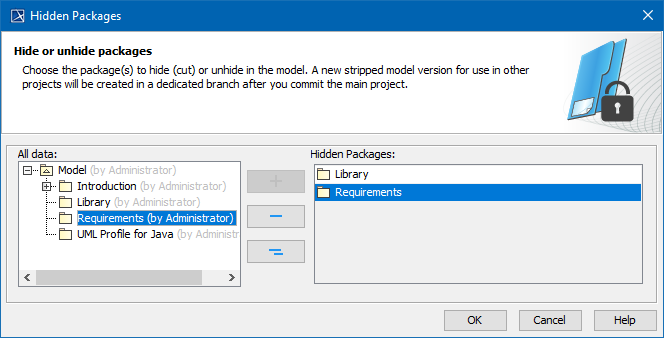
The Hidden Packages dialog opens. From the All Data side, select the packages you want to hide andadd them to the Hidden Packages side. Move the selected package back to the All Data side to unhide it.
Click OK when you are done.
The package usage checking is suggested. Usage checking may be time-consuming; however, it helps to identify elements that are related to the soon-to-be hidden parts. If any issues are found, they are displayed and described in the Package Usage window.
After you complete or skip Usage checking, you will see a notification that hiding the selected elements will be completed only after committing your project.
The stripped model version is created to be available to use in other projects. Hidden packages are marked with a lock sign in the Model Browser.
Anchor
Used_project
Used_project
Hiding used project
You can hide a used project the same way as other packages. When hiding a used project, you cannot hide separate used project parts: you need to hide the whole used project. After hiding is done, a dedicated branch is created with the stripped model version, where all elements of the used project disappear from the Containment tree, and all references to these elements are cut from other model places.
Note
You can only hide directly used projects.
In a situation where the project is used indirectly and directly, you will get a restriction message telling you that hiding the used project is not allowed since it is also being indirectly used via other projects.
Anchor
Branch
Branch
Dedicated branch
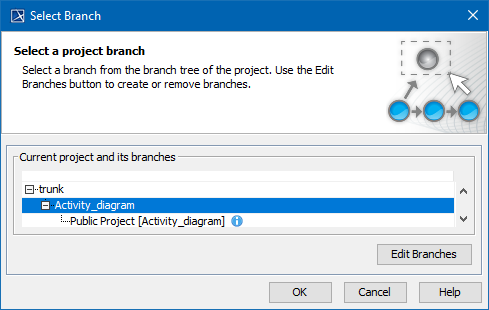
A stripped model is stored in a dedicated branch created when element hiding is performed for the first time. By default, this branch is named Public Project. You can rename the branch if you need to.
Project with it`s Public Project branch. The public project now can be reused in another project.
If all packages from the model are unhidden, the dedicated branch will be deactivated.
If the main project is using a public branch of another project and that branch gets deactivated, you will be informed about this change with a warning icon in the main project with a warning icon in:
Containment tree (under Project Usages root),
Project Usages dialog,
Advanced Project Usages Configuration dialog.
Note
The state of the used project is checked at the same time interval as checking for a new project version in the background, or by clicking the Project Usages Update button.
Anchor
package_changes
package_changes
Hidden package changes
After a package or a used project is successfully hidden or unhidden, an icon with a lock on a package (or used project) is shown in a Difference viewer.
The icon with a lock on a package (or on a used project package) is also shown in:
Upcoming Changes browser panel,
Local changes browser panel,
Commit dialog,
Content History panel,
Element History.
Model synchronization
Anchor
Sync_mode
Sync_mode
A stripped model is read-only. It can only be used for reuse in other projects, not for editing. However, you can edit the main project. On committing, checking is performed to see if the changes affect hidden and public parts of the model, and model synchronization is initialized. In the Project Options dialog, you can define the model synchronization mode. The default mode is Manual; that is, after committing project changes, you will be notified about local changes affecting a public model stored in a dedicated branch. You can then decide either to synchronize changes or not.
To select a synchronization mode
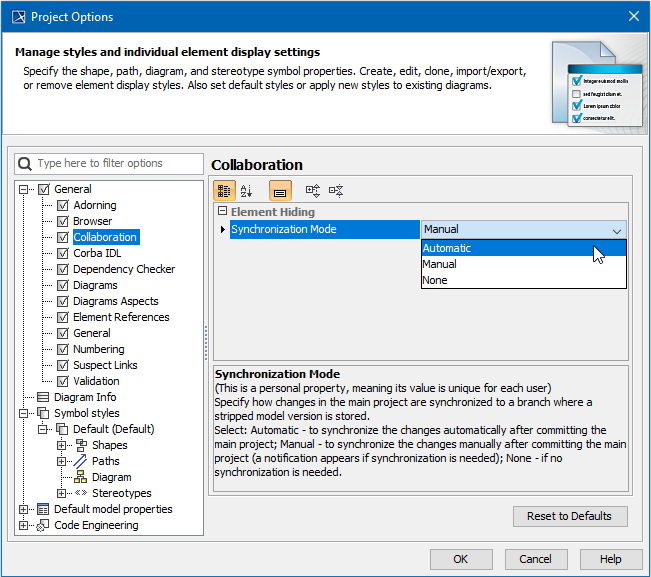
On the main menu, click Options > Projects. The Project Options dialog opens.
In the list of option groups, select General and then select Collaboration in the list of options.
For the option Synchronization Mode, specify one of the following values:
Automatic - to synchronize changes automatically on committing the project changes.
Manual (default) - to synchronize changes upon your decision.
None - do not perform any synchronization.
Selecting a synchronization mode to specify how changes in the main project are synchronized to a branch where a stripped model version is stored