Cameo Collaborator for TWC allows you to publish your models using the command-line interface. This option is useful if you want to publish them periodically, e.g., once a day or during non-business hours to save time.
Note
title
Publishing prerequisites
To be able to publish models to Cameo Collaborator for Teamwork Cloud:
The machine you publish from must run an OS with a graphical user interface.
Before publishing a project from the command-line interface, specify publishing properties by modifying a properties file. You can modify the file for every model you publish or reuse it for several models if you do not need to change the values of publishing properties.
To configure the properties for publishing to Cameo Collaborator
In the <modeling tool installation directory>/plugins/com.nomagic.collaborator.publisher directory, open the template.properties file.
Read the comments and specify the values of the following properties (or leave the default values if they do not need to be changed):
Code Block
#
# Teamwork CloudTeamworkCloud server properties:
## Specify the Teamwork Cloud server user name and password.
server_server=<localhost>
username=<userName>
server_password=<passWord>
# Specify the Teamwork Cloud server address.
# If the connection between the server and your modeling tool is encrypted, type https in front of the server address.
server_url=<localhost>
# Set to true if the Teamwork Cloud server is configured to use SSL certificates.
#server_use_ssl=false
#server_use_encrypted_password=false
# Set to true if you want to update used projects to the newest versions when publishing.
#require_update_module=false
##enableSSL=false
#encryptPassword=false
#
# Project properties:
## SpecifyProjectthe project name.
#
project=<project>#
# If you want to publish a specific branch of the project, specify the branch Project branch name.
# This property is optional.
# If this property is not specified project
# is loaded from trunk.
# If project_version property is specified, branch_name property will be ignored.
#branch_name=branch1
#
#If theProtected project is password-protected, specify the project password.
#project_password.
#
#projectPassword=password
#
# Document properties:
#
# Specify theDocument name of the Cameo Collaborator document.
document_name=MyDocument
# Specify the name of.
#
documentName=MyDocument
#
# Category name or path to the category wherewithyou"/"wantastothepublishcategorythe documentseparator.
#category_namecategoryName=myCategory
#
#SpecifyIntheorderfulltoqualifiedsetnamescope,ofprovidethefullmodel element containing the model data you want to publishqualified name.
# For multiple scope elements, separate entries with semicolon (;).
#
scope=Model
#
#Specify the server ID of the model element containing the model data you want to publish.
# specify either the scope or scope_by_element_server_id propertyIn order to set scope, provide element server id.
# For multiple scope elements, separate entries with semicolon (;).
#scope_by_element_server_id#
# scopeById=<element.server.id>#
# SpecifyDocumenttheelement name of the Documentelement in the template youwhichintendwilltobeuseused for publishing.
#template_nametemplateName=Entire Model#
# Specify the document template Document template module is a server project which will be used in theimported to
# active project and will be committed.
#
# For example:
# myModule
# myModule##myBranch
# myModule##myBranch##version
##template_module#templateModule=<my.module>
#
#SpecifyCommentsthe comments location:
# comments_in_document - all comments creatednewincommentsdocument will be stored in the document.
# comments_in_project_without_import - all newcommentscommentscreated will be stored in the project. Existing document comments will not be migrated.
# comments_in_project_with_import - all newcommentscommentscreated will be stored in the project. Existing document comments will be migrated.
#
# NOTE: You need to specify Cameo Collaborator for Teamwork Cloud URL in order to migrate comments to the project.
#
# By default comments are saved in the document.
##comments_location#commentsLocation=comments_in_document
#
# Set to true in order to enable model editing from the document.
#enable_editing#
#enableEditing=true#
# Set to true in order to enable commenting.
#enable_commentingenableCommenting=true
#
# Set to true in order to update the existing document with the same name.
overwrite_existing_document=true
.
#
updateDocument=true
#
# Set to true in order to publishmarkthe projectdocument as an OSLC resource.
#mark_resource_as_oslc#
#markResourceAsOSLC=true
Save and close the file.
Note
title
Specifying the project version and branch
There are four possible outcomes, depending on which of the project_version and branch_name properties you specify:
If both properties have default values, the latest available version of the model is published (either the Trunk version or the Branch version).
If you specify only the version number (the branch_name property has the default value), the specified Trunk version of the model is published.
If you specify only the branch name (the project_version property has the default value), the latest version of the specified branch of the model is published.
If both properties are specified, the specified version of the specified branch of the model is published
.
Publishing a Cameo Collaborator
for Teamwork Cloud
document
To publish a Cameo Collaborator document from the command - line interface, you need to execute a specific command , outlined below.
To publish a Cameo Collaborator document from the command - line interface
Open the command-line interface.
Go to the <modeling tool installation directory>/plugins/com.nomagic.collaborator.publisher directory containing the executive file for model publishing. The executive file is the corresponding .sh or .bat file depending on your operating system and the version of your modeling tool.
Execute In the command line, type the following command:
These commands are valid only if the name of the actual executive file matches the name included in the command, e.g., publish.bat. Before executing the command, check the executive file name, and, if needed, change it to match the name in the command.
After completing the steps above, your model is published is published to Cameo Collaborator. If you want to publish the same model frequently, you do not need to do it manually every time. Instead, schedule publishing as a background task to save time.
Tip
title
Logging
When publishing, all information is logged to the log file of your modeling tool. If you want the information to be logged to the command line interface, open the <modeling_tool_intallation_directory>\plugins\com.nomagic.collaborator.publisher\publish.properties file and add -verbose to the APP_ARGS line.
Scheduling to publish a document
If you need to publish your models periodically and/or during non-business hours, you can schedule them to be published automatically. The following procedures describe the scheduling process on Windows and Linux operating systems.
To schedule a publishing task on Windows
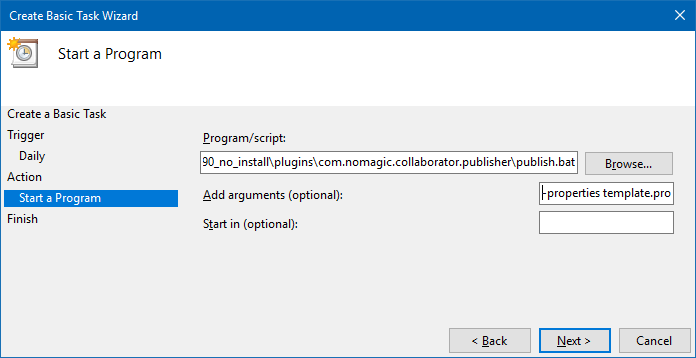
Open the Task Scheduler from the Start menu of your Windows computer and select the option to create a basic task.
Type the task name, an optional description and click Next.
Select how often you want the task to reoccur and click click Next.
Specify when you want the task to start and click Next.
To schedule the publishing to start automatically, select the Start a program radio button and click Next.
Click the Browse button, go to the <modeling tool installation directory>/plugins/com.nomagic.collaborator.publisher directory, and open the the publish.bat fileexe file.
In the Add Arguments (optional) box, type -properties template.propertiesand and click Next.
Click Finish.
To schedule a publishing task on Linux
Connect to the remote server using SSH, or open the terminal directly.
Type the following command to open the crontab file with the default text editor:
# crontab -e
Using the Cron syntax create a cronjob to run the model publishing task once a day at midnight: