You can customize the appearance of a published project by customizing the template you plan to use for publishing. The best practice is to save an existing predefined template with a different name, and then make changes to the newly created template file. After creating a new template file, you need to use it in the project you intend to publish. There is the option to change the default color of the title bar, document header and text, to add or remove the search button, and other style options. The procedure bellow describes how to modify the Entire Model template (stored as Cameo Collaborator Library.mdzip), but you can also modify other predefined templates the same way. To customize the appearance a published project
Go to the installation directory of your modeling tool, open the modelLibraries folder and then open the Cameo Collaborator Library.mdzip as a separate project.
Save the open project in the same directory using a different name (e.g., Custom template.mdzip).
When you receive the warning not to edit standard/system profiles and libraries, click Continue.
Open a View Diagram and double-click the element with the «Document» stereotype to open the properties Specification window.
Specify the values of the following properties:
Name - specifies the name of the document (e.g., Custom template).
Caption Color - specifies the color of the area under the title bar.
Control Color - specifies the color of the documet splitter separating the Navigation pane, contents pane, and Comments pane.
Document Text Color - specifies the text color of the names of different project areas (e.g., Navigation, Comments, etc.).
Background Color - specifies the color of the title bar.
Header Text Color - specifies the color of the text displayed in the title bar.
Search Enabled - specifies whether or not the Search button is enabled (the valid value is true or false).
The example of a published project shows the elements that can be customized using the style properties listed above.
Click Close and save the project.
Setting the default scope
In the custom template, you can set the default scope for publishing. When the default scope is set, you don't need to specify it while publishing the project. In this case, the default scope is published even if you specify another scope in the Cameo Collaborator Publisher dialog. To set the default scope for publishing
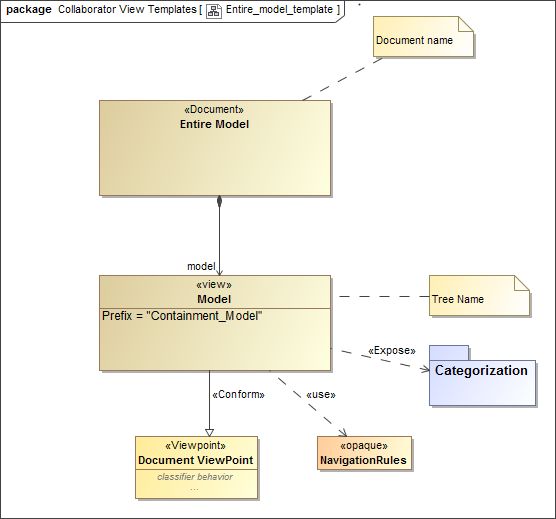
In the Containment tree, select the package you want to set as the default scope for publishing (e.g. Categorization) and drag it onto the diagram pane.
Draw the «Expose» dependency from the element with the «Document» stereotype to the package.
The figure displays the View Diagram of the Entire Model template with a default scope that is specified through the «Expose» dependency.
If you want to add more packages to the default scope, repeat steps 3 and 4.
Save the project.
Select the custom template in the Cameo Collaborator Publisher dialog when you publish the project to Cameo Collaborator.
Setting the home page of a published project
The home page of a published project is the diagram that opens by default after the project portal is loaded. It can be set directly in the model that you intend to publish.
To set the home page of a published project
Open the model you intend to publish.
In the model browser, right-click the diagram you want to display as the home page of the project portal, and select Home Page.
Selecting the diagram to be displayed in the home page of a published project portal.
After completing the above steps, the «HomePage» stereotype is applied to the selected diagram. When you publish your model, a diagram with this stereotype is automatically displayed as the home page of a project portal.
Note
title
Important
Before setting the home page of a published project, make sure that the Document View Collaborator Profile is used in the model you intend to publish. You can select it from the list in the <install.root>\profiles predefined location.