Drag the classifier you want to use as the Conveyed Classifier onto the intended Connector.
In the Create/Edit Item Flow dialog, specify the following options:
Item Flow. From the drop-down menu, select an existing Item Flow or create a new one by selecting <NEW>.
Info
If you select an existing Item Flow, you don't need to specify the rest of the options in this dialog.
Direction. From the drop-down menu, select the direction of the new Item Flow.
Conveyed Classifiers. Click From the Select Conveyed Classifier dialog, select a classifier to use as the Conveyed Classifier. Click OK.
Note
If you have invoked the Create/Edit Item Flow dialog by dragging a classifier onto the connector and do not want to change it, you may skip this option.
Item Property. Click From the Select Item Property dialog, select a Part Property to use as the Item Property. Click OK. (Optional)
Click OK.
Note
The Specify Activities step in the Create / Edit Item Flow dialog is available only in the Between Part Types creation mode.
An Item Flow with the selected Conveyed Item (and Item Property if it was defined) is created and is set for the Connector.
If the name of the Item Property is not displayed on the Item Flow, you can perform the following actions to display it.
To display the Conveyed Item name on the Connector
On the diagram pane, select the connector with the Item Flow assigned.
Right-click it to open a shortcut menu. Select the Edit Compartments command.
The Compartment Edit dialog opens. In the dialog, select the Information From tab depending on the flow direction.
In the Hidden list, select the Conveyed Item names you want to see on the Item Flow and move them to the Selected list.
Click OK.
Working with Between Part Types creation mode
The Between Part Types creation mode allows you to create an Item Flow between Part Property types. In this mode, you can quickly realize and synchronize Flows on Activity Edges, Connectors , and Messages.
To create and realize an Item Flow
Select the Association, Connector, Message, Control Flow, or Object Flow on the diagram pane and in its smart manipulator toolbar, click .
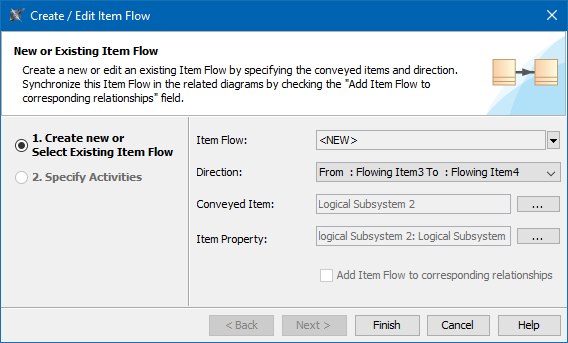
In the Create/Edit Item Flow dialog, Create new or Select Existing Item Flow step, specify the following options:
Item Flow. From the drop-down menu, select an existing Item Flow or create a new one by selecting <NEW>.
Info
If you select an existing Item Flow, it is not necessary to specify the rest of the options in this dialog.
Direction. From the drop-down menu, select the direction of the new Item Flow.
Conveyed Classifiers. Click From the Select Conveyed Classifier dialog, select a classifier to be used as the Conveyed Classifier. Click OK.
Item Property. Click From the Select Item Property dialog, select a Part Property to be used as the Item Property. Click OK.
Select the Add Item Flow to corresponding relationships check box. (Optional)
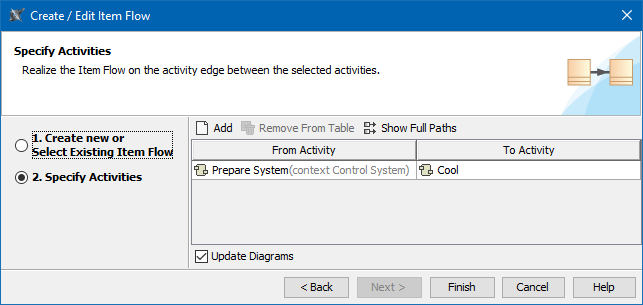
Click Next if you need to specify the activities.
In the Specify Activities step, add the activities.
Note
This step is not available if you are creating the Item Flow between the Part Properties with no types set.
Note
Select the Update Diagrams option if you want the created Item Flow to be realized on the Activity Edge between selected Activities in all diagrams that will display those Activities. If there will be no diagrams with those Activities, you will get a suggestion to create a diagram for each Activity pair selected in the Specify Activities step.
Click Finish when you are done.
Realizing Item Flows
You can realize hidden Item Flows in two ways:
Through the Item Flow Manager.
From the selected relationship's Smart Manipulator toolbar.
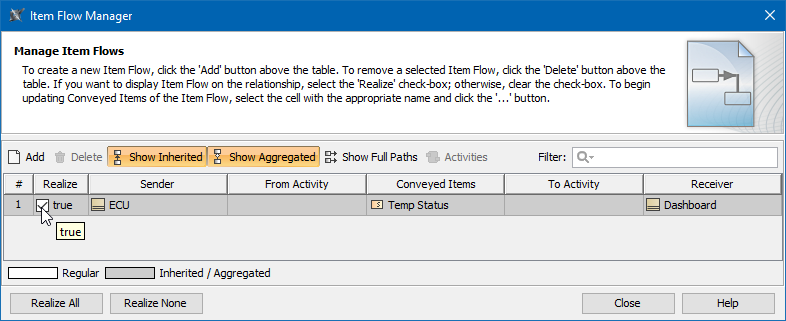
To realize Item Flows through the Item Flow Manager dialog
Select Association, Connector, Association, Control Flow, Object Flow, or Message in the diagram pane.
On the smart manipulator, click . The Item Flow Manager dialog opens.
Do one of the following:
Set the Realize column option to true for those Item Flows you want to realize.
Click the Realize All button, if you want to realize all Item Flows.
Click Close when you are done.
To realize Item Flows from the Smart Manipulator toolbar
Select Association, Connector, Association, Control Flow, Object Flow, or Message in the diagram pane.
From the Smart Manipulator toolbar, select Realize All Item Flows.