After upgrading Teamwork Cloud to a new version, you have to migrate its database as well. The database migration tools support incremental migration, which means that selected resources are migrated version by version. During migration, new resources and partially migrated resources are still accessible in the source database, therefore users can work with them avoiding downtime. To learn more about different approaches you can use to migrate the Teamwork Cloud database, see Migration strategies.
For database migration, two migration tools are used:
The command-line migration tool (to be deployed on the source database server). Upon initial launch, this tool creates a new database schema and migrates all non-model data (users, roles, etc.).
The UI migration tool (to be deployed on any machine with GUI support). The UI migration tool provides visual migration control and is used to migrate all resources.
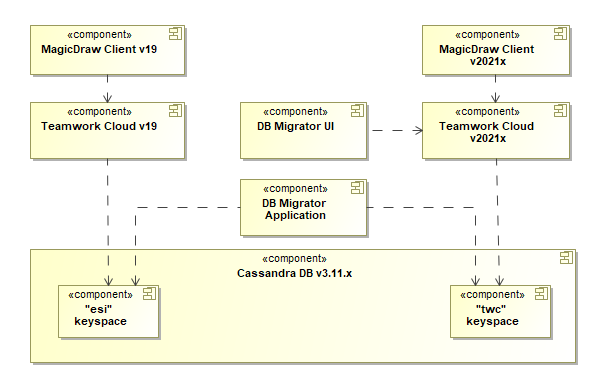
The following figure illustrates how these migration tools work.
This schema displays how database migration tools work.
Warning
title
Important
It is highly recommended not to work with the upgraded version of Teamwork Cloud before initial database migration, except for setting up a license with the default Administrator user.
Before starting modeling activities in the version 2021x project, make sure that the project is fully migrated along with its ALL used projects.
Note
title
Migration prerequisites
Before starting Teamwork Cloud database migration, make sure the following requirements are met:
The source database version must be 19.0 SP3 or 19.0 SP4. You can migrate the Teamwork Claud database only from versions 19.0 SP3 and 19.0 SP4 (schema version #26). The schemas of the databases of earlier versions are not suitable for migration. If you want to migrate a database of an earlier version, first migrate it to version 19.0 SP3 or 19.0 SP4. For more information, see Migrating data to version 19.0 SP3 or Migrating data to version 19.0 SP4.
The Configure Server permission is required for migration. To migrate the Teamwork Cloud database, you need to have the Configure Server permission or the Server Administrator role in the target version of Teamwork Cloud.
Anchor
migration
migration
To migrate the Teamwork Cloud database
Download and extract the migrationtool_<version_number>_no_install.zip and migrationtool_<version_number>_ui-win.zip files intended for your operating system (here, the files for Windows OS are used as an example).
On the source database server, run the migrationtool_<version_number>_no_install\MigrationTool\migrator.bat file (migrationtool_<version_number>_no_install/MigrationTool/migrator.sh for Linux).
Info
title
Command-line migration tool
This tool creates a new database schema and migrates all non-model data (users, roles, etc.). If non-model data is changed in the source database between different resource migration iterations. e.g., new users are created or new roles are assigned, these changes are migrated to the target database after each resource migration. If non-model data is manually changed in the target database, the changed components are no longer migrated from the source database (target changes win).
Run the migrationtool_<version_number>_ui-win\migrationtool_ui\migrator.bat file (migrationtool_<version_number>_ui-win/migrationtool_ui/migrator.sh for Linux).
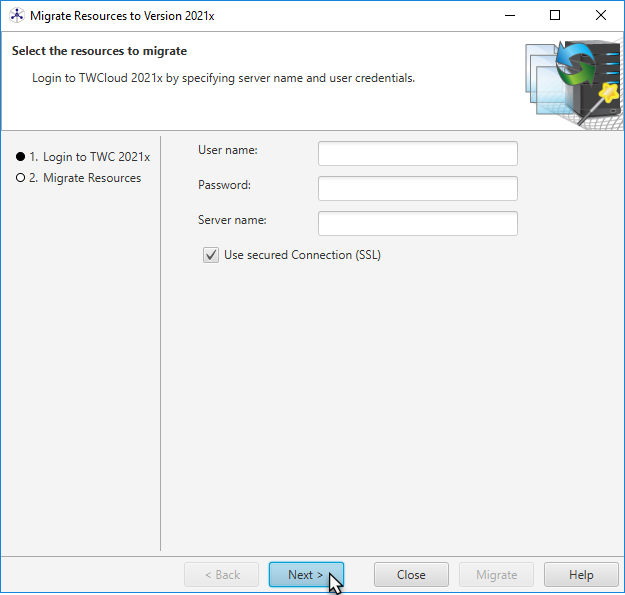
When the resource migration wizard opens, enter the user name, password, and server name of the target version of Teamwork Cloud and click Next.
Select the resources you want to migrate.
Tip
title
Migration statuses
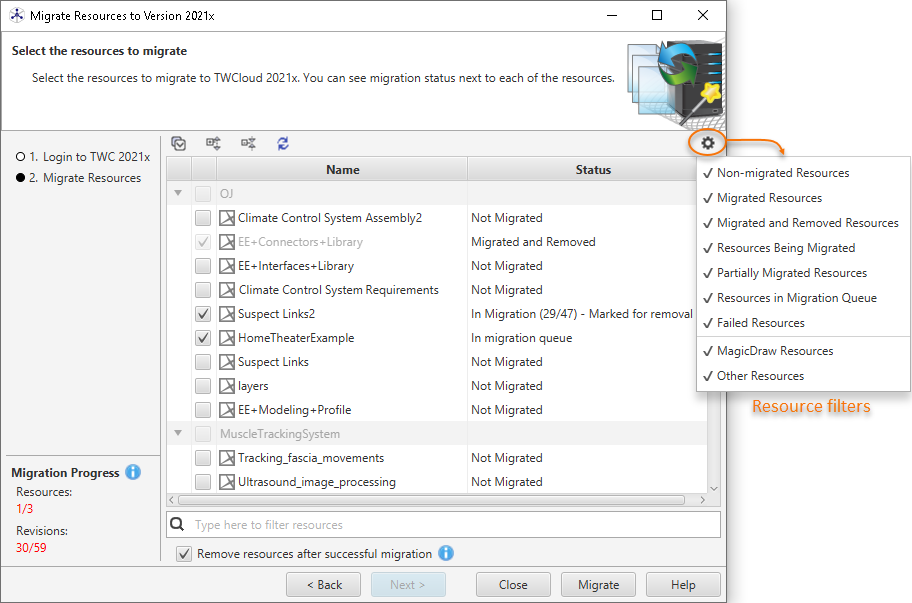
On the left side of the resource migration wizard, you can see the migration status of each resource. Migration statuses can be the following:
Not Migrated - the resource has never been selected for migration.
Migrated - all resource versions are migrated to the target database. No new resource versions have been created in the source database.
Migrated and Removed - all resource versions are migrated to the target database and the resource is removed from the source database. This means the the resource is fully migrated and users can work with it only in the target database.
In Migration - the resource is being actively migrated. The migration progress is shown next to the resource. Only one resource is migrated at a time.
Partially Migrated - the resource has been previously migrated, but there are new resource versions in source database These new resource versions can be migrated to the target database.
In migration queue - the resource is marked for migration and is waiting in the migration queue.
Failed - resource migration failed. You can look for the reason of the failure in the migration tool log files. The migration of failed resources is re-attempted during the next migration iteration.
To filter resources by their status or type, click as shown in the figure above.
Do one of the following:
Clear the Remove resources after successful migration check-box to migrate all versions of the selected resources to the target database, but leave them available in the source database as well. All new resource versions created in the source database after migration can be migrated during the next iteration.
Note
title
Important
If you choose the migration option where the Remove resources after successful migration check-box is not selected, the migrated resources will not be visible in the target database. However, users will be able to continue working with them in the source database.
Select the Remove resources after successful migration check-box to migrate all versions of the selected resources to the target database and remove them from the source database. If you choose this migration option, the resources will be fully migrated and visible in the target database. Working with such resources in the source database will no longer be possible.
Click the Migrate button.
Once the resources are migrated, close the resource migration wizard.
If you chose the incremental migration approach (see Migration strategies), repeat steps 3 to 8 for every following migration iteration.