Page History
If you want to be able to edit a Cameo Collaborator for Teamwork Cloud document, you have to publish it specifically for editing as described below.
| Note | ||
|---|---|---|
| ||
To be able to publish models to Cameo Collaborator for Teamwork Cloud:
|
...
| Info | ||
|---|---|---|
| ||
When you publish a new document, it inherits Teamwork Cloud project permissions. When you update a document, project permissions are not affected. |
...
Start your modeling tool and open the model you want to publish.
- In the main menu, select Tools > Cameo Collaborator > Publish.
- In the Cameo Collaborator Publisher dialog, specify the following properties:
- Document name - enter the name of the published document. By default the document name is the same as the model name.
Category name - select the Teamwork Cloud category where the published document will be stored.
Scope - click
 and select the Package or several Packages containing the data you want to publish.
Template - select the Entire Model templatetemplate for publishing. You can select one of the predefined templates or a custom template used in your model. Click
 if you want to select a locally stored template or a template stored in Teamwork Cloud.
Warning title Updating projects If you update a published model, specify the same template that you used before. Otherwise, the navigation between comments and commented items will be corrupted. To restore corrupted navigation, update the document again using the initial template.
- If needed, change the following options (click the Options button to see the full option list):
Select the Comments in project check-box, to save Cameo Collaborator comments in the project as model elements.
Note title Working with comments as model elements Before selecting to save Cameo Collaborator comments in a project, make sure you understand how to work with comments as model elements.
Select the Enable commenting check-box, to allow reviewers create comments in a Cameo Collaborator document.
Select the Update previously published document check-box, to update a previously published document with the same name. If you select this check box when publishing a document for the first time, it will be published as new.
Warning title Projects reverted to an earlier version When publishing, the selected template is automatically used in your model and then committed to Teamwork Cloud. If you update a model that has been reverted to an earlier version (without the template used in it), you will corrupt the navigation between existing comments and commented items. Afterwards the navigation cannot be restored.
Select the Mark document as OSLC resource check-box, to publish the model as an OSLC resource.
Select the Enable editing check box highlighted below.
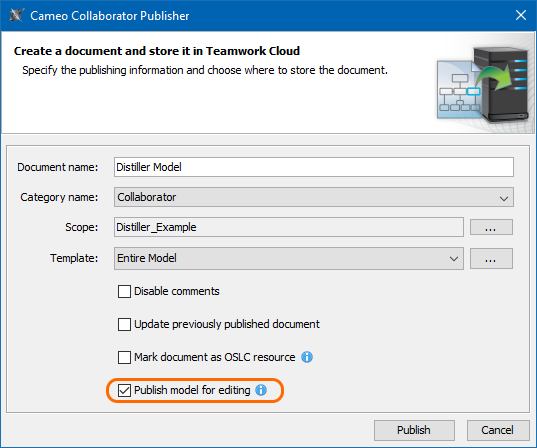
- Click the Publish button.
...