On this Page
- New Attribute
- Attribute Name
- Attribute Type
- Additional Information About Attribute Type
- Attribute Visibility
- Attribute Multiplicity
- Attribute Changeability
- Convert Attribute To Association
- Convert Attribute To Port
An attribute is a named property of a Class that describes a range of values that can be held by the instances of that Class. You can specify attribute properties in the attribute's Specification window. Specifying attribute properties include changing the name, defining the type, converting the attribute to a port, etc. In the same window, you can find the description of each property. Descriptions are presented in the description area of the Specification window at the bottom of the Specification window.
More information
- For more information about the Specification window usage, see Specification window.
- For more information about specifying property values, see Editing Property Values.
Adding New Attribute
To create a new attribute, do one of the following:
- In the Containment tree, from the class shortcut menu, select Create Element > Property.
- In the class Specification window > Attributes, click the Create button.
- On the diagram pane, select the class and press Ctrl+Alt+A.
- On the diagram pane, select the class and click Create Property.
- On the diagram pane, select the class and click Create Element > Property.
Attribute Name
The attribute's name must be unique in the Class scope. Nevertheless, do one of the following instructions to change the attribute's name.
Warning
Illegal characters for attribute names are ( ) [ ] { } ! @ # % ; ', ; : ' " ?

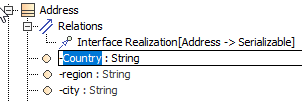
Example of changing the attribute name from 'country' to 'Country'
To change an attribute name
- Click the Attribute in the selected Class on the diagram pane or in the Browser tree. Type a new name.
- Click on the Class block, double-click on the Attribute, and on the Attribute Specification window, change the name and click Close.

Attribute Type
Attribute Type
The attribute's type can be any of these: Class, Interface, or Primitive Class, such as int or double. You are allowed to define the attribute's type.
To define the type of an attribute
- Do one of the following:
- Open the Specification window of an Attribute in your Class block, by right-clicking on the Attribute, and click on the cell of the Type property value. Then click the
 button. In the opened window, select the type. Click OK.
 - On the diagram pane, right-click the Attribute, and then point to Type. In the opened list, select the type or point to New to create a new type.
- On the Class shape, click the Attribute, and then on the smart manipulator toolbar, click the
 button. In the opened list, select the desired type.
 - On the Class shape, click the Attribute, and then click the Attribute the second time. After the Attribute name, type a colon ":" and then type in the name of the new attribute type. Click Enter or click anywhere on the diagram. The type is now created and assigned.
- Open the Specification window of an Attribute in your Class block, by right-clicking on the Attribute, and click on the cell of the Type property value. Then click the
Colon
Type the colon ":" , press Ctrl+Space or Ctrl+Backspace, and then in the open list, select the type.
- In the Containment tree, select an element and drag it to the Attribute on the diagram.
Additional Information About Attribute Type
To add additional information about the type of an attribute
- Open the Attribute Specification window, by right-clicking on the Attribute.
- In the top right corner of the window, select Expert in the Properties drop-down menu.
- In the Type Modifier list, select a particular sign in the:
- & - one class has a reference to other model elements.
- * - one class has a pointer to other model elements.
- [] - one class has an array of other model elements.
Attribute Visibility
| Visibility Name | Function |
|---|---|
| Public '+' | An attribute can be accessed by any other elements. |
| Package '~' | An attribute can be accessed by elements from the same package. |
| Protected '#' | An attribute can be accessed from the inside of the selected class and classes derived from that class. |
| Private '-' | An attribute can be accessed only from inside of that class. |
Visibility
The attribute visibility is shown at the attribute signature.
To set the attribute visibility
Do one of the following:
- Type '+', '~', '-', or '#' visibility marks just before an Attribute name directly on a diagram.
- Open the Attribute Specification window. From the Visibility drop-down list, select the desired item: public, package, protected, or private.
Attribute Scope
To set an attribute scope
- Open the Attribute Specification window.
- In the top right corner of the window, select Expert in the Properties drop-down menu.
- Select the Is Static check box to true.
Attribute Multiplicity
To set the attribute multiplicity
- Open the Attribute Specification window.
- In the top right corner of the window, select Expert in the Properties drop-down menu.
- Select or set the multiplicity value for the Multiplicity field.
Attribute Changeability
The attribute changeability controls the access by operations on the class on the opposite end.
| Name | Function |
|---|---|
| Is Read Only | When false - no restrictions on modifications. When true - the value can not be altered after the object is instantiated and its values initialized. No additional values can be added to a set. |
To set the attribute changeability
- Open the Attribute Specification window.
- In the top right corner of the window, select Expert in the Properties drop-down menu.
- Select the Is Read Only check box to true.
Convert Attribute To Association
Converting an Attribute
Keep in mind a few things about an attribute when converting it to an association:
- the attribute has to have a type specified, and
- the attribute is not a member end of some association.
To convert an attribute to an association
- On a diagram pane, select a Class with an Attribute, or select an Attribute itself.
- From the Class's or Attribute's shortcut menu, select the Refactor command, then Convert To, and Association.
- On the diagram pane, the Attribute is represented as an association with a role.

Logitics
You can move attributes back to the class by dragging and dropping them on the class shape.
Convert Attribute To Port
To convert to a port
- Right-click an Attribute or multiple Attributes.
- On their shortcut menu, click Refactor > Convert To > Port.