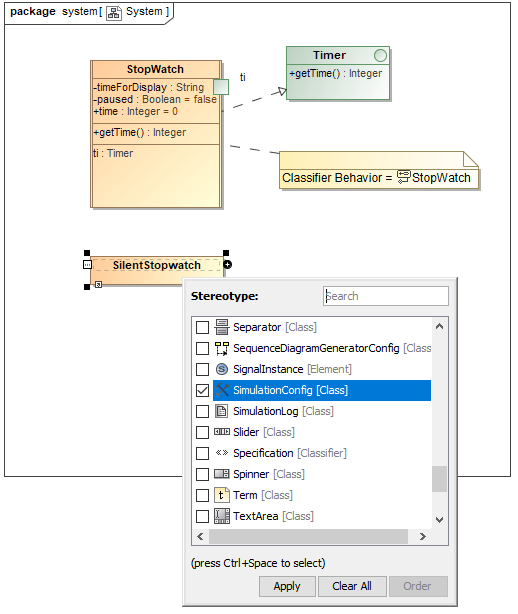
Magic Model Analyst allows you to customize model execution by using an Simulation Configuration. The Simulation Configuration is a stereotype that can be applied to a Class Element. This stereotype contains tag definitions for model execution customization such as enable or disable animation and UI mockups. To be able to use the Simulation Configuration, we need to add the SimulationProfile.mdzip file to our project.
To add the SimulationProfile.mdzip file to a project
- Click File > Use Project on the main menu. The Use Project wizard dialog opens.
- Select the From predefined location option.
- Select <install.root>\profiles in Project modules paths, and then select SimulationProfile.mdzip.
- Click Next to go to the second step, Module Settings.
- Use the default settings and click Finish. The simulation profile will be added to the project. You can see it in the containment browser.
An Simulation Configuration is a Class Element, which is applied with the «SimulationConfig» stereotype (see the following figure). This stereotype contains tag definitions to customize model execution (see SimulationConfig stereotype).
Next, we will create the Simulation Configuration to execute our StopWatch model without using animation.
To execute our StopWatch model without using animation
- Open a System Class diagram.
- Create a new Class Element by clicking the Class button on the Class diagram toolbar.
- Click the diagram to create the Class Element.
- Name the created Class Element "SilentStopwatch".
- Right-click the SilentStopwatch Class and select Stereotype to apply the «SimulationConfig» stereotype to the created Class. The Stereotype context menu group will open.
- Select SimulationConfig from the list of available stereotypes for the Class Element.
- Click Apply. The SilentStopwatch Class will be with the applied SimulationConfig stereotype.
Next, we will create a SimulationLog to record the runtime events occurrence and assign this SimulationLog to the SimulationConfig.
To record all runtime events occurrence and assign a SimulationLog to the SimulationConfig
- Create a new Class Element by clicking the Class button on the Class diagram toolbar.
- Click the diagram to create the Class Element.
- Name the created Class "SimulationLogs".
- Right-click the SimulationLogs Class and select Stereotype to apply the «SimulationLog» stereotype to the created Class. The Stereotype context menu will open.
- Select SimulationLog and click Apply. The SimulationLogs Class will be with the applied «SimulationLog» stereotype.
Now we need to specify the tagged values of the «SimulationConfig» stereotype that is applied to the SilentStopwatch Class.
To specify the tagged values of the «SimulationConfig» stereotype
- Open the Specification dialog of the SilentStopwatch Simulation Configuration by right-clicking the SilentStopwatch symbol and select Specification.
- Select the Tags node on the left-hand side of the dialog.
- Select SimulationProfile from the Profile drop-down menu.
- Specify the tagged value of the execution target to the StopWatch Class by selecting executionTarget and click CreateValue. The SelectElements dialog will open for you to select the Element that will be the execution target.
- Select the StopWatch Class (you can also select the stopwatch InstanceSpecification, which has been created in the previous section) as the executionTarget.
- Click OK to close the Select Elements dialog.
- Follow the same steps used to set the tagged value of executionTarget to the StopWatch Class and specify the tagged values of the following tag definitions
i. log to SimulationLogs.
ii. resultLocation to the Stopwatch folder.
iii. silent to true. - Click Close to close the Specification dialog.
To execute the Simulation Configuration
- Right-click the SilentStopwatch symbol on the diagram and select Simulation > Execute.
- Click the RunSimulation button on the Simulation window toolbar to start the simulation. The StopWatch Class will then be executed without animation. You will need to wait until the runtime object of StopWatch is at the ready State. You can see the State of the runtime object at the Variables tab. The State of the object will be displayed in square brackets.
- Select the StopWatch node in the Variables tab.
- Select the start signal from the Triggers drop-down menu on the Simulation window toolbar.
Now, you can see that the value of time:Integer, which is displayed in the Variables tab, will increase by one every second.
To stop the execution
- Select the StopWatch node in the Variables tab.
- Select the stop signal from the Triggers drop-down menu. The StopWatch object will go to the stopped State.
- Select the stop signal again to move the object to the final stage to close the simulation session. The latest value of time:Integer will be saved into the slot value of the stopwatch InstanceSpecification.


