Assume constraint
An assume constraint states the assumed constraints imposed on the model, expressed formally or informally in the requirement.
There are two ways these constraints can be assumed:
- by referencing a constraint defined elsewhere in the model.
- The element symbol is displayed with the assume keyword (unnamed element) or the assume constraint keyword (named element).
- See the procedures:
- The element symbol is displayed with the assume keyword (unnamed element) or the assume constraint keyword (named element).
- by containing an owned assume constraint usage, i.e., the assumed constraint is the assume constraint usage itself.
- The element symbol is displayed with the assume constraint keyword.
- See the procedures:
- The element symbol is displayed with the assume constraint keyword.
Assuming a constraint by referencing a constraint defined elsewhere in the model
Assuming constraints via the Textual Editor
To assume constraints via the Textual Editor
- In the body of a requirement for which you want to reference a constraint, declare one of the following:
- For an unnamed assume constraint, declare the assume keyword, then follow with the name of the constraint you want to reference.
- For a named assume constraint, declare the assume constraint keyword, name the new usage, and then reference subset the constraint you want to reference.
- Specify the constraint (expression, attributes, etc.) in the element's body.
- Click the Synchronize button.
constraint massIsPositive {
attribute mass : MassValue;
mass > 0 [kilogram]
}
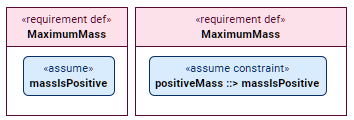
requirement def MaximumMass {
attribute massActual : MassValue;
attribute massRequired : MassValue;
assume massIsPositive { // step 1.a - unnamed usage reference subsets another constraint usage
:>> mass = massRequired;
}
assume constraint positiveMass ::> massIsPositive { // step 1.b - named usage reference subsets another constraint usage
:>> mass = massRequired;
}
}
Assuming constraints via the Drag and Drop handler in a view
To assume constraints via the Drag and Drop handler in a view
- Drag and drop a constraint element from the Containment tree or use its symbol's Drag and Drop handler on a requirement element symbol executing the Create Assume Constraint command.
Assuming constraints via the Specification panel
To assume constraints via the Specification panel
- Drag and drop a constraint element from the Containment tree or use its symbol's Drag and Drop handler and drop it on the Assumed Constraint field in the Properties section of the Specification panel for the assume constraint element.
The appropriate constraint is specified for the element.
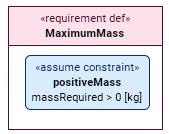
Assuming a constraint via the owned assume constraint usage itself as the assumed constraint
Assuming constraints via the Textual Editor
To assume constraints via the Textual Editor
- In the Textual Editor, place the cursor where you want to create the element and declare the keyword assume constraint for an assume constraint usage
- Specify the element name.
- Specify the constraint (expression, attributes, etc.) in the element's body.
- Click the Synchronize button.
requirement def MaximumMass {
attribute massActual : MassValue;
attribute massRequired : MassValue;
assume constraint positiveMass { // named constraint
massRequired > 0 [kilogram]
}
}
Assuming constraints via the symbol compartment in a view
For more information, see the Compartments page.
To assume constraints via the symbol compartment in a view
- Do one of the following:
- Select an element symbol and click the Create Element button on it. In the dropdown menu, click the assume constraint element.
- Select an element symbol and on the right side of the assume constraints compartment, click the Create assume constraint button.
- Specify the constraint (expression, attributes, etc.).
The new element is created and displayed in the assume constraints compartment.
Assuming constraints via the Specification panel
To assume constraints via the Specification panel
- Open the Specification panel.
- Do one of the following:
- In the Properties section bar, click the Create Element
 button. The shortcut menu appears. Click the assume constraint element in the shortcut menu.
 - In the assume constraints compartment section's bar, click the Create assume constraint
 button.
- In the Properties section bar, click the Create Element
- Specify the constraint (expression, attributes, etc.).
The element is created in the assume constraints compartment.