Use the subclassification relationship to specialize a definition element. The specialized definition inherits the features of the more general definition element and can add other features.
Subclassification
Subclassifying a definition via the Textual Editor
To subclassify a definition via the Textual Editor
In the Textual Editor, identify the definition element that you want to be the specializing one.
Follow the element name with either one of the following:
keyword specializes
textual symbol :>
Follow the keyword with the name of the specialized definition element.
Click the Synchronize button.
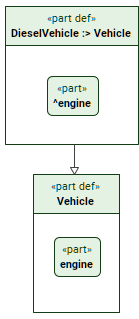
partdefVehicle;
partdefDieselVehicle :>Vehicle; /* or */ partdefDieselVehiclespecializesVehicle;
Subclassifying a definition via the Drag and Drop handler in a view
To subclassify a definition via the Drag and Drop handler in a view
Drag and drop an element from the Containment tree or use its symbol's(2026x Refresh1) Drag and Drop handleron an element symbol executing the Set Superclassifier command.
Subclassifying a definition via the view palette
To subclassify a definition via the view palette
In the view palette, under the Specializationsgroup, select subclassification.
Draw a line with the arrowhead going from the specific definition element to the general one.
Subclassifying a definition via the Create Relation command
To subclassify a definition via the Create Relation command
Right-click the element that you want to be the specializing one.
In the shortcut menu, click Create Relation, then in the submenu, under Outgoing, click subclassification. The Create...dialog opens.
In the Create...dialog, do one of the following:
In a view, click the element symbol you want to specialize. Hold Shift to select multiple elements.
Click the Add button. The element selection dialog opens. In the element selection dialog, select the element you want to specialize and click OK.
Drag and drop the needed element you want to specialize from the Containment tree onto the Create... dialog.