Single sign-on (SSO) means that everyone in the domain can log on to Cameo Collaborator (Alfresco Community) without providing their credentials.
To set up SSO perform the following steps
Configuring Alfresco Community
- Go to <Alfresco Community installation directory>\tomcat\shared\classes and open for edit the alfresco-global.properties file.
Copy the following text and paste it at the beginning of the file:
authentication.chain=passthru1:passthru,ldap-ad1:ldap-ad,alfrescoNtlm1:alfrescoNtlm
ldap.authentication.active=false
ldap.authentication.userNameFormat=%s@domain.local
ldap.authentication.java.naming.provider.url=ldap://ADServer:389
ldap.synchronization.java.naming.security.principal=Administrator@domain.local
ldap.synchronization.java.naming.security.credentials=thepassword
ldap.synchronization.groupSearchBase=cn\=Users,dc\=domain,dc\=local
ldap.synchronization.userSearchBase=cn\=Users,dc\=domain,dc\=local
synchronization.import.cron=0 0 5 * * ?
ntlm.authentication.sso.enabled=true
passthru.authentication.defaultAdministratorUserNames=Administrator
passthru.authentication.useLocalServer=true
passthru.authentication.domain=
passthru.authentication.servers=
Replace:
- domain.local with your domain name in lines 3 and 5.
- ADServer with your Active Directory server name in line 4.
- Administrator with your domain administrator's name in line 5 and 11.
- thepassword with your domain administrator's password in line 6.
If Alfresco Community and Active Directory run on different servers, replace the last 3 lines with these:
passthru.authentication.domain=domain.local
passthru.authentication.servers=domain.local \\ADServer
passthru.authentication.defaultAdministratorUserNames=Administrator
- Save and close the file.
- Re-start Alfresco Community.
Configuring Alfresco repository
- Go to <Alfresco Community installation directory>\tomcat\shared\classes\alfresco\web-extension and open for edit the share-config-custom.xml file.
Find the following line:
<config evaluator="string-compare" condition="Remote">
Replace the line with the following code block:
<config condition="Remote" evaluator="string-compare">
	<remote>
		<connector>
			<id>alfrescoCookie</id>
			<name>Alfresco Connector</name>
			<description>Connects to an Alfresco instance using cookie-based authentication</description>
			<class>org.alfresco.web.site.servlet.SlingshotAlfrescoConnector</class>
		</connector>
		<endpoint>
			<id>alfresco</id>
			<name>Alfresco - user access</name>
			<description>Access to Alfresco Repository WebScripts that require user authentication</description>
			<connector-id>alfrescoCookie</connector-id>
			<endpoint-url>http://alfrescoserver.local:8080/alfresco/wcs</endpoint-url>
			<identity>user</identity>
			<external-auth>true</external-auth>
		</endpoint>
	</remote>
</config>
Replace alfrescoserver.local with your Cameo Collaborator server name in line 14.
Save and close the file.
Configuring the domain server
Configuring the domain server means modifying the security options of the domain local policies.
- Log on as the domain administrator.
- Press Windows Key + R and run gpedit.msc. The Local Group Policy Editor dialog opens.
- On the left side of the open dialog, click Local Computer Policy > Computer Configuration > Windows Settings > Security Settings > Local Policies > Security Options. A list of security options appear on the right side of the dialog.
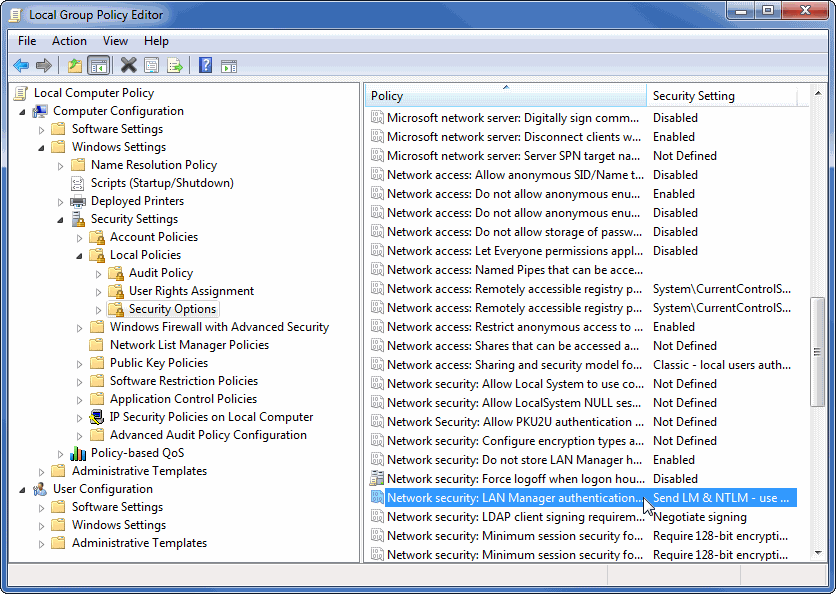
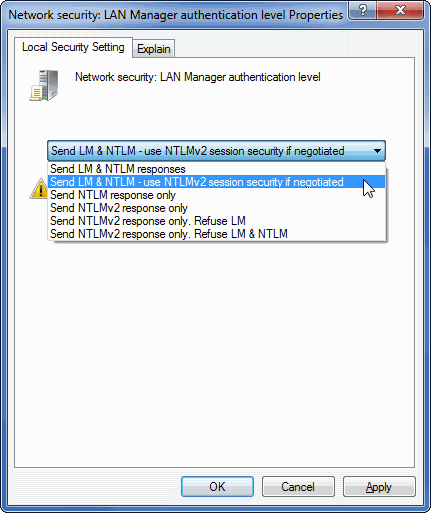
- Double-click Network Security: LAN Manager authentication level and select Send LM & NTLM - use NTLMv2 session security if negotiated from the drop-down list in the open dialog.
- Close both dialogs.
Configuring the client computer
- Log on as the local administrator.
- Press Windows Key + R and run gpedit.msc. The Local Group Policy Editor dialog opens.
- On the left side of the open dialog, click Local Computer Policy > Computer Configuration > Windows Settings > Security Settings > Local Policies > Security Options. A list of security options appear on the right side of the dialog.
- Double-click Network Security: LAN Manager authentication level and select Send LM & NTLM - use NTLMv2 session security if negotiated from the drop-down list in the open dialog.
- Close both dialogs.
Adding Alfresco Community server to trusted sites
- Log on as the domain administrator.
- Press Windows Key + R and run gpmc.msc. The Group Policy Management Console (GPMC) of your Domain Controller opens.
- On the left side of the open dialog, click User Configuration > Polices > Windows Settings > Internet Explorer Maintenance > Security. A list of security options appear on the right side of the dialog.
- Double-click Security Security Zones and Content Ratings and select the Import the current security zones and privacy settings option in the open dialog.
- Click the Modify Settings button. The Internet Properties (or Internet Options) dialog opens.
- Open the Security tab, if it is not yet open, and select Local intranet.
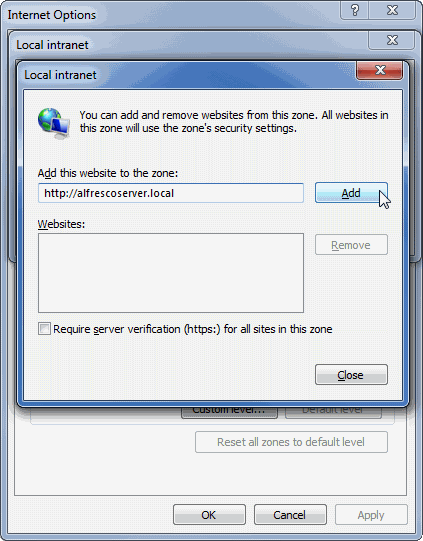
- Click the Sites button and in the open dialog click the Advanced button.
Type the Cameo Collaborator server name you specified in line 14 when performing Configuring Alfresco repository. In this case, this is http://alfrescoserver.local (see the following figure).
If you want to access the Cameo Collaborator server over standard HTTPS port, click to select the Require server verification (https:) for all sites in this zone check box.
- Close all the dialogs.
Update group policy depending on your operating system.
You can also configure the Internet options for each client individually.
Testing SSO
Open Internet Explorer or Google Chrome.
In the Address bar, type <server address>/share (in this case, it is http://alfrescoserver.local:8080/share) and press Enter.
You should be logged on to Cameo Collaborator without asking credentials.
Configuring Mozilla Firefox (optional)
If you use Mozilla Firefox for accessing Cameo Collaborator, you must configure it appropriately.
- Open Mozilla Firefox.
- In the Address bar, type about:config and press Enter.
- After the config page loads, in the search box type network.automatic.
In the search results list, double-click network.automatic-ntlm-auth.trusted-uris and type the Cameo Collaborator server address in the open dialog (see the following figure).
Multiple sites can be separated by commas, for example http://alfrescoserver.local, https://www.example.com.
- Click OK to apply changes.
- Re-open the Internet browser to see the effect of the configuration.
Related pages