To ensure that the Alfresco server works smoothly, you must perform regular server maintenance (server clean-up). Maintenance frequency depends on how often documents are updated, and how many documents are published to the server. In this section, you will learn how to clean up the Alfresco server manually from the command line interface. For instructions how to conduct an automated clean-up, see Cleaning up Alfresco server automatically.
Manual Alfresco server maintenance consists of:
Recommendation
As a precaution, it is recommended to back up the Alfresco server before making any changes.
Cleaning up PostgreSQL
Before starting PostgreSQL clean up, make sure that Alfresco Tomcat server is stopped, and Alfresco PostgreSQL is running, as shown below.
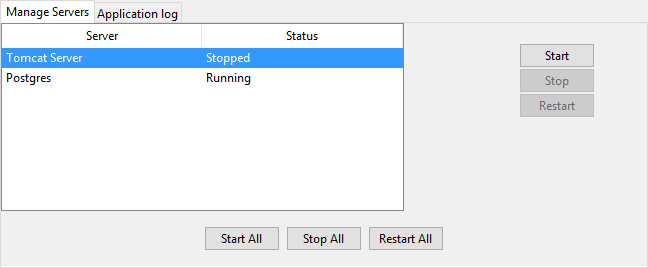
Alfresco server manager dialog.
To clean up PostgreSQL
- Open the command-line interface.
- Connect to the database by completing the following steps:
- Using the command-line, go to cd /<Alfresco Community installation directory>/postgresql/bin.
Execute one of the following commands:
For Windows: psql -U alfresco
For Linux: ./psql -U alfresco
- Enter the PostgreSQL user password. Usually, it is the same as the administrator password in Alfresco.
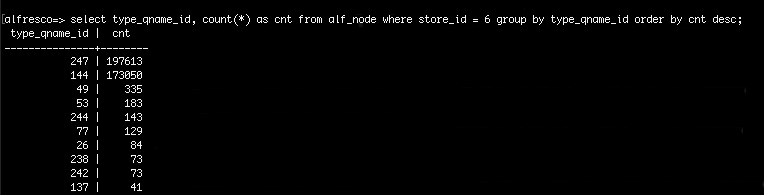
- Find out which data takes the most space, by executing the following commands:
select type_qname_id, count(*) as cnt from alf_node where store_id = 6 group by type_qname_id order by cnt desc;
Important
Make sure to add a semicolon at the end of command, as shown above.
The result should look similar to the example below. The type_qname_id column shows the data index. The cnt column shows the amount of a particular type of data.
select * from alf_qname qn left join alf_namespace ns on qn.ns_id = ns.id where qn.id in (247, 144, 49);
Add your data!
The numbers 247, 144, 49 in the command are taken from the results of the previous command. Always pick the IDs with the largest amount of data. In this example, they are 247, 144, 49.
The result should look similar to the example below. Note that in the example, the data with ID 144 is marked as deleted. In the figure above, you can also see that it is the second largest amount of data in the database (amount 173050).

Additional information
In your installation, the IDs of a particular type of data may be different.
Get the time (in milliseconds) of the last transaction you want to remove from the server by completing the following steps:
- Go to https://www.epochconverter.com/.
In the EpochConverter, enter the date of the last transaction to remove from the server to find the timestamp in miliseconds. For example, if you enter July 17, 2017 (GTM +03:00), the time stamp value will be 1500238800000 milliseconds.
Recommendation
The best practice is to take the date from a week ago, so that you only remove the data older than one week.
Get the ID of the last transaction to be removed from the server by executing the following commnad:
select id from alf_transaction where commit_time_ms <= 1500238800000 order by commit_time_ms desc limit 1;
Add your data!
The number 1500238800000 in the command, is the sample timestamp value. Before executing the command, make sure to replace the sample timestamp with your custom timestamp value.
The figure below shows the result of the command where the timestamp value is 1500238800000. In this example, the ID of the last transaction to be removed from the server is 30841.

Find the amount of data to be removed from the server by executing the following command (optional):
select count(id) from alf_node where type_qname_id = 144 and transaction_id <= 30841;
Add your data!
Replace the values of the following properties with your custom data:
type_qname_id = 144 - the ID of deleted data.
trasaction_id <= 30841 - the ID of the last transaction to be removed from the server.
In the example below, the amount of data to be removed (the amount of data marked as deleted and older than the last transaction to be removed) is 176225.

- Remove the data marked as deleted by executing the following commands:
delete from alf_node_properties where node_id in (select id from alf_node where type_qname_id = 144 and transaction_id <= 30841);
Add your data!
Replace the values of the following properties with your custom data:
type_qname_id = 144 - the ID of deleted data.
trasaction_id <= 30841 - the ID of the last transaction to be removed from the server.
This command deletes the properties of the specified data node.
delete from alf_node where type_qname_id = 144 and transaction_id <= 30841;
Add your data!
Replace the values of the following properties with your custom data:
type_qname_id = 144 - the ID of deleted data.
trasaction_id <= 30841 - the ID of the last transaction to be removed from the server.
This command deletes the specified data node.

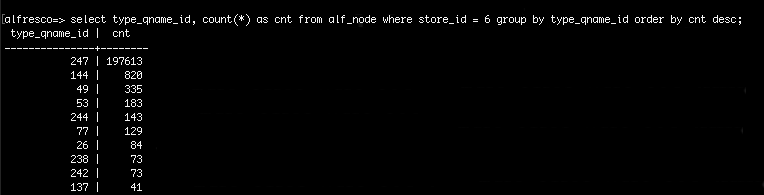
- Check if the data marked as deleted was removed by executing the following command:
select type_qname_id, count(*) as cnt from alf_node where store_id = 6 group by type_qname_id order by cnt desc;
In the example below, you can see that most of the data marked as deleted (ID 144) was removed. The amount of data went down from 173050 to 820.
Recommendation
After cleaning up PostgreSQL, it is recommended to run DB vacuum to retain free space. For mode information, see https://www.postgresql.org/docs/9.1/static/sql-vacuum.html.
When you finish cleaning up PostgreSQL, move on to the next server maintenance part and perform Solr4 clean up, described in the next section.
Cleaning up Solr4
Before starting Solr4 clean up, make sure that both Alfresco Tomcat server and Alfresco PostgreSQL are stopped, as showed below.
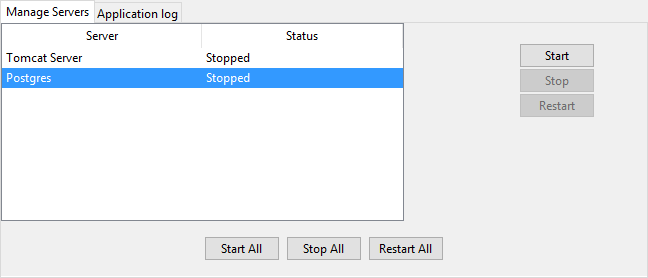
Alfresco server manager dialog.
To clean up Solr4
- Go to the <Alfresco Community installation directory>/alf_data directory.
- Delete the following folders:
- solr4Backup
- contentstore.deleted
- Go to the <Alfresco Community installation directory>/alf_data/solr4 directory.
- Delete the following folders:
- content
- index
- model