Cameo Collaborator allows you to publish your models using the command-line interface. This option is useful if you want to publish them periodically, such as once a day or during non-business hours, to save time.
Before you begin, ensure that your computer is prepared for publishing projects, and that you are able to log on to Cameo Collaborator.
Compatability warning
Ensure that the versions of Cameo Collaborator and Cameo Collaborator Publisher plugin are compatible. You cannot publish a project:
- To Cameo Collaborator 18.0 SP3 or an earlier version of the product using Cameo Collaborator Publisher 18.0 SP4.
- To Cameo Collaborator 18.0 SP4 using Cameo Collaborator Publisher 18.0 SP3 or an earlier version of the plugin.
Publishing from the command-line interface consists of three main steps:
- Preparing for model publishing
- Configuring publishing properties
- Publishing or scheduling publishing as a background task
Preparing for model publishing
To publish your model using the command-line interface, ensure that the default JVM heap size of the publisher is big enough. If you need, also use the template you intend to apply for publishing in your model.
To prepare for model publishing from the command-line interface
If your model is large, increase the default JVM heap size of the publisher. We recommend keeping the heap size value larger than the value defined for your modeling tool. You can find it in the properties file located in the <modeling tool installation directory>\bin directory (e.g, magicdraw.properties).
In the model you intend to publish, use the library containing the template you want to apply for publishing. This step is not necessary if you specify the template_location property described in the Configuring publishing properties section.
- Open the model you intend to publish.
- From the Options menu, select Project Usages, and click the Use Project button. The Use Project dialog opens.
In the Select project step displayed below, select the library you want to use.
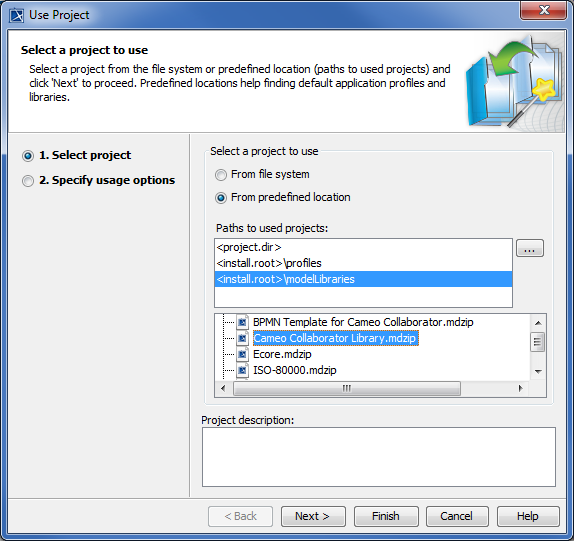
Tip
Predefined Cameo Collaborator templates, such as Entire Model, are stored in the <modeling tool installation directory>\modelLibraries directory.
- Click the Next button, and, if required, specify usage options.
- In the Load Mode area of the wizard, ensure that you select the Always load check box if it is not already selected.
- Click the Finish button to close the dialog.
- Save the model and close the modeling tool.
Important
Do not skip this step if:
- You want to publish a model stored in the Teamwork Cloud. Otherwise, updating a published project will corrupt the navigation between comments and commented items.
- You do not specify the template_location property described in the Configuring publishing properties section.
Now that your model is prepared for publishing, you should configure the publishing properties.
Configuring publishing properties
Before publishing a project from the command-line interface, specify publishing properties by modifying a properties file. You can modify the file for every model you publish, or reuse it for several models if the values of publishing properties do not need to be changed. The procedure below explains how to open the file and define the properties it contains.
To configure the properties for publishing to Cameo Collaborator
- In the <modeling tool installation directory>/plugins/com.nomagic.collaborator.publisher directory, open the template.properties file.
- Read the comments in the file describing the valid values of the properties listed below, and fill in the desired values (or leave the default values if they meet your needs):
- publish_to - Specify the Alfresco value, since Cameo Collaborator allows publishing to the Alfresco server only.
- project - If your project is local, specify the full file path. If you store your project in Teamwork Cloud or Teamwork Server, specify the project name.
- scope - Specify the full qualified name of the model element that owns the model data you want to publish. For example, specify the name of the root package of a model if you want to publish the entire model. For multiple scope elements, separate entries with a semicolon (;).
template_document_name - The value of this property is the name of the Document element displayed in the Collaborator View Diagram of the template you intend to use for publishing.
Updating projects
If you update a published project by republishing it, ensure that you specify the same template document name you used when publishing the project the first time. Not doing so will result in the loss of all comments.- template_location - Specify the full file path to the template you intend to apply for publishing. Predefined Cameo Collaborator templates are stored in the <modeling tool installation directory>\modelLibraries directory. If you use the template you want to apply for publishing in your model, you can leave this property unspecified.
- document_name - If you are going to publish your project to a folder in the selected location root, specify the full path to the document.
- overwrite_existing_document - Set to true if you want to overwrite the existing document.
- comments_enabled - Set to true to enable commenting in a published document.
- publish_to - Specify the Alfresco value, since Cameo Collaborator allows publishing to the Alfresco server only.
The following properties are intended for models stored in Teamwork Cloud or Teamwork Server only:
server_username - Specify the user name of the server where you store the project you want to publish.
server_password - Specify the password of the server where you store the project you want to publish.
server_url - Specify the address of the server where you store the project to be published. If the connection between the server and your modeling tool is encrypted, type https in front of the server address.
server_use_ssl - Set to true if the server where you store the project to be published is configured to use SSL certificates.
require_update_module - Set to true if you want to update used projects to the newest version when publishing.
- project_version* - If you want to publish a specific version of the project, specify the version number.
branch_name* - If you want to publish a specific branch of the project, specify the branch name.
- project_password - If the project you want to publish is password-protected, specify the project password.
The following properties are intended for publishing to Alfresco only:
- alfresco_username - Specify the user name of the Alfresco server where you want to publish the project.
- alfresco_password - Specify the password of the Alfresco server where you want to publish the project.
- alfresco_repository_url - Specify the address of the Alfresco server where you want to publish a project.
- location_root - Specify the place in the server repository where you want to store the published project. If you don't know what value to specify, see Choosing where to store the published project.
diagram_image_type - Specify the format in which diagram images should be saved.
If you choose the .svg format, diagrams may not be displayed when browsing a project in Internet Explorer 11. This issue occurs randomly, and can be solved by refreshing the web page.- site_url_name - Specify the desired site URL If you are going to publish your project to Repository/Site.
- server_type - Specify the type of the server where the project you want to publish is stored. Valid values are teamwork and twcloud.
- Save and close the file.
*There are four possible outcomes, depending on which of the project_version and branch_name properties you specify:
- If both properties have default values, the latest available version of the model is published (either the Trunk version, or the Branch version).
- If you specify only the version number (the branch_name property has the default value), the specified Trunk version of the model is published.
- If you specify only the branch name (the project_version property has the default value), the latest version of the specified branch of the model is published.
- If both properties are specified, the specified version of the specified branch of the model is published.
Publishing a model to Cameo Collaborator
To publish a model from the command-line interface, you need to execute a specific command, outlined below.
To publish a model to Cameo Collaborator from the command-line interface
- Open the command-line interface.
Go to the <modeling tool installation directory>/plugins/com.nomagic.collaborator.publisher directory containing the executive file for model publishing. The executive file is the corresponding .sh or .bat file depending on your operating system and the version of your modeling tool.
In the command line, type the following command:
On Windows:
publish.bat -properties template.properties
- On OS X or Linux:
./publish.sh -properties template.properties
Important
These commands are valid only if the name of the actual executive file matches the name included in the command, e.g., publish.bat. Before executing the command, check the executive file name, and, if needed, change it to match the name in the command.
After completing the steps above, your model is published to Cameo Collaborator. If you want to publish the same model frequently, you do not need to do it manually every time. Instead, schedule publishing as a background task to save time.
Copying published projects
In Alfresco, do not try to copy a published project or the folder that contains one or more published projects. A copy of a published project is considered a shortcut to the copied project. Therefore, if you need a standalone copy of a published project, publish the same project twice using a different name.
Scheduling the task for a model to be published
If you need to publish your models periodically and/or during non-business hours, you can schedule them to be published automatically. The following procedures describe the scheduling process on Windows and Linux operating systems.
- Open the Task Scheduler from the Start menu of your Windows computer, and select the option to create a basic task.
- Type the task name, an optional description, and click Next.
- Specify when you want the task to start, and click Next.
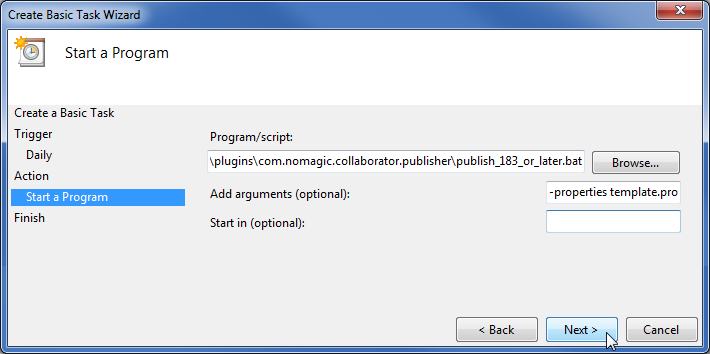
To schedule the publishing to start automatically, select the Start a program check-box and click Next.
Click the Browse button, and find the executable .bat file in the <modeling tool installation directory>/plugins/com.nomagic.collaborator.publisher directory (the file name depends on the version of your modeling tool).
In the Add Arguments (optional) box, type -properties template.properties and click Next.
- Click Finish.
After completing one of the procedures (depending on your operating system) described above, your model is published automatically on a regular basis at a specified time.