You can export ReqIF files to be used with:
- IBM DOORS 9.4, 9.5, and 9.6
- IBM DOORS Next Generation
- PTC Integrity
- Polarion REQUIREMENTS
- Siemens Teamcenter
- Dassault Systemes Reqtify
Exporting requirements to ReqIF files ensures that all html formatting, images, and hyperlinks are represented in ReqIF format file properly. You can choose to export project elements or specifications, also, advanced users can create automated exports and scheduled exports from Teamwork Server or Teamwork Cloud projects. It should be noted that the exported files keep their original names.
It is recommended to export requirements into a separate project which can be later used in other models as a used project.
To export requirements to a ReqIF file
- Open a project from which you want to export requirements.
- From the File menu, select Export To > Requirement Interchange Format (ReqIF) File.
- Choose to export one of the following:
- Elements - if you want to export the plain list of requirements.
Specifications - if you want to export requirements and hierarchical relationships between them.
If you choose to export Specifications, make sure you have at least one package with the «Specification» stereotype applied. To apply the stereotype, your project has to use the ReqIF Profile. When you try to export specifications from the project that doesn't have the ReqIF Profile used in it, you get the message asking if you want to use the profile. In this case, click Yes, apply the «Specification» stereotype to the required packages and repeat the export procedure.
In the open Select Elements / Select Specification Package dialog, select the elements or specification packages you want to export and click
 or
or  (if you want to add elements recursively). Then they appear in the Selected elements list on the right side of the dialog.
When you're done selecting, click OK.
In the Select ReqIF file dialog, select the output location for the exported ReqIF file, then select the file you want to export or type the file name to create a new one.
In the ReqIF Flavor pane on the right of the Select ReqIF file dialog, select the flavor of your exported ReqIF file.
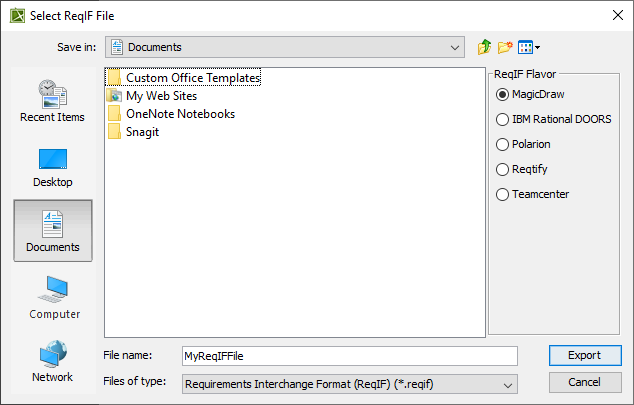
If you cannot find the needed ReqIF Flavor on the list, please choose MagicDraw.
Click Export.
Images attached to the model are exported to the ReqIF file automatically as well.
When the ReqIF file is exported, a notification message appears, stating the quantity of exported specifications, elements and relationships. If you choose to export elements only, the message doesn't contain lines that indicate exported specifications and relationships.
Click the Note: you can change import/export and mapping options here link in the notification message, if you want to change these options.
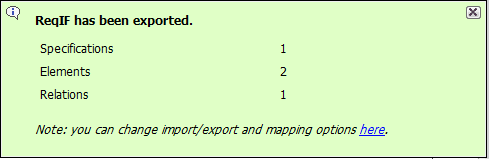
The notification message is displayed for a fixed duration, but you can find all project notification messages in the Notification Window. To open the Notification Window, click Window > Notification Window, or press Ctrl + M.
Changing requirements exporting options
Changing requirements exporting options is beneficial if you have a custom requirement type defined, or you are exporting not a requirement file but another type of data, for example, test cases.
A requirement type is limited to class and class extended types.
You can change the following export options:
- Specify an element type to create for the objects you are exporting
- Specify a relationship type to create for the relationships you are exporting
- Specify a path to the output location for exported resources (images, documents, etc.)
- Choose whether to export all properties or not and form a list of ignored and not exported properties
To change ReqIF file exporting options
- Click Options > Project. The Project Options dialog opens.
- In the options group list, select General, then scroll down to the ReqIF options group.
- Click a desired option specification cell to change it's value.
- Click OK after you are finished.