To create an exceptional flow
- Open the Use Case Specification window and click the Use Case Scenario Sketch property group.
- In the use case scenario, select the basic flow step you want to create an exceptional flow for.
- In the Exceptional Flow tab, click the Add New button
 . The shortcut menu opens.
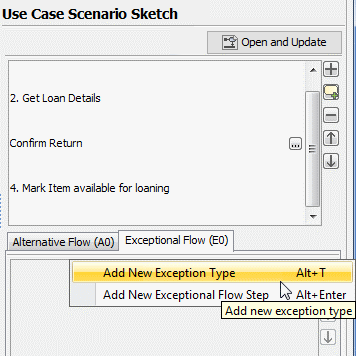
Do one of the following:
Select the Add New Exception Type command or press Alt+T. The drop down list opens. Type the name of a new exception type. The exception type is created (a new class is created). The created exception type contains an unnamed exceptional flow step.
Select the Add New Exceptional Flow Step command or press Alt+Enter. If there was an exceptional type created in the exceptional flow already, a new exceptional flow step is created for the selected exception type. If there was no exception type in the alternative flow, a new exceptional flow step is created together with a new exception type. Now you can type the name of the new exceptional flow step.
Types and steps of the exceptional flow are numbered automatically. Use the Up  and Down
  buttons to change the order of types in the exceptional flow or the order of steps in the particular type. In the Activity diagram, steps are represented according to their order in the Use Case scenario.