You can distribute custom resources in the following two ways:
- Using Custom Resource Building Wizard:
- Install the Development Tools plugin. Click Help > Resource/Plugin Manager, download the plugin and restart the program.
Create required files. For information about what files are required for each type of the resource, see Creating required files and folders structure.
The structure must not contain the "data/resourcemanager" folders yet.
Start Resource Builder (Tools > Development Tools > Build Custom Resource...), select a MagicDraw folder structure you have constructed in the step #2 step.
- Fill the properties in the provided form.
Select the desired resource (a ZIP archive) output file, and click Finish. Resource Builder will create the "data/resourcemanager" folder containing an XML file with the properties you provided and assemble everything inside the MagicDraw folder into the ZIP file you specified as the output file. The resource (ZIP) file you have created can be distributed to your team members and installed using the Resource/Plugin Manager.
- Distribute manually. The manual distribution consists of the following steps:
- Create required files. For information about what files are required for each type of resource, see Creating required files and folders structure.
- Create a Resource descriptor file. For more information about the Resource descriptor file, see Resource manager descriptor file.
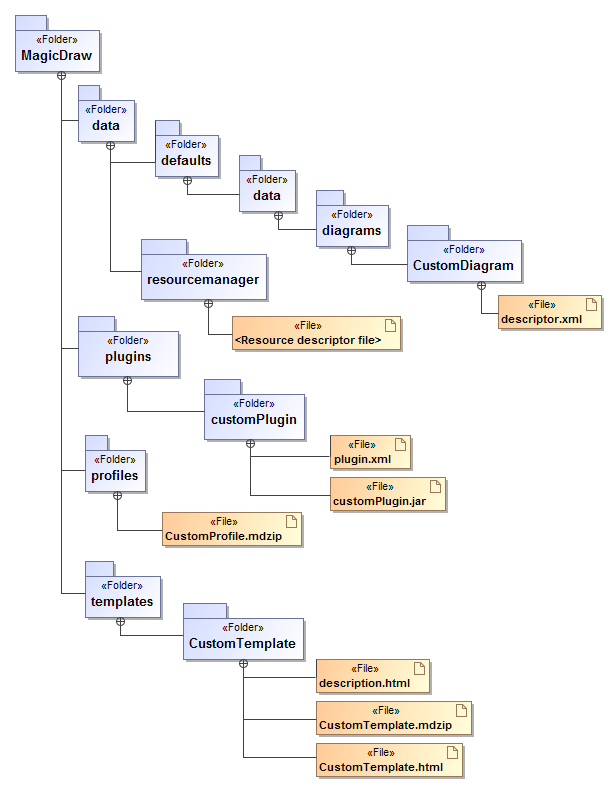
- Archive created files to a zip file. The zip file should include the required files, as well as folders that have a structure matching the structure of a modeling tool. Information about the folders structure for each type of resource and the general view of the file structure is depicted in the following figure:
- Import your prepared data to your modeling tool through the Resource Manager.
For more information about the MagicDraw Resource Manager, see MagicDraw UserManual.pdf.
Resource Manager supports zip archives only!