The following outlines how to fill the Instance Table for the specified classifier:
- Create new instances.
- Create new instances with parts.
- Add already existing instances.
- Copy and paste instances from another resource (HTML, Excel, Word, etc.).
To create a new instance
On the table toolbar, click the Create button.
The new instance can be created only if the classifier is already specified for the Instance Table. Otherwise, the Create button is not available.
If there is more than one classifier specified, from the menu of the button, select a classifier for which you need to create an instance.
The new instance is added to the Instance Table as the last row.
- Type the instance name and specify slot values.
To create a new instance with parts
On the table toolbar, click Create > Create with Parts.
The new instance with nested parts is created if:
- the classifier is specified for the Instance Table. Otherwise, the Create with Parts button is not available.
- the nested properties are displayed as columns in the Instance Table.
To add an existing instance
- On the table toolbar, click Create > Add Existing. The Select Instance Specification dialog opens.
- In the tree or list on the left side of the dialog, select an element and add it to the Selected elements list. You can select more than one element. Elements available for selection:
- Instances of one or more classifiers specified for the table. An instance is available if it belongs to at least one of the classifiers.
- Packages that contain these instances. In this case, the contents of a selected package, but not the package itself, will be added to the table.
Click OK when you are done.
The selected instance is added to the table as the last row.- You can drag a selected element to the contents of the Instance Table directly from the Model Browser.
- To select adjacent elements, select a single element and then hold down the Shift key while you click other elements.
- To select nonadjacent elements, select a single element and then hold down the Ctrl key while you click other elements.
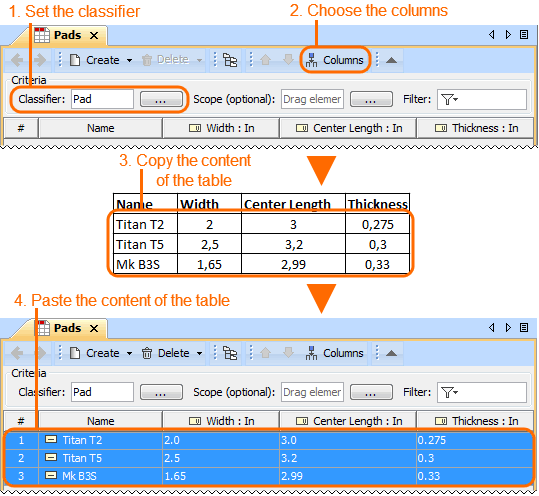
To copy and paste instances from another resource
Copy the content of the table from another resource.
- The number of columns in that table should be the same as the number of columns in the Instance Table.
- The data types of columns in the Instance Table must be compatible with copied information.
- Open the Instance Table where you want to paste the copied data.
- Make sure the Classifier is specified in the Criteria area.
In the table toolbar, click the Columns button and choose columns of instance slot values that you want to fill with copied information.
- The cells must be editable in the Instance Table.
Press Ctrl+V (Cmd+V on OS X).
Each row displays one instance with its slot values.- If an instance already exists in the model, the information updates.
- If instances have ID prefixes in another resource, they are automatically set after the copy-and-paste command only for pasted instances in the Instance Table. Manage ID prefixes in the Element Numbering dialog.


