To create a numbering customization for an element
Assume you need to number packages as shown:

Task for numbering packages.
There should be three numbering levels. The following table describes the rules for calculating package numbers in each level:
| Numbering level | Numbering format | Examples |
|---|---|---|
| 1st | <number> | “1”, “2”, “3” |
| 2nd | <number><separator><character> | “1.A”, “1.B”, “2.A”, “2.B” |
| 3rd | <number><separator><character><separator><number> | “1.A.1”, “1.A.2”, “1.A.3”, |
So we need to create a numbering scheme and use it in the numbering customization for Package elements.
Perform this task in the Quick Start perspective.
1. Creating a stereotype to customize a desired element
To create a stereotype that customizes UML Packages
- Create a Profile diagram.
- On the Profile diagram palette, click the Stereotype button.
- Click a free space on the diagram pane. A new stereotype shape appears and the Select Metaclass dialog opens.
- Select the Package metaclass and click OK.
- Name the stereotype Numbered Package.

Stereotype for customizing UML packages.
Make the «Numbered Package» stereotype invisible if you want the stereotype and its properties to be hidden in a diagram.
2. Adding a new attribute for storing numbers
To add a new attribute for storing package numbers to the «Numbered Package» stereotype
- Select the shape of the «Numbered Package» stereotype on the Profile diagram pane.
- Add a new stereotype attribute of the String type named No.

Property for storing package numbers.
3. Creating a numbering scheme to define a numbering style and number parts
To create a numbering scheme
- On the Profile diagram palette, click the Class button.
- Click a free space on the diagram pane. A new Class shape appears.
Name the Class Package Numbering Scheme.
The name of the numbering scheme will be displayed in the Element Numbering dialog. We recommend giving it a short and meaningful name.
- Apply the «NumberingScheme» stereotype to the Class.

Scheme for numbering UML packages.
To define a numbering style
- Open the Specification window of the newly created numbering scheme.
- Click the Numbering Style value cell to open the list of available numbering styles. Select the Multi-level numbering style in this list. Use the Multi-level numbering style (remember: you must have three numbering levels for numbering packages).
- Click Close when you are done.

Numbering scheme with multilevel numbering style defined.
The following table shows number parts that should be used to create the numbering formats described in the preceding table.
| Number part | Number part name |
|---|---|
| <number> | Level 1 |
| <separator> | Dot 1 |
| <character> | Level 2 |
| <separator> | Dot 2 |
| <number> | Level 3 |
To create a number part
- Select the shape of the numbering scheme on the profile diagram pane.
- Add a new number part.

Creating a new number part.
To specify a number part for the first numbering level
- Create a number part named Level 1.
- Open the Specification window of the number part.
- Click the Sequence property value specification cell and select Numeric in the values list. You must have numbers at the first numbering level.
- Click the Initial Value property value cell and type the number 1 as its value. Numbering at the first level should start at 1.
- Click Close when you are done.

Numbering scheme with number part defined for first numbering level.
To specify a number part for the first separator
- Create a number part named Dot 1.
- Open the Specification window of the number part.
- Click the Sequence property value specification cell. Select Separator in the values list.
- Click the Initial Value property value cell and type the character (a dot) as its value. The separator between the first and the second numbering level should be a dot.
- Click Close when you are done.
To specify a number part for the second numbering level
- Create a number part named Level 2.
Open the Specification window of the number part.
Click the Sequence property value specification cell. Select Character in the values list. You must have letters at the second numbering level.
Click the Initial Value property value cell and type the letter A as its value. The numbering at the second level should start at A.
Click Close when you are done.

Numbering scheme with number parts defined for the second numbering level.
The rest of the number parts are created accordingly.

Numbering scheme with all number parts defined.
As there are no number parts specified for the fourth (and beyond) numbering levels, packages will be numbered using the number parts of the third numbering level. For example, “1.A.1.1”, “1.B.1.2”, and so forth.
4. Creating a customization element for the stereotype that customizes the desired element
In order to use the scheme for numbering packages, you must define it in the numbering customization for package elements. First, create a customization element.
To create a customization element for the “Numbered Package” stereotype
- On the diagram palette, click the Customization button.
- Click a free space on the diagram pane. The new customization shape appears.
- Name the customization Numbered Package Customization.
- Open the Customization Specification window.
- Click the Customization Target property. Select the Numbered Package stereotype in the element Selection dialog and click OK.
Set the Show Properties When Not Applied property to true. All properties of the Numbered Package stereotype will be visible as properties of the Package metaclass, even if the stereotype is not yet applied.
Click Close when you are done.
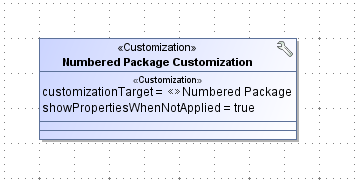
Customization element for the “Numbered Package” stereotype.
5. Add a numbering attribute to the customization element
After creating the customization for the Numbered Package stereotype, specify the stereotype attribute for storing element numbers as well as defining a numbering scheme to use. For this, you must create a numbering attribute.
To add a numbering attribute to the customization element of the Numbered Package stereotype
- Select the shape of the customization.
- Add a new Auto Numbering Property named Package Numbering.
- Open the Specification window of the created attribute.
- Specify a value for the Numbered Property property. Click the property value cell and then click the ... button. In the element Selection dialog, select the No. property of the Numbered Package stereotype and click OK.
- Specify a value for the Numbering Scheme property. Click the value cell and either:
- Select the Package Numbering Scheme class in the opened list.
- Click the ... button. In the element Selection dialog, select the Package Numbering Scheme class and click OK.
- Change the Default Number property value to true. The true value indicates that this numbering attribute will be set as the default when numbering instances of the customized Package metaclass.
- Specify the Use Prefix On Owner attribute value. The true value indicates that the element prefix will be used for its numbered owner as well.
- Click Close when you are done.
- Save and reopen the project to apply the created numbering customization.
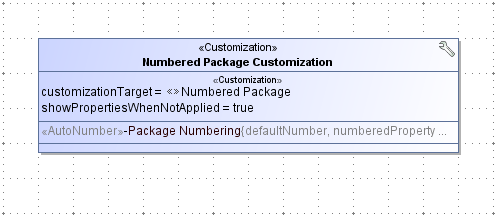
Numbering attribute in the customization element of the “Numbered Package” stereotype.
6. Changing the number display mode
To see the number before the element name, you must change the number display mode.
To change the number display mode on packages
- Open the appropriate package diagram.
- Create a package to apply the numbering scheme.
- Name the package Organization.
- Apply the Numbered Package stereotype to the Organization package.
- Right-click the shape of the package on the diagram pane. Click Symbol Properties.
- Set the Show Number Tag Name property value to false. The false indicates that the element number tag name (the No property of the Numbered Package stereotype) will not be displayed on the package shape.
- Click the Element Number Display Mode value cell to open the list of available modes. Select the Before the element name mode in this list.
7. Reopen the project to apply changes
Open the appropriate package diagram and see the packages numbered using the newly created numbering customization.
