You can customize the content of the Differences tree as well as navigate through differences in both the Difference tree and the Specification panel using the toolbar that is located at the top of the Difference Viewer window.

The toolbar buttons for customizing the Differences tree and navigating through differences are described in the following tables.
|
|
|
| Expand | Click to expand all nodes in the Differences tree. |
| Collapse | Click to collapse all nodes in the Differences tree. |
| Go To First Change | Click to select the first change. |
| Go To Previous Change | Click to select the previous change. |
| Go To Next Change | Click to select the next change. |
| Go To Last Change | Click to select the last change. |
| Report | Click to generate a project comparison differences report in Microsoft Word format. |
| Filter | Click to open the Items Filter dialog. Clear the check-box next to an element that you need to hide in the Differences tree. |
| Show Auxiliary | Click to show or hide in the Differences tree the profiles and used projects with the «auxiliaryResources» stereotype applied (for example, UML Standard Profile). |
| Reset Windows Configuration | Click to place all tabs and windows to their default positions. |
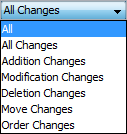
You can also filter the elements displayed in the Differences tree by change type. Use the Display drop-down list to specify a change type. Be advised that filtering elements by a particular change type displays both elements with the particular changes and elements with the particular owned element changes.