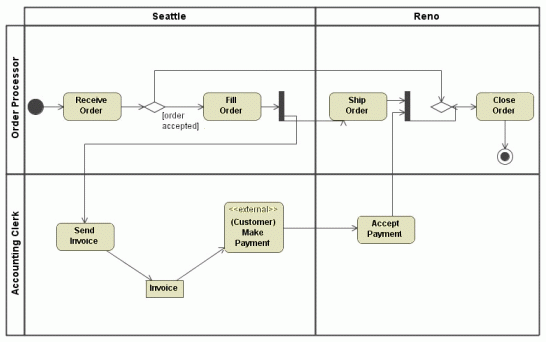
Actions and subactivities can be organized into Swimlanes in the Activity diagrams. Swimlanes are used to organize responsibility for actions and subactivities according to class. They often correspond to the organizational units in a business model.
Swimlanes limit and provide a view of the behaviors invoked in the activities. They consist of one or more partitions and can be vertical or horizontal.
An Activity diagram can be visually divided into Swimlanes, each separated from the neighboring Swimlanes by vertical or horizontal solid lines on both sides. Each Swimlane represents a responsibility for part of the overall activity, and may eventually be implemented by one or more objects. The relative ordering of the Swimlanes has no semantic significance, but can indicate some affinity. Each action is assigned to one Swimlane. Transitions can cross lanes. The routing of a transition path is non-essential.
You can customize Swimlane representation by changing its symbol property values. Press Alt + Enter to open the appropriate dialog. Each property is described in the description area on this dialog.
To create a Swimlane
On the Activity diagram palette, click the Vertical Swimlanes button
 and then click an empty space on the diagram pane.
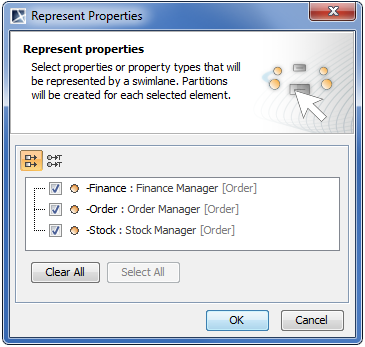
If the Represent Properties dialog opens, select the properties you want to display as Swimlanes in the diagram (see the following figure) and click OK. Otherwise, a few empty Swimlanes are created.
The Represent Properties dialog opens if:
- The Activity diagram is owned by a classifier, such as a Class, Component, Use Case.
- The classifier or its subject has properties.
Partitions are created for each property you select to represent as a Swimlane in the Activity diagram.
You can also create a Swimlane by dragging one or more properties, Actors, Classes, or Instance Specifications from the Containment tree to the Activity diagram pane. Partitions for each element are created as well.
To set representative elements, do one of the following
- Open the Specification window of the Swimlane and click the cell of the Represents property value. Then click
 and select the element. Click OK when you are done.
 - From the Containment tree, drag the representative element to the partition on the diagram.
To add an additional partition, do one of the following
- On the diagram, right-click the Swimlane, select Insert Swimlane and then Insert Vertical Swimlane or Insert Horizontal Swimlane.
- From the Containment tree, drag one or more property, actor, class or instance specification elements to the Swimlane on the diagram.
To draw multidimensional Swimlanes
- Draw a vertical Swimlane.
- From the Swimlane shortcut menu, select Insert Horizontal Swimlane.
- Insert as many horizontal and vertical Swimlanes as you need.
To add model elements to a Swimlane
If a Swimlane is already drawn in the Activity diagram, drawing an action (or any other element) highlights the Swimlane in blue. This means the action shape depends on the Swimlane symbol.
If the model elements depend on a Swimlane symbol, they are deleted if the Swimlane symbol is deleted.
To rearrange Swimlanes, do one of the following
- Drag any of the Swimlanes in the direction where you want it to be.
- Click the heading of any Swimlane and use the displayed control arrow to move the Swimlane left, right, up or down.

To delete a single Swimlane entirely, do one of the following
- Click the header of the Swimlane, then press Delete.
- Click the header of the Swimlane, then press Ctrl + D.
- Right-click the header or any empty space on the Swimlane, then select Delete Swimlane.
To delete all Swimlanes and their contents
- Click any empty space on the Swimlanes, then press Ctrl + D.
To delete Swimlanes without deleting contained elements, do one of the following
- Click any empty space on the Swimlanes, then press Delete.
- Right-click the headers or anywhere on the Swimlanes, then select Delete All Swimlanes, Keep Contents.
Rrelated pages