Report Wizard provides a report template that you can use to generate a web portal report. A web portal report is a report published in HTML format so it can be viewed in a web browser. With the web portal report, you can share your project and virtually make your models readable to the other stakeholders, including those who do not understand MagicDraw models. The web portal report allows the readers to provide feedback on any element or diagram in the model by commenting on it. This web portal report template is only available in MagicDraw Enterprise edition. In other editions, MagicDraw provides a demo version of the web report template, which can contain, at most, 10 symbols per view.
A web portal report simplifies the complexity of a model by reducing less needed elements from the model tree and displays the most relevant views of your project. For example, a MagicDraw project report includes views such as Glossary, Requirements, Architecture, Implementation, and so forth, and a SysML Plugin project report includes views such as Requirements, Structure, Interfaces, Constraints, and so forth. It helps you generate your project in a user-friendly and easy-to-browse environment.
The web portal report features a quick search to help you find elements and diagrams for faster content viewing.
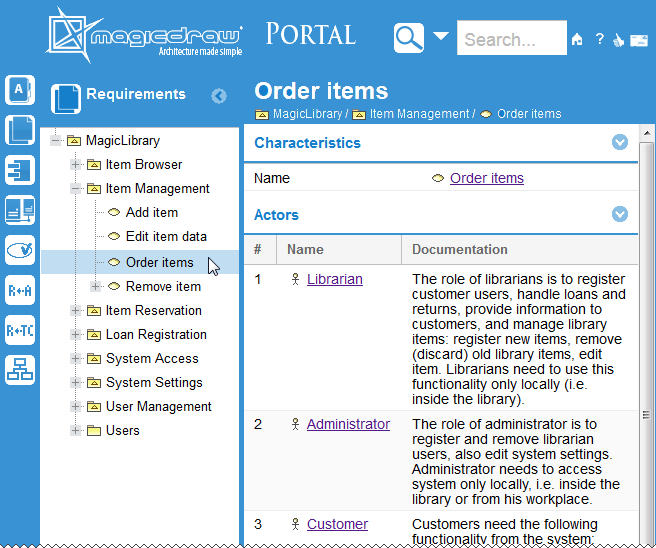
An Example of Web Portal Report - Software Engineering Portal.
Generating reports
Generating a web portal report is as easy as generating any other reports with Report Wizard.
To generate a web portal report from a MagicDraw project
- Press Ctrl+Shift+G to open the Report Wizard dialog.
- In the Select Template pane, expand the Web Reports package and select Software Engineering Portal.
If your MagicDraw has a plugin that provides another template for generating a web portal report, you can find this template in a separate package. For example, if you have installed SysML Plugin, you should expand the SysML - Web Reports package and select SysML - Web Reports.
3. Click Next.
4. If you need to allow comments on the report, do the following:
- Click the Variable button. The Report Variable dialog will open.
- In the value cell of the WebComment variable, type the global address for comments delivery, for example, example.com/jiraExample.php, see figure below.
- Click OK.
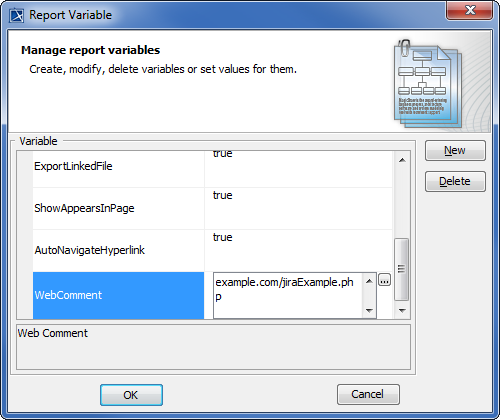
Enabling Feedback on a Web Portal Report.
5. If you want ScreenTips to appear on the report when it opens for the first time, do the following:
Click the Variable button. The Report Variable dialog will open.
In the value cell of the ShowTip variable, type either True or true.
Click OK.
6. Click Next.
7. Select the elements you need to include in the report and click Next. For more information, refer to Select Element Scope Pane.
9. Save your report in a specific location, type the report name (for example, report.html), and specify other output options if desired.
10. Click Generate.
As a web portal report includes a number of files and folders, it is strongly recommended that you save the report in a separate folder. For more information, refer to Generate Output Pane.
11. You can open the report by double-clicking the HTML/HTM file in the location specified in step 6 (in this example, report.html).
12. You can place the report in a shared directory or on a web server to make it available for the other stakeholders.
Commenting on a report
If a web portal report enables feedback or comments, you can write something about a model element or a diagram in the report. See step 4 in Generating Reports for more information on how to enable feedback or comments in a web portal report.
To write a comment on a web portal report
- Select an element or diagram you need to comment in the model tree view on the left-hand side of the web portal report.
Click the comment icon in the upper-right corner of the report. The Comment dialog opens.

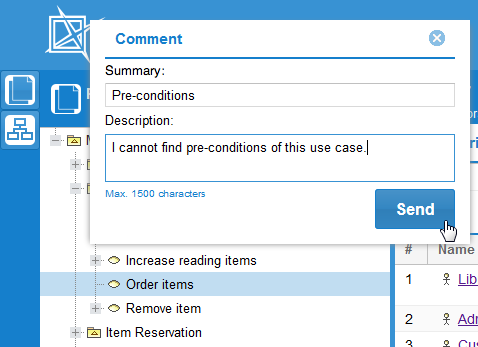
Commenting on a Web Portal Report.
- Type a short statement that describes your comment or feedback in the Summary box.
Type your comment in details in the Description box.
IMPORTANT! Your comments in the Description box should not exceed 1500 characters. Comments exceeding the limit will not be included.
Click Send. The global address of the selected element or diagram, the name of that element or diagram, and the contents in both the Summary and Description boxes will be sent to the web server.
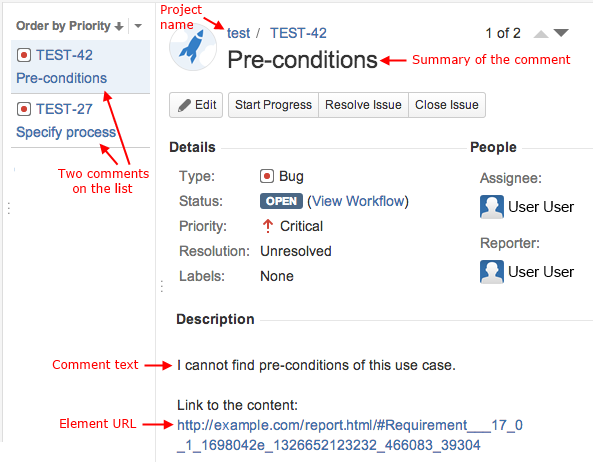
Reading comments
There are several ways to deliver comments on elements and diagrams in a web portal report and allow others to read them. You can choose to deliver them through an issue tracking system, such as JIRA, or an e-mail platform, such as Gmail or Outlook.
The following example shows how to deliver comments, if you need to get the comments to a certain account on JIRA as issues of the type ‘Bug’:
Copy the following script:
<?php
$contentUrl = $_GET['url'];							   // Global address of the commented
							                           // element or diagram.
$contentTitle = $_GET['contentTitle'];				   // Name of the commented element
							                           // or diagram.
$contentSummary = $_GET['commentSummary'];             // Summary text of the comment.
$contentCommentArray = $_GET['comment'];			   // Text of the comment.
$contentComment = implode(" ", $contentCommentArray);
$description = $contentTitle . " \\\\ " . $contentComment . " \\\\ " . "Link to the content: \\\\" . $contentUrl;
$issue = array(
    'type'=>'1',				                        // Type of JIRA issue
    'project'=>'TEST',                                           	    		// that stores the comment.
                                            			// '1' means 'Bug'.
                                                       // Name of JIRA project
				                                        // that stores the comments (3.1).
    'description'=> $description,						// Description contents
	'summary'=> $contentSummary,                        // of JIRA issue that
 	'priority'=>'2',	                                // stores the comment.
    'assignee'=>'username',	                            // Summary text of JIRA issue
	'reporter'=>'username',	                            // that stores the comment.
    						                            // '2' means 'Critical'.
           					        // Username of JIRA account,
						                                // to which the comment is sent (3.2).
    					        // Username of JIRA account,
						                                // which sends the comment (3.3).
);
$soapClient = new SoapClient("https://example.com/rpc/soap/jirasoapservice-v2?wsdl");									// (3.4)
$token = $soapClient->login('username', 'password'); 									                                // (3.5)
$soapClient->createIssue($token, $issue);
?>
Create a new file and paste the script onto the file.
Change the following values (the red ones in the script):
The name of a JIRA project.
The assignee’s username.
The reporter’s username.
The global address of a web service, which provides JIRA.
The username and password of the JIRA account wherein a new issue is created from the comment data.
Save the file as jiraExample.php.
Upload the file to your web server, for example, Apache Tomcat.
When enabling comments in your web portal report (Step 4 in Generating Reports), specify <web server address>/jiraExample.php (for example, example.com/jiraExample.php) as the value of the WebComment variable.