If you use multiple Legends in one diagram, you should specify a different set of adornment properties for Legend Items of each Legend. This way Legend Items of different Legends do not conflict when applied to the same element. For example, try using Fill Color in one Legend, and Icon in another. If you want to use the Icon property in multiple Legends, then specify different Icon Position on Shape/Path for Legend Items of each Legend. I addition, you can define Legend Item adornment by specifying the Pen Color, Line Width and Line Style properties describing the appearance of a shape border or path.
Legend Item priority
If you can not avoid conflicting Legend Items in a diagram or table, specify the Priority property for each Legend Item. It defines which Legend Item should be applied in case several Legend Items conflict.
Example
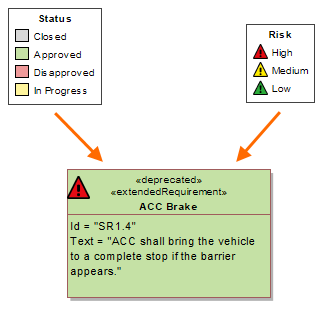
Let's say you want to use two legends in a Requirements Diagram: the Status Legend indicating the status of each Requirement and the Risk Legend showing the risk level of Requirements. It is likely that Legend Items from both Legends will be applied to the same Requirement. For example, a single Requirement can have both status and risk values specified. Let's analyze this specific use case by creating the Legends mentioned above and defining their Legend Item adornment properties so that Legend Items would not conflict when applied to the same Requirement:
- Open the desired Requirements Diagram.
- In the diagram, create a legend intended to show the status of Requirements and name the Legend Status.
- Create and define the Legend Items for the Status Legend by completing the following steps:
- Create four Legend Items indicating four possible Requirement status values and name them Closed, Approved, Disapproved, and In Progress.
- Open the Specification window of the first Legend Item.
- Specify the Legend Item adornment by selecting the desired Fill Color.
- Specify the Elements by Condition property by creating a Property Test operation and selecting the Status property value the Legend Item represents.
- Repeat the steps from b. to d. with the rest of the Legend Items.
- In the same diagram, create a Legend to indicate the risk level of Requirements and name the Legend Risk.
- Create and define the Legend Items for the Risk Legend by completing the following steps:
- Create three Legend Items indicating three possible Requirement risk levels and name them High, Medium, and Low.
- Open the Specification window of the first Legend Item.
Specify the Legend Item adornment by selecting the desired Icon and Icon Position on Shape.
Specifying Icon
When specifying the Icon property:
- Click
 to select an image from the Image Library of your modeling tool.
 - Click
 to select a custom image from the local file system.
 - Click
 to specify the URL of an image.
- Click
Specify the Elements by Condition property by creating a Property Test operation and selecting the Risk property value the Legend Item represents.
- Repeat the steps from b. to d. with the rest of the Legend Items.
If you followed the above steps, you have a Requirements Diagram with the Status and Risk Legends applied to it. The Legend Items of both Legends do not conflict when applied to the same shape, as shown below.