Projects can be added to Teamwork Cloud (TWCloud) in one of the following ways:
In order to do that, you need to log in to TWCloud first.
To create a project in TWCloud from scratch
- From the Collaborate menu, choose Projects. The Manage Projects dialog opens.
- In the Online Projects tab, click the New button. The New Server Project dialog opens.
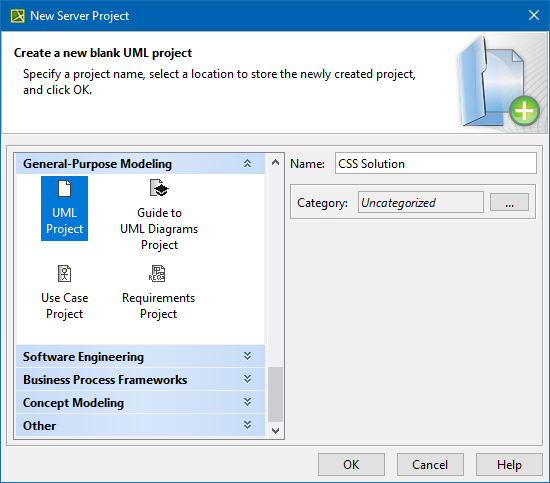
- In the Name box, type a new project name.
Next to the Category box, click
 and select the category in which you want to store your project.
- Click OK.
To add a local project to TWCloud
- Open the local project you want to add to TWCloud.
- From the Collaborate menu, choose Add Project to Server. The Add Project to the Server dialog opens.
- If you want to give the project a new name, type the name directly in the Name box when it is added to the server.
Next to the Category box, click
and select the category in which you want to store your project.- If you have some explanations or notes about this project, provide them in the Comment box.
- If the project has no used projects, or if it has some that you want to be added to the server, skip this step. If you don't want any of the used projects to be added, do the following:
- Click More in the Add Project to the Server dialog for more options.
- Click the Local Projects tab. The list of used local projects opens.
In the Action column of each local project that you don't want to add to the server, select Leave as Local Project.
If you exclude all or some of the used projects from the addition to TWCloud (see step #7), you can always link them to the project later.

You can disable the Maintain Mount Points of Used Projects option in the Add Project to the Server dialog to prevent the automatic creation of Mount relationships in your project.
- Click Add.

The project is now added to TWCloud.
When the project is added to the server:
- The title of the client application, e.g., MagicDraw, Cameo Systems Modeler, window displays#1 next to the project name. This is the initial project version number.

- The contents of the Model Browser are gray. The model is unlocked.
- If the project is added to the used projects, you can see them in the Model Browser under the root package and under Project Usages.
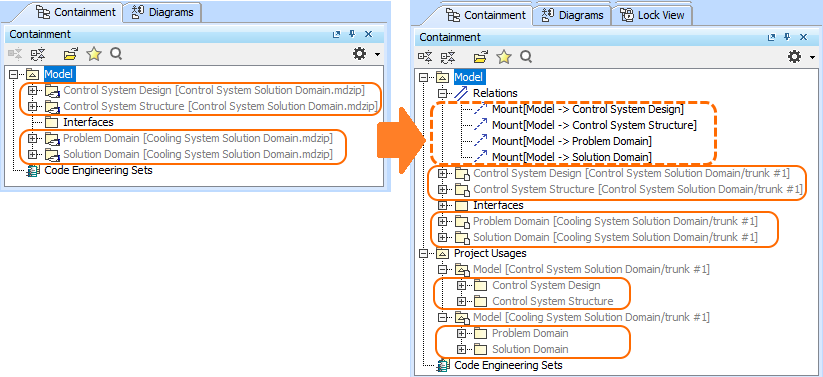
- To view the project, select Collaborate > Recent Server Projects.
Related pages