On this page
The Excel/CSV Sync Options dialog allows you to specify settings before syncing data between an Excel/CSV file and a table. You can select files for syncing and define syncing and mapping options in this dialog.
Opening the Excel/CSV Sync Options dialog
To open the Excel/CSV Sync Options dialog
- In the table toolbar, click
 and do one of the following:
- Select the Sync Options command.
- Select the Excel/CSV File > Select File. Click the Details button on the left bottom corner of the dialog.
The Excel/CSV Sync Options dialog opens.
Description of the Excel/CSV Sync Options dialog areas
The Excel/CSV Sync Options dialog consists of the following areas:
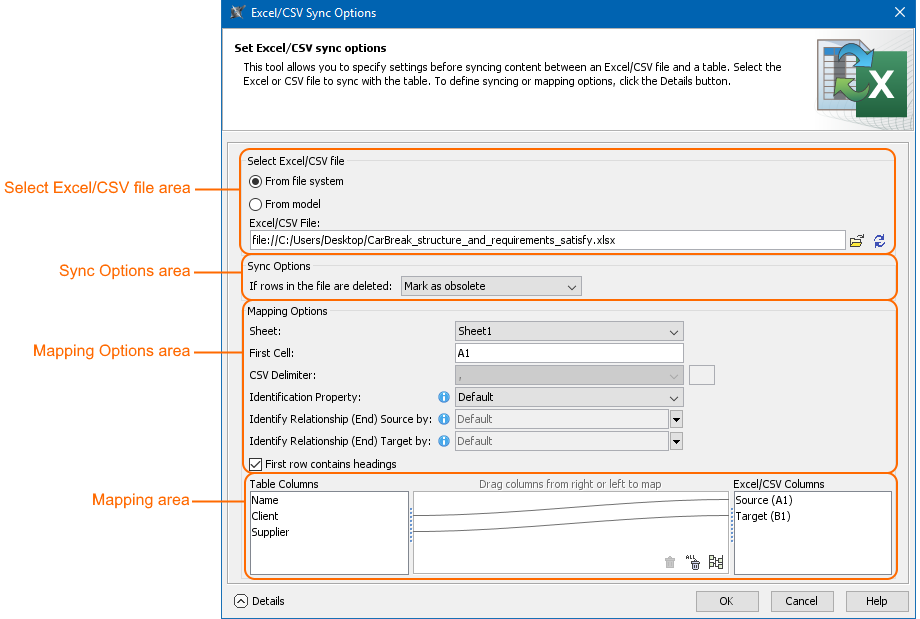
The main areas, highlighted in orange, in the Excel/CSV Sync Options dialog: select file, sync, mapping options, and mapping.
Select Excel/CSV file area
The Select Excel/CSV file area allows you to select the Excel or CSV file from your file system or from your model if the Excel or CSV file is attached to a project. How to attach the file to a project >
You can link only one Excel/CSV file with the same modeling tool table.
The Select Excel/CSV file area contains the buttons described in the following table.
| Button | Description |
|---|---|
| If you select From file system, the Open dialog opens. The selected file path is displayed in the Excel/CSV File field. |
| Refreshes the mapping area after changing the file. |
Sync Options area
The Sync Options area contains one option that allows you to specify the sync mechanism behavior when importing data to a table if rows in your file are deleted. All available values are described below.
| Sync option | Description |
|---|---|
| If rows in the file are deleted |
If some elements are read-only in Excel file, they cannot be deleted from the model.
|
Mapping Options area
The Mapping Options area allows you to specify mapping options. The following table lists all available options.
| Mapping option | Description |
|---|---|
| Sheet | Select the Excel file sheet you want to sync. The first sheet is selected by default. It is available only for Excel files. |
| First cell | Select the Excel file cell you want to start syncing from. The first cell filled with data is read by default. If the selected sheet is empty, it reads from the A1 cell. It is available only for Excel files. |
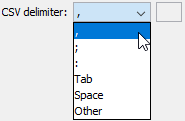
| CSV delimiter | Select the delimiter of the CSV file from the drop-down list. If you want to specify the custom delimiter in the next box, select Other. By default, the comma (,) is selected. |
| Identification Property | Select the property that identifies if the element already exists in the model. It allows to avoid element duplication. The Default value identify elements by their Name and requirements by their ID first. The rest of the values are the same as columns shown in the table of your model but only of Primitive data types. If the imported element Identification Property option value matches with an already-existing element property, the identified element properties are updated. |
| Identify Relationship (end) Source by: | This option is displayed only if any kind of direct relationship is selected as the Element Type option value in the Criteria area. Click Select the Default value to identify relationships by their name or id. Select <UNSPECIFIED > value to create the same relationship between the same elements. The mechanism identifies relationships according to the following rules:
|
| Identify Relationship (end) Target by: | This option is displayed only if any kind of direct relationship is selected as the Element Type option value in the Criteria area. Click Select the Default value to identify relationships by their name or id. Select <UNSPECIFIED > value to create the same relationship between the same elements. The mechanism identifies relationships according to the following rules:
|
| First row contains headings check box | Clear the check box if your Excel/CSV file does not contain headings. The check box is selected by default. |
Mapping area
The Mapping area allows you to manage mapping between modeling tool table columns and Excel/CSV table columns by creating new mappings, re-mapping, or deleting them:
- To create a new map or re-map one by one, drag columns from the left tree/right tree onto columns in the right tree/ left tree.
- To create a new map or re-map all columns in the ordinal position, click ![]() at the bottom of the mapping area.
at the bottom of the mapping area.
- To delete mapping one by one, select an appropriate map and click ![]() at the bottom of the mapping area.
at the bottom of the mapping area.
- To delete all mappings, click ![]() at the bottom of the mapping area.
at the bottom of the mapping area.
If you do not define your own mapping - that is, the mapping area is empty - the columns by default are mapped on the ordinal position.
The hashtag (#) column from the modeling tool table is not included in the mapping.
Related pages