On this page
This section shows how to work with columns in the table: selection, clearing values, hiding, reordering, adding, and removing columns.
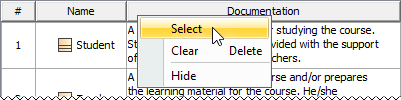
Selecting an entire column
To select an entire column
- Right-click the column header.
- From the shortcut menu, click the Select command.
Clearing values from an entire column
Data types
Only String, Boolean, Number, or Enumeration data types can be cleared from a cell.
To clear values from an entire column
- Right-click the column header.
- Do one of the following:
- From the shortcut menu, click the Clear command.
- Press Delete from the keyboard.
![]()
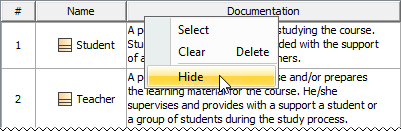
Hiding a column
To hide a column
- Select single or multiple cells, and from the shortcut menu, select Column > Hide.
- Right-click the column header to open the shortcut menu, and select the Hide command.
Reordering columns
To reorder columns
- Click the column header and drag it to the desired place. Only the first column cannot be moved.
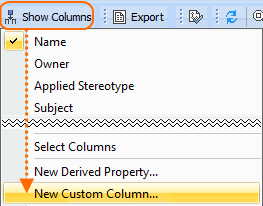
Adding and removing columns
To add or remove columns
- To open the available columns list:
- On the table toolbar, click the Columns to open the menu with common properties corresponding to element types that have been selected for the table.
- On the table toolbar, click Columns > Select Columns to open the dialog with all properties, including tags of stereotypes corresponding to selected element types.
Using the Select Columns dialog, you can choose to display the properties of the specified element type, as well as the properties that are subtypes of the specified element type.
- Do one of the following:
- Select the properties you want to see as columns in the table.
- Unselect the properties you do not want to see as columns in the table.
Adding and removing Custom Columns
Custom Columns allow you to create structured expressions the results of which are only visible in the table for which the Custom Column is created. If you prefer to create an expression that can be reusable in multiple tables, matrices, maps, and other locations where structured expressions are accepted, you need to create a Derived Property instead.
To add Custom Columns
In the toolbar, click Show Columns/Columns > New Custom Column.
In the Expression dialog, specify criteria for the Custom Column, and click OK.
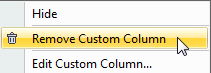
To remove Custom Columns
- Right-click the Custom Column header you want to remove.
- From the shortcut menu, select the Remove Custom Column command.
Specifying Custom Columns
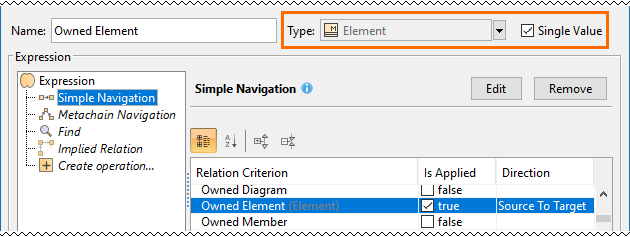
When you create a new Custom Column, you need to define the expression in the Expression dialog. Keep in mind:
- The Custom Column type and multiplicity (conveyed via the Single Value check box) are set automatically according to the specified expression once it is created or edited. You can also change them manually, however, they will only be applied if you make no modifications in the expression itself.
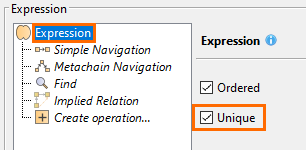
- The root union of a Custom Column structured expression has the Unique check box which you can select to have only one identical element count as the result displayed in the table column cell. By default, the check box is selected.
Additional information
- To learn more about specifying expressions, see the Specifying criteria for querying model page.
- You can also select to show implied relationships in the table. The procedure for specifying which relationships to display in the table is the same as described in Specifying dependency criterion.
Editing Custom Columns
To edit a Custom Column
- In a table, right-click the header of the desired Custom Column and select Edit Custom Column.
- In the Expression dialog, make desired changes and click OK.
Setting detailed column names
Column names in the table header are set automatically. They are element property names. You cannot change column names. If an element has some properties with the same name (for example, in associations or if a tag of stereotypes is selected as a column), detailed column names could provide more precise information.
To see detailed column names
- On the Options toolbar, click
 and then select Show Detailed Column Name.
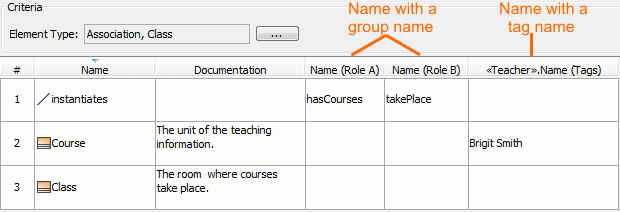
The group name (between brackets) to which the selected property belongs, and/or the stereotype name (just before the property name), will be displayed in the column heading.
The following diagram shows three different columns with the same name for the association element: Name, Name (Role of A), and Name (Role of B) and a column for the class element with the stereotype «Teacher». Name (Tags). If the command Show Detailed Column Name were not selected, there would be four columns with the same headings, i.e., Name.