A lifeline represents an individual participant in the Interaction. The lifeline represents only one interacting entity, symbolized by a rectangle.
The following steps show you how to work with a lifeline:
Assigning a type to a lifeline
To assign a type (classifier) to a lifeline, do one of the following:
- In the lifeline Specification window, in the Type property value, click the ... button, and in the open dialog, select the type. When you are finished, click OK.
- On the diagram, from the lifeline shortcut menu, select Type. In the open list, select the type.
- On the diagram, click a lifeline, and then, on the smart manipulator toolbar, click . In the open list, select the type.
- On the diagram, click a lifeline, and then press Ctrl+T. In the open list, select the type.
On the diagram, select a lifeline, and in the name area, type the “:” and the name of the type. Press Enter or click anywhere on the diagram. The type is created and assigned.
Type the “:”, press Ctrl+Space, or Ctrl+Backspace. In the open list, select the type.
- In the Containment tree, select an element and drag it to the lifeline shape.
Showing/hiding a base classifier
To hide/show a base classifier
- On the diagram, right-click the lifeline. From the shortcut menu, select the Show Classifier check box.
Displaying lifelines
You can display lifelines on the Sequence or Communication diagram in the following ways:
- By manually dragging lifeline elements from the Containment tree.
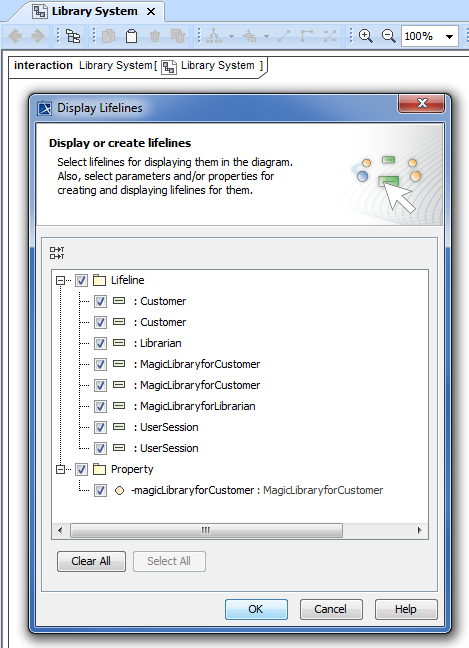
- By automatically using the Display Lifelines dialog.
There are two situations in which you can use the Display Lifelines dialog to automatically display lifelines:
To display lifelines when creating a new diagram
- When creating a new Sequence or Communication diagram for an existing classifier, the Display Lifelines dialog opens automatically.
- In the opened Display Lifelines dialog, select the lifelines you want to display, and click OK.
Selected lifelines are displayed on the diagram pane.
To display lifelines in a preexisting diagram
- Select the diagram pane.
- Open the Display Lifelines dialog by performing one of the following steps:
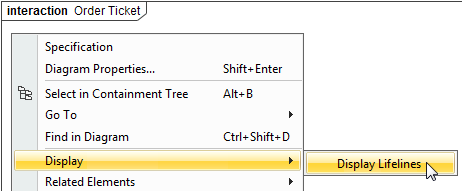
- From the diagram shortcut menu, select Display > Display Lifelines.
- On the diagram toolbar, click and select Display Lifelines.
- In the dialog, select the lifelines you want to display, and click OK.
Selected lifelines are displayed on the diagram pane.
Deeply nested parts
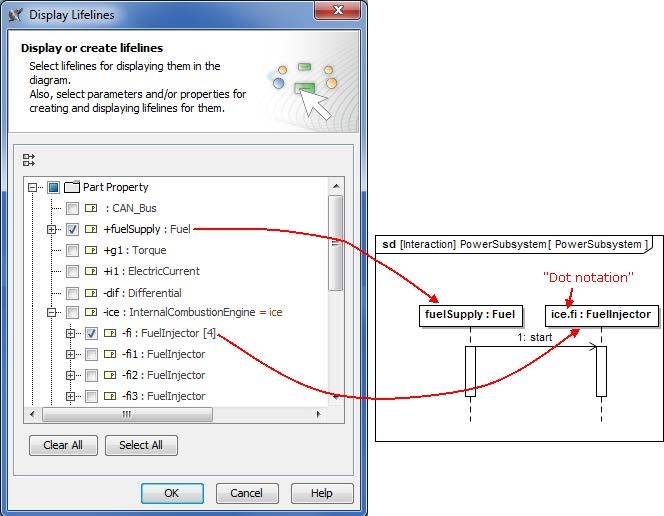
The “dot notation” is available for the lifelines. Now you can send messages directly to the deeply nested parts.
To display a deeply nested part
Create a Sequence diagram. The Display Lifelines dialog opens.
You can open the Display Lifelines dialog in the existing diagram. On the diagram pane, click the right mouse button and from the shortcut menu, select Related Elements > Display Lifelines.
Select a nested part you want to display.
Make sure that the nesting part is not selected, otherwise it will be displayed instead of the nested part.
Activation bars on lifelines
By default, when there is a message sent between lifelines in a sequence diagram, the lifelines are displayed with activation bars on them. However, you can hide the activation bars from the diagram.
To hide activation bars from lifelines in a sequence diagram
- Right-click on the diagram pane. From the shortcut menu, select Diagram properties.
- The Diagram properties of Sequence Diagram dialog opens. Deselect Show Activations check box, setting the value from true to false.
Sample model
The models used in the figures of this page is the Communication diagram and Sequence diagram sample models that comes with MagicDraw. To open this sample do one of the following:
- Download:
- communication diagram.mdzip.
- sequence diagram.mdzip. - Find in modeling tool:
- <modeling tool installation directory>\samples\diagrams\communication diagram.mdzip.
- <modeling tool installation directory>\samples\diagrams\sequence diagram.mdzip.


