On this page:
A trade study or trade-off study is the activity of a multidisciplinary team to identify the most balanced technical solutions among a set of proposed viable solutions (System Engineering Manual, Federal Aviation Administration, 2006).
A trade study is used to compare with a number of alternative solutions to see whether and how well they satisfy a particular set of criteria. Each solution is characterized by a set of measures of effectiveness (often abbreviated “moe’s”) that corresponds to evaluation criteria and has a calculated value or value distribution. The moe’s for a given solution is then evaluated using an objective function (often called a cost function or utility function), and the results for each alternative are compared to select a preferred solution.
Magic Model Analyst has built-in support for trade study analysis. The TradeStudyExamples sample model is used as a demonstration for trade study analysis through the following steps.
Creating a Trade Study Analysis Block
- Create a new Analysis Block in a Block Definition diagram (BDD), e.g., TradeStudyInstances.
- Add the main Block of the simulation context as the Part Property of the newly created Analysis Block, e.g., v : VehicleAnalysis.
- Create a constraint Block containing a constant expression for determining the best weighted value and related constraint parameters, e.g., Criteria.
Add the newly created constraint Block as a Constraint Property in the Analysis Block then right-click the Constraint Property and select Stereotype objectiveFunction.
- «objectiveFunction» is a special type of a constraint Block for determining all values of weighted alternatives in terms of weighted criteria.
- The specification of the constraint must be an equation with LHS = RHS, where LHS contains only one parameter to bind with TradeAnalysis::^score, and RHS can contain multiple parameters (bound with corresponding value properties) to evaluate as winner criteria.
- The output of «objectiveFunction» will be compared with previous weighted results. If an alternative is greater, it will be set as the winner (maximum value by default). However, if you want the minimum value, use a negative value, e.g., value = -distance.
Create alternatives by creating references properties typed by a Block of alternatives and apply «alternatives» to the newly created references properties, e.g., C : Caliper, R : Rotor, and P : Pad as shown in the figure below.
If you intend to use the Parameter Sweep functionality to automatically generate alternatives based on the specified ranges, skip this step.
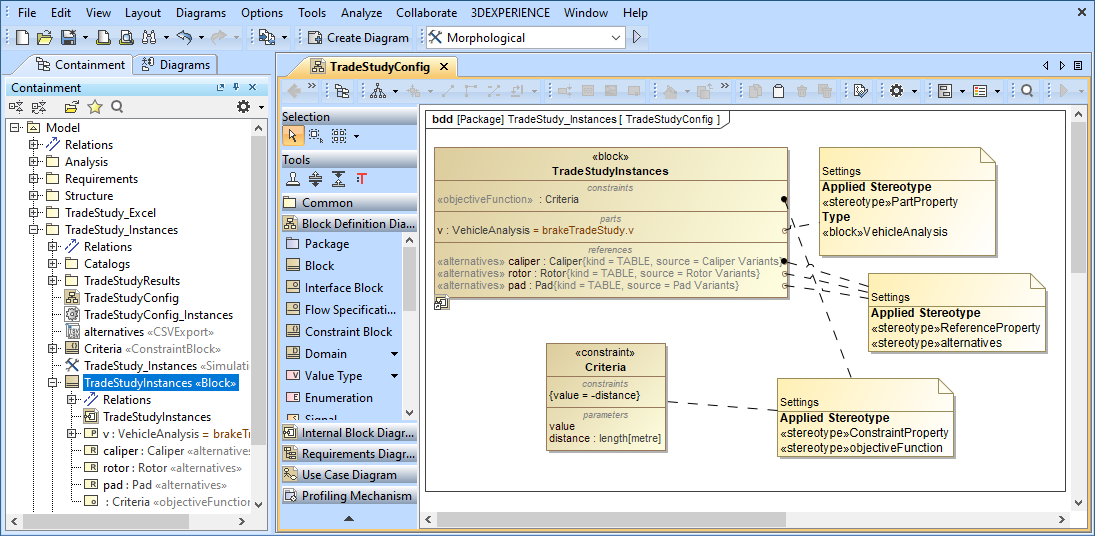
The structure of the Trade Study Analysis Block.
Inheriting the Analysis Block from the Trade Study Analysis Block
From the Containment tree under the MD Customization forSysML::analysis patterns::trade study package, drag TradeStudy «Block» «Analysis» into the Block Definition diagram (BDD) created in the previous section.
Note
The TradeStudy package is available in all SysML projects. If the MD Customization for SysML package is not visible, click
 in the Containment tree pane and select Show Auxiliary Resources.
- To inherit the TradeStudy «block» «Analysis», create a Generalization Relation from the TradeStudyInstances Block to TradeStudy «block» «Analysis» as shown in the figure below.

Inheriting the Analysis Block from the TradeStudy Block.
Creating an Internal Block diagram for alternatives kind = Instance Table
- Create an Internal Block diagram (IBD) of the TradeAnalysis Block. You must select Parts which have been set as «objectiveFunction» and «alternatives» to display. You must also display ^score (inherited property) in the diagram.
- Bind ^score with a Binding Connector to the LHS parameter of «objectiveFunction», e.g., ^score – value. You must also bind a value property of the main simulation context with a Binding Connector to the RHS parameter of «objectiveFunction», e.g., stoppingDistance – distance.
- Bind each «alternatives» with a Binding Connector to each Part property.
- For each «alternatives», source depends on kind through the Tags settings. If kind = TABLE, source must be an instance table which must be the same Classifier as the alternative property, as shown in the two figures below. However, sorting of rows in the table is not necessary.
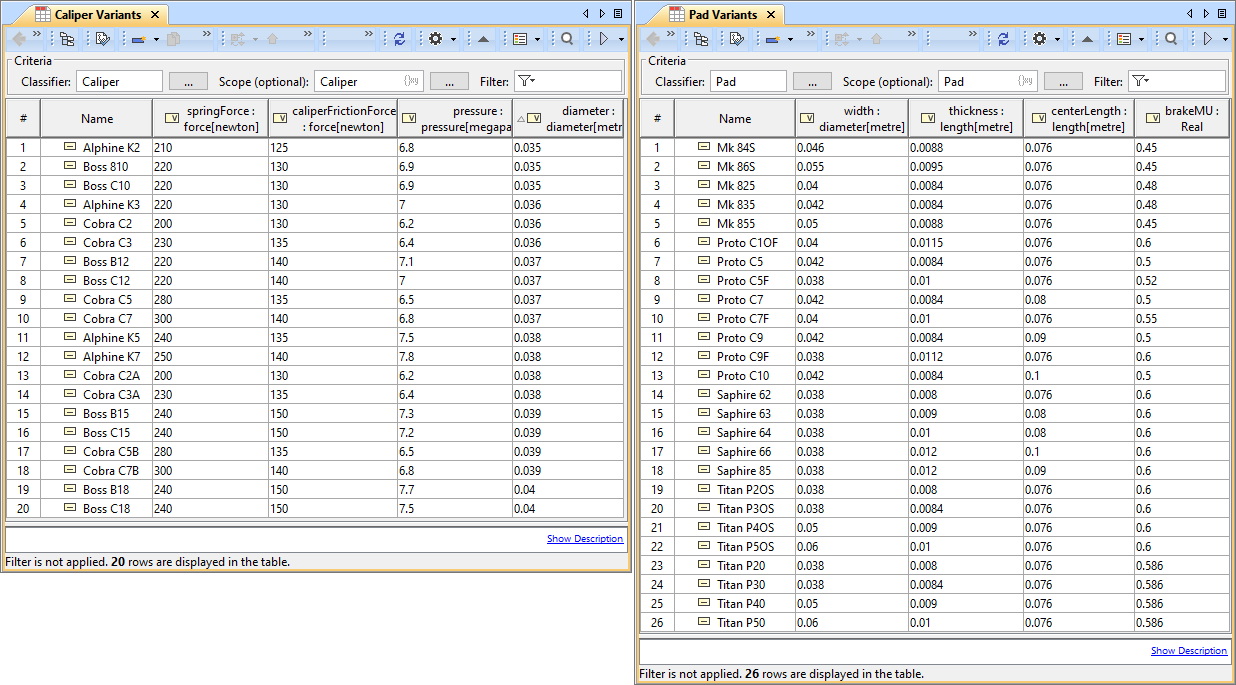
TABLE, kind of «alternatives», must be the same Classifier as the alternative property.
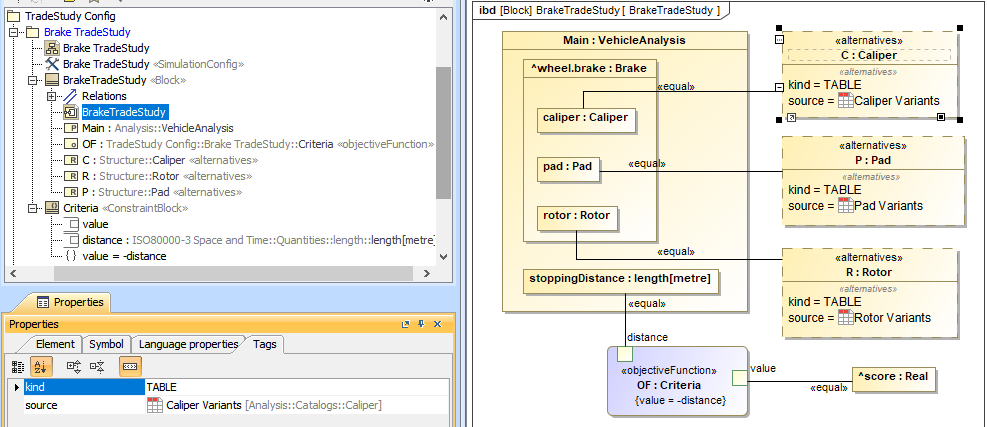
Binding of the TradeAnalysis Block in the Internal Block diagram (kind = TABLE).
Creating an Internal Block diagram for alternatives kind = Subtypes
- Refer to Step 1-3 about creating an Internal Block diagram for alternatives kind = Instance Table.
- For each «alternatives», source depends on kind through the Tags settings. If kind = SUBTYPES, source must be a parent Block of subtypes which must be the same type as the alternative property, as shown in the two figures below. Also, the parent Block will not be evaluated as well as any Blocks which have Is Abstract = true.
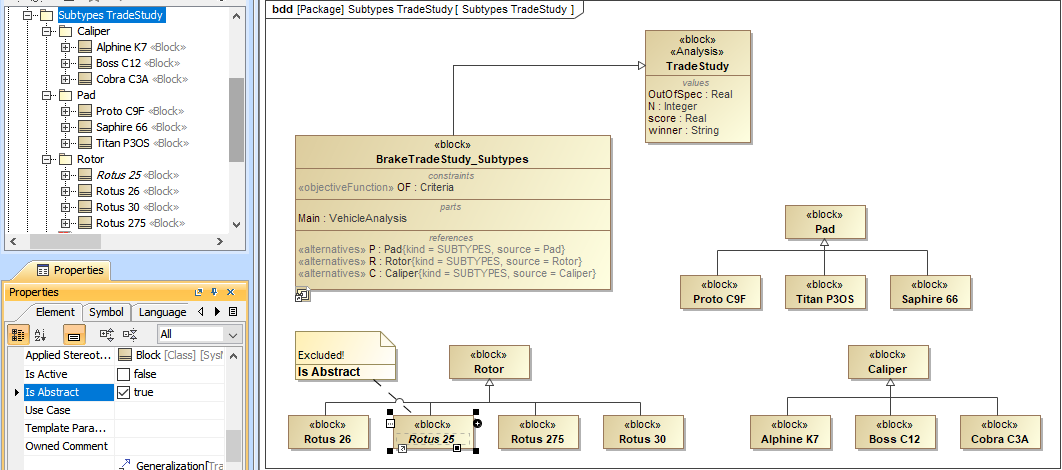
SUBTYPES, kind of «alternatives», must be the same type as the alternative property.
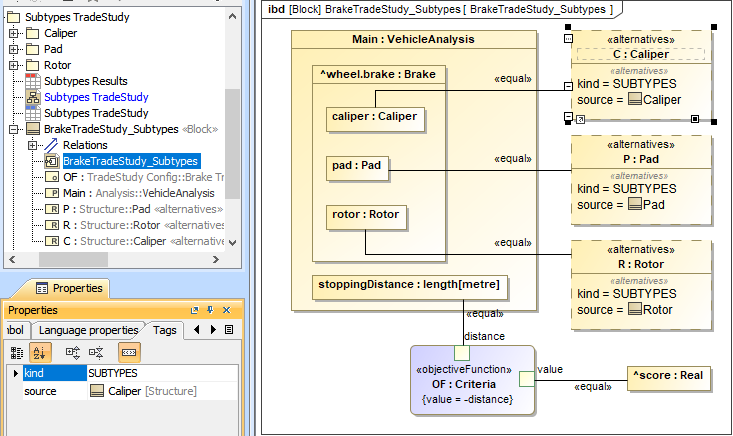
Binding of the TradeAnalysis Block in the Internal Block diagram (kind = SUBTYPES).
Creating an Internal Block diagram for alternatives kind = Excel
- Refer to Step 1-3 about creating an Internal Block diagram for alternatives kind = Instance Table.
- For each «alternatives», source depends on kind through the Tags settings. If kind = EXCEL, source must be either an Instance table linked to an Excel file («DiagramTableMapToDataSource» applied) or using an «ImportMap». Table columns or element properties must be correctly mapped to Excel/CSV columns as shown in the two figures below (see also Sync with Excel or CSV files). However, you do not need to use the Read from File command from the Publish Excel toolbar to load data into the table.
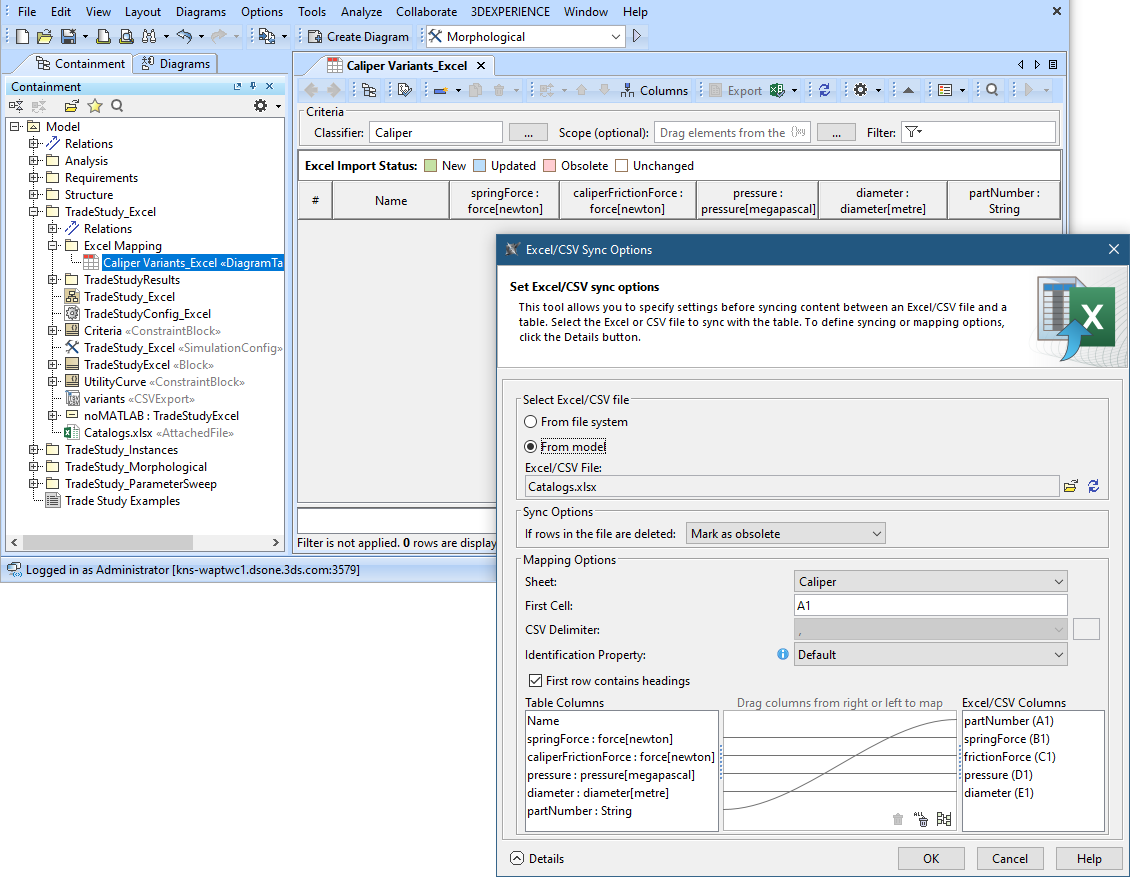
EXCEL, kind of «alternatives» with an Instance table linked to Excel file («DiagramTableMapToDataSource» applied) settings.
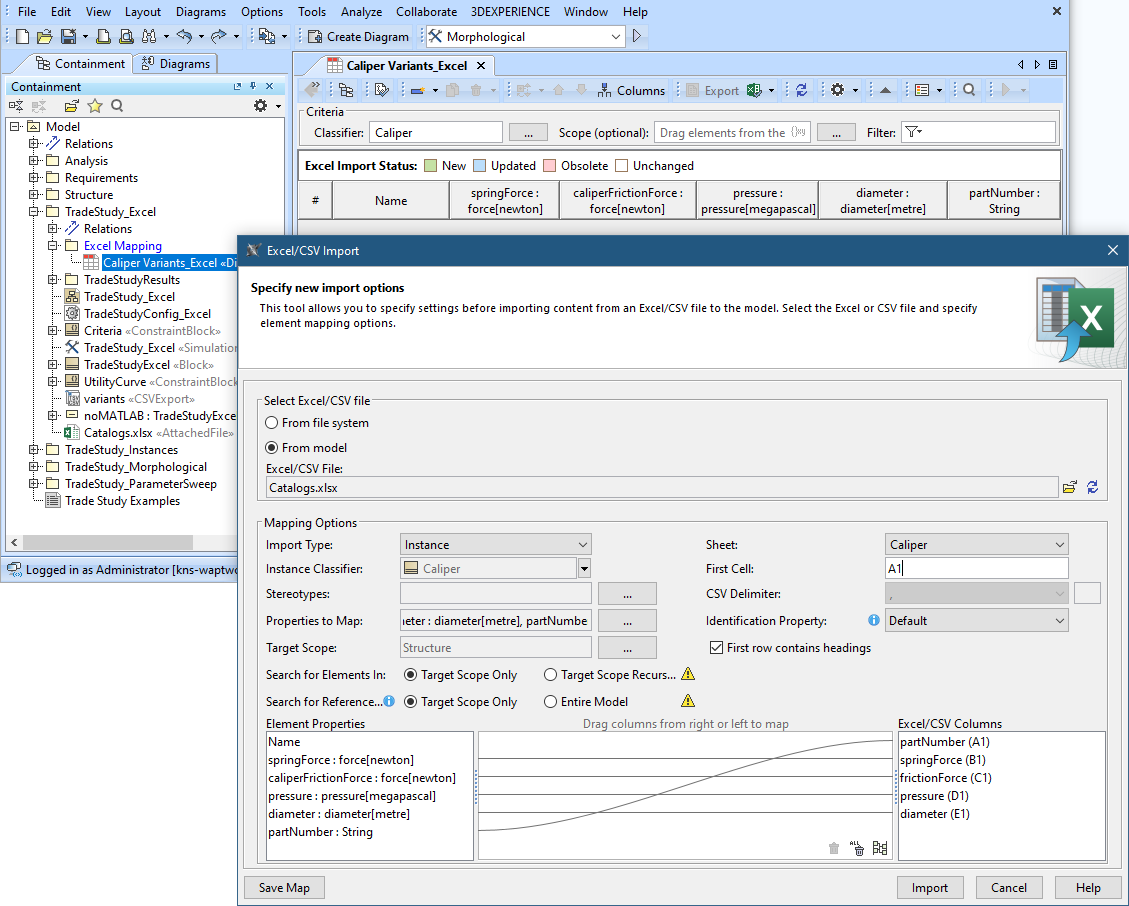
EXCEL, kind of «alternatives» with Import Map settings.
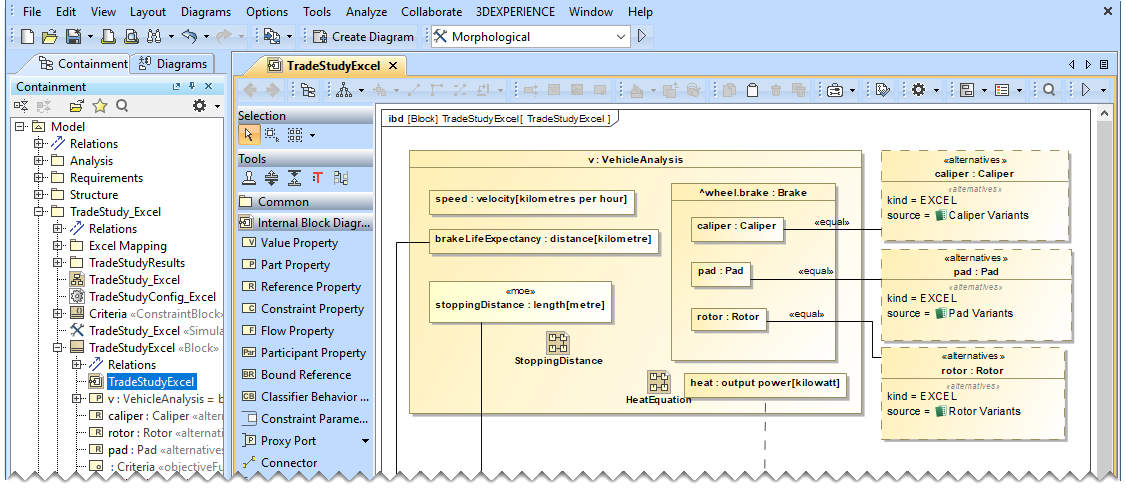
Binding of the TradeAnalysis Block in the Internal Block diagram (kind = EXCEL, source = Import Map).
Creating an Internal Block diagram for alternatives kind = Parameter Sweep
Parameter Sweep generates alternatives automatically based on the specified parameters. Once you create the Analysis Block, follow the steps below to model an Internal Block Diagram for using Parameter Sweep.
In this workflow, the TradeStudyExamples model is used as an example. You can find it in the <install_root>\samples\simulation directory.
To create an Internal Block Diagram for using Parameter Sweep
- Create an Internal Block diagram (IBD) for the Analysis Block (e.g, TradeStudyParameterSweep).
- In the diagram, display the Constraint Property of the Analysis Block with the «objectiveFunction» stereotype.
- In the diagram, display the ^score Value Property (inherited from the TradeStudy Block in the MD Customization for SysML profile).
- Connect the ^score Value Property to the LHS parameter of the Constraint Property (e.g., value) using a Binding Connector.
- Connect a Value Property of the main simulation context (e.g., stoppingDistance) to the RHS parameter of the Constraint Property (e.g., distance) using a Binding Connector.
- Create Bound References and use Binding Connectors to connect them to specific properties whose alternatives you want to generate in the specified ranges, e.g., outerDiameter : diameter[meter], thickness : length[meter], etc.
- Apply the «designVariable» stereotype to the newly created Bound References.
- Specify ranges for design variables using any of the four methods described in Parameter sweep.
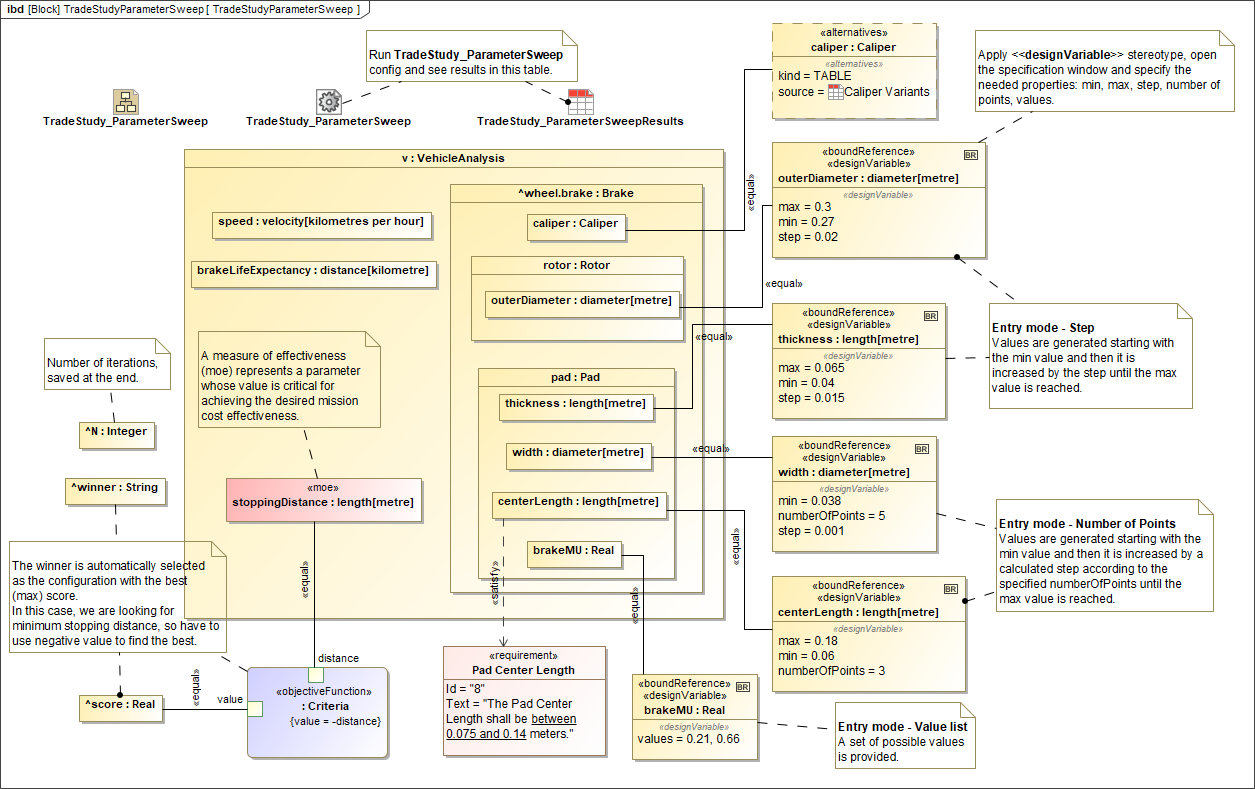
The Internal Block Diagram for the Analysis Block illustrating how to use different methods of Parameter Sweep.
Creating a Simulation Configuration diagram and configuring other settings
Create a Simulation Configuration diagram, add a SimulationConfig to the newly created diagram, and set the following tags:
- executionTarget: set to the TradeAnalysis Block, e.g., BrakeTradeStudy in the sample. executionTarget can be an instance of the TradeAnalysis Block so that the instance can be reconfigured.
resultLocation: a package/instance table must be specified so an instance with related information will be saved after running the simulation. The information includes N, OutOfSpec, score, winner, and other elements.
Note
- If you do not create a SimulationConfig and run the TradeAnalysis Block directly, TradeStudy will not be triggered, but the TradeAnalysis Block will be run as normal .
- If the executionTarget of a SimulationConfig is the TradeAnalysis Block, TradeStudy execution will override other executions, so Monte Carlo simulation will not be triggered even if numberOfRuns is more than 1.
- silent: set the silent tag accordingly to see the animation.
- rememberFailureStatus: use rememberFailureStatus when evaluating those weighted alternatives. Any alternatives violating any of the attached constraints/Requirements will not be considered as the winner, but they will be used in the calculation of OutOfSpec.
Tags neglected: to neglect animationSpeed, constraintFailureAsBreakpoint, UI, and autoStart.
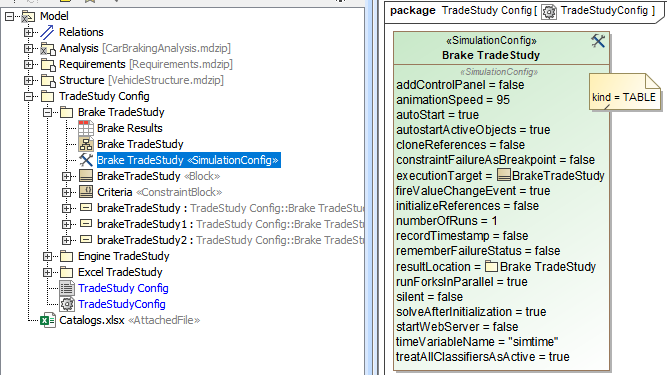
SimulationConfig created for other settings, e.g., executionTarget and resultLocation.
Running the SimulationConfig and reviewing results
- Run the SimulationConfig created in the previous section.
- When running the SimulationConfig, the information of TradeStudy will be printed in the Console pane. The Simulation pane will be disabled, but all warning/errors will be printed.
- There is a progress bar shown with the description of Executing alternative [n] of [total iterations] (Time elapsed: [time]), and the Cancel button that allows canceling Trade Study as shown in the figure below.
- Simulation automatically iterates all variants and instantiates all possible configurations in memory. For example, Brake which contains the combinations of Pad (26 instances), Caliper (20 instances), and Rotor (4 instances) will have 26 x 20 x 4 = 2,080 configurations.
The winner value on each iteration will be compared directly with the score value property.
Note
- The Starting Math Engine progress bar will be shown in this sample because MATLAB is used as the external evaluator. See also Integration with MATLAB.
- Any alternatives violating any of the attached constraints/Requirements will not be considered as the winner. They will be used in the calculation of OutOfSpec.
- The rememberFailureStatus of a SimulationConfig will be used when evaluating those alternatives.
- When more than one alternative has the same winning score of a Trade Study, a warning message is printed.
- In some cases, you can click Unlock in the Simulation pane to see execution details during the execution.
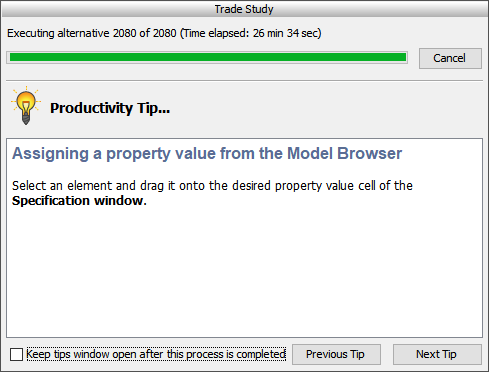
A progress bar shown with description and the Cancel button during the simulation.When the simulation is either completed or canceled, winning information will be printed on the Console pane in the following three lines as shown in the figure below.
The first line shows the number of iterations (completed/canceled) of all alternatives for executionTarget with elapsed time.
The second line displays the winning configuration from the winner string.
The third line is the winningscore from the ^score.
Note
The winner string is printed with the formats as follows:
AlternativeProperty.Name1 : StringKind [, AlternativeProperty.Name2 : StringKind, AlternativeProperty.Name3 : StringKind, …]where StringKind will apply the following rules, depending on kind of alternative:
kind=TABLE: then StringKind=InstanceName, e.g., P : Saphire 66, C : Alphine K7, R : Rotus 30.
kind=SUBTYPES: then StringKind=subtypesName, e.g., power : Diesel, support : Wheels, stopping : Brakes.
kind=EXCEL: then StringKind=#Row, e.g., R : #5, P : #21, C : #21, where Row is the number of Excel rows.
- kind=Parameter Sweep: then StringKind=GeneratedValue, e.g., brakeMU : 0.66, centerLength : 0.12, outerDiameter : 0.29, thickness : 0.04, width : 0.038.
The result instance will be saved at the location as specified in resultLocation of SimulationConfig. You can create an instance table, set a Classifier to the TradeAnalysis Block, and set Scope to the package of the results.
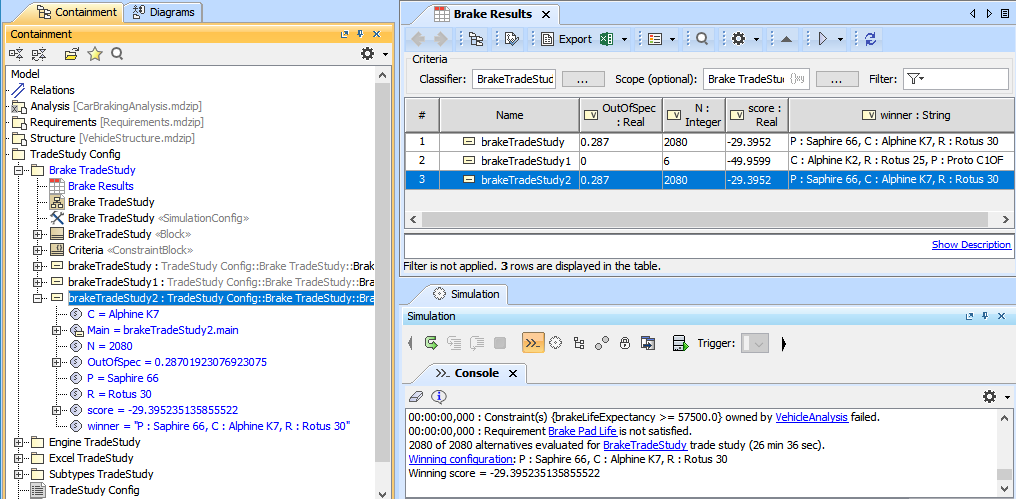
The TradeAnalysis result (in the last 3 lines) is printed on the Console pane, and the result instance is saved into a package and presented in the instance table.