If you choose to check elements for changes before synchronizing them, you can select which changes should be synchronized and whether they are synchronized from a modeling tool to Teamcenter or vice versa.
Synchronization rules
- If new elements have been created, synchronizing will create corresponding elements in Teamcenter or a modeling tool depending on where these elements are missing.
- If elements have been removed, synchronizing will remove corresponding elements from Teamcenter or a modeling tool depending on where these elements still exist. Note that when you remove items from a Teamcenter (when synchronizing or otherwise), they are not completely deleted from Teamcenter, but just removed from a certain folder or BOM.
- If a project has elements with changed properties, you can use the Conflict Dashboard dialog to select whether the changes are synchronized form a modeling tool to Teamcenter or vice versa
To check elements for changes and synchronize them
- Start your modeling tool and open the SysML project which you want to check for changes and synchronize.
- Connect to the Teamcenter server.
- Do one of the following:
- Click in the Containment tab toolbar of the model browser. This option checks changes for the entire project and allows to synchronize them.
- In the Teamcenter Active Workspace panel, select the item you want to check for changes and/or synchronize (i.e., scope) and click . This option checks changes only for the selected item (e.g., a folder) and the items it owns, and allows to synchronize them.
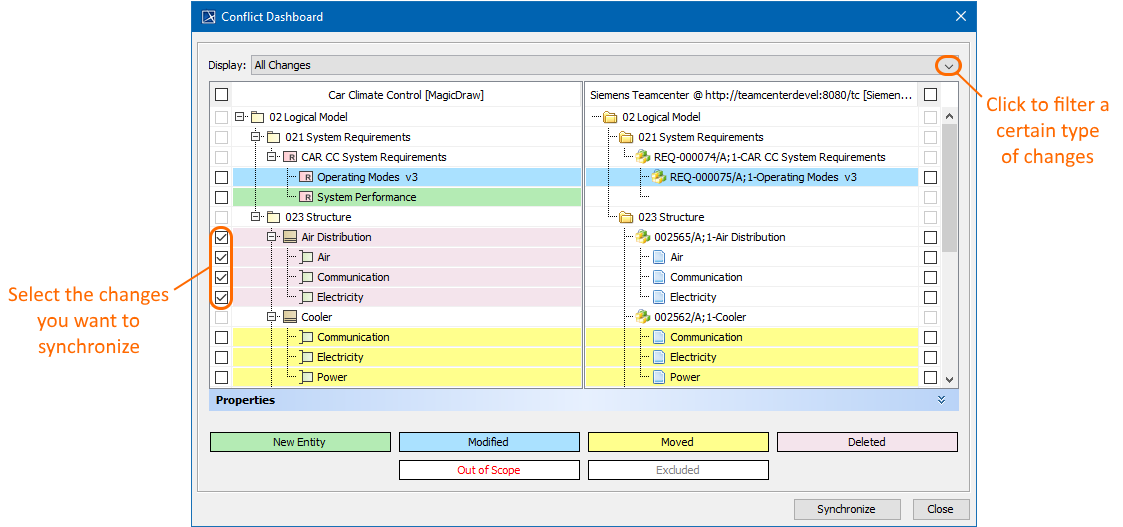
In the Conflict Dashboard dialog (shown below), view the changes between the elements in your modeling tool and items in Teamcenter.
Tips for using Conflict Dashboard
- In the Conflict Dashboard dialog, different types of changes are highlighted with different colors. The meaning of each color is specified on the bottom of the dialog.
- You can filter the changes of a specific type by clicking the Display drop-down box and selecting the desired type.
- If you have checked project for changes but do not want to synchronize them, simply close the Conflict Dashboard dialog. Otherwise, move to the next step.
Select the check boxes next to the changes you want to synchronize. If you want to synchronize the changes from your modeling tool to Teamcenter, select the changes on the left side of the dialog (the modeling tool side). If you want to synchronize the changes from Teamcenter to the modeling tool, select the changes on the right side of the dialog (the Teamcenter side).
- Click the Synchronize button.
- When you're asked if you want to continue, click Yes.
- Wait for the confirmation message indicating that synchronization is complete. Otherwise, move to the next step.
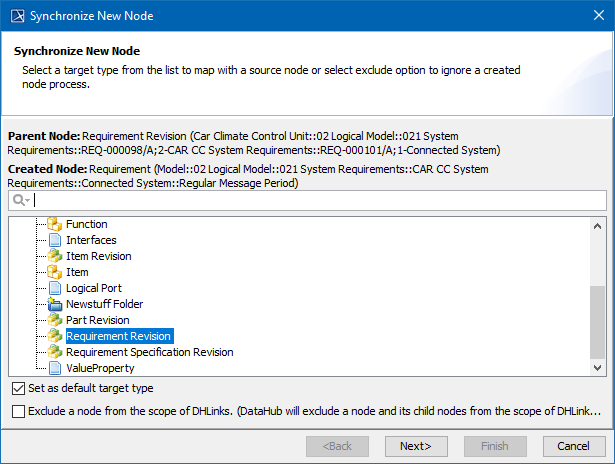
- If the Synchronize New Node dialog opens, a new element you need to map is created during synchronization. Select the type of the new element and click Next.
- If needed, map the properties of the new element:
- Click the Edit button.
- On the left side of the Synchronize New Node dialog, find the source element property you want to map.
- From the drop down list on the right side of the dialog, select the target element property you want to map to the source element property.
- Click the Finish button to exit the Synchronize New Node dialog.
When you get a confirmation message, the synchronization is complete.

