This page includes the following:
- Migrate the Cassandra database from Teamwork Cloud 18.x to version 19.0 SP1
- Migrate the UML meta-model in the database from UML version 2.5 to version 2.5.1
- Upgrade to TWCloud 19.0 SP1
- Update your server projects
Migrating Teamwork Cloud from an 18.x version to 19.0 SP1 is performed in two stages, migrating a database to version 19.0 SP1 using the database schema migration tool and migrating the UML Specification to version 2.5.1 using the UML migration tool.
After successfully migrating the database and UML Specification, you must update the projects to enable project editing. Upgrading your CEDW 18.3, TWCloud 18.4 or 18.5 to TWCloud 19.0 SP1 is also possible without migrating your database. If you do not need to keep your existing data, you can simply skip the migration steps and delete your database folder.
Warning: Check the schema version before upgrading TWCloud
Before upgrading your TWCloud, check if the schema of your current TWCloud is the same as that of TWCloud you are going to upgrade to. If both schema versions match, you can upgrade your TWCloud without the need to migrate your data. Otherwise, you need to migrate your data.
| TWCloud version | Schema version |
|---|---|
| 18.3 | 1 |
| 18.4 | 8 |
| 18.4 SP1 | 8 |
| 18.5 | 12 |
| 18.5 SP1 | 12 |
| 18.5 SP2 | 12 |
| 18.5 SP3 | 12 |
| 18.5 SP4 | 12 |
| 19.0 GA | 20 |
| 19.0 SP1 | 20 |
Migrating a Cassandra database
This section is only applicable if you are upgrading from a version lower than 19.0
This section outlines the steps to migrate your data from Teamwork Cloud 18.3-18.5 . If you already have existing data created in CEDW 18.3, TWCloud 18.4 or 18.5, you must migrate the data to a 19.0 compatible format before using Teamwork Cloud (TWCloud) 19.0 SP1. For each schema version change, you will have to use the relevant migration tool to migrate the schema. If upgrading from Schema version 12 (18.5 series), use the 19.0 migration tool to accomplish this. If migrating from Schema version 8, you will first have to use the 18.5 migration tool.
Before migrating the database, perform a cold backup per the procedure here. The migration tool is a .zip file that should be on the same download page as the TWCloud installer file. If your database has already been migrated, you should see a message informing you that the database is up to date.
Warning
If you start TWCloud 19.0 SP1 with the Cassandra database created in any previous versions of the server without migrating your data first, the TWCloud server will fail to start, and an error message similar to the following will appear in server.log:
ERROR 2017-10-17 16:25:27.317 Connection to Cassandra failed: Database version is version 18.5, expected 19.0 SP1. Please do the migration. [e]
ERROR 2017-10-17 16:25:27.317 Error while trying to activate CoreManagerComponent [e]
INFO 2017-10-17 16:25:27.324 Shutting down in 7 seconds [e]
The following instructions show how to migrate data from TWCloud 18.5 to TWCloud 19.0 SP1.
To migrate data from 18.5 to TWCloud 19.0 SP1
- Stop TWCloud if it is running.
- Confirm that Cassandra is up and running.
- Run the command, nodetool drain, to flush all memtables from the node to the SSTables on the disk.
C:\> cd "Program Files\apache-cassandra-3.11.2\bin"
C:\> nodetool drain
For more information about this command, click here: http://cassandra.apache.org/doc/latest/tools/nodetool/drain.html. - Stop Cassandra.
Back up the Cassandra database on your machine. You can back up the database by copying the stored database folder. You are required to back up the following default folders for each OS.
Windows: C:\Program Files\DataStax Community\data
Linux: /var/lib/cassandra/data (if you used the scripted installer, the data is located under /data)
Note
The location of your data is configured in cassandra.yaml, as specified by the data_file_directories parameter. Make sure that you back up the correct folder. Alternatively, you can use the backup and restore script, explained in Backup and restore data procedures. In this case, you must start Cassandra, since the script makes use of the nodetool utility which will connect to the running instance of Cassandra.
If your data is created in an earlier version than TWCloud 18.5, run the TWCloud 18.5 migrator. Otherwise, proceed to the next step.
- To upgrade your Cassandra version to 3.11-x, uninstall the old version and install Cassandra 3.11-x in this step.
- Start Cassandra and confirm that it is up and running.
Run the command, nodetool upgradesstables. This process may take a while.
For more information about this command, click here: http://cassandra.apache.org/doc/latest/tools/nodetool/upgradesstables.html
- Download the migration tool zip and extract the .zip file.
Run the migration tool for your operating system (migrator for Linux or migrator.exe for Windows).
Wait for the migration process to complete and the successful data migration message to appear.
- Upgrade your UML meta-model using the following instructions.
Migrating a UML meta-model in the database
This section is only applicable if you are upgrading from a version lower than 19.0
As of version 19.0, TWCloud uses the UML meta-model version 2.5.1. Therefore, you need to migrate the UML meta model in the database since earlier versions of TWCloud are using the UML meta-model version 2.5. This UML meta-model migration is necessary to continue working with old TWCloud projects in 19.0 SP1. If you do not migrate the UML meta-model prior to using TWCloud 19.0 SP1, the project will not load. You can download the migration tool to migrate the UML meta-model to version 2.5.1.
Warning
- The migration tool modifies the Cassandra database and may leave it in an incomplete migration state in the event of failure. To prevent data loss, create a backup your database before performing the UML migration. To find out more about backing up your data, see Backup and restore data procedures.
- If the Cassandra database has not been migrated to TWCloud 19.0 SP1 before running the migration tool, you will receive an error similar to the following "Cannot migrate. Database version is 18.5, expected 19.0 SP1. Please migrate to specified database version first."
You must complete the following prerequisites before migrating the UML meta-model in your database to version 2.5.1.
To migrate database to UML v2.5.1 follow these steps
- Stop TWCloud server if it is running.
- Make sure that Cassandra is up and running.
Run the UML migrator application (for Linux or for Windows).
- Open the Command Prompt (if using Windows) or Terminal window (if using Linux).
- Go to the migration tool directory.
- Launch the migrator UML application in the terminal with the following parameters
- Windows: Migrator -host 127.0.0.1 -port 9160
- Linux: ./Migrator -host 127.0.0.1 -port 9160
- Wait for the migration to complete. Upon successful migration, the following message appears: "Finished UML 2.5 -> 2.5.1 migration."
The parameters are:
- host is the Cassandra host name or ip address
- port is the Cassandra port (i.e. 9160)
- u is the Cassandra username (optional) (i.e. cassandra)
- pwd is the Cassandra password (optional) (i.e. cassandra)
- n is the cluster name (optional) (i.e. "Test cluster")
Upgrading to TWCloud 19.0 SP1
You must migrate your data prior to upgrading to TWCloud 19.0 SP1. If you do not need your existing data, you can skip the migration and simply delete the Cassandra database folder from your machine.
Location of your data
The location of your data is configured in cassandra.yaml, as specified by the data_file_directories parameter
To upgrade to TWCloud 19.0 SP1
Stop the Teamwork Cloud Services
- (Optional) Make a copy of the installation directory - this will leave a reference to the existing configuration, as well as a source for your signed certificates, if you are not using the self-signed certificates generated during the install.
Uninstall CEDW 18.3, TWCloud 18.4, 18.5 or 19.0 from your machine. Do not uninstall Cassandra.
- Install TWCloud 19.0 SP1 on Linux or on Windows.
- Start TWCloud.
Updating projects
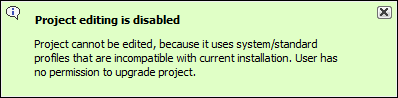
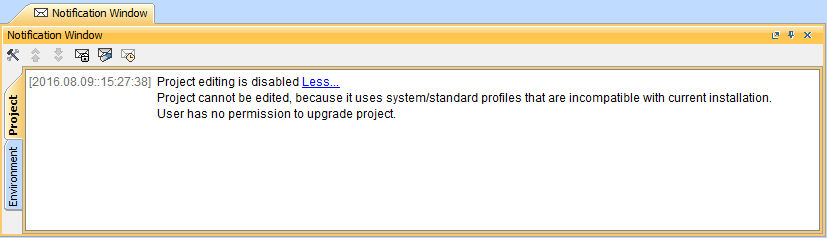
Once you have successfully migrated your data to TWCloud 19.0 SP1, you must update the projects in the database to the latest version. A project that is not updated will open in read-only mode. When you open the project in a modeling tool, the following notification appears. Project editing is disabled, because it uses system or standard profiles that are incompatible with the current installation.
You will not be able to edit a project until you update the project to the latest version.
You can see the same notification in the Notification Window. Therefore, you must update the project before you can edit it.
 Editing a project that has not been upgraded to the latest version is not allowed.
You need an Administer Resource permission to upgrade a project by migrating it. While the project is being migrated, other users are prevented from any modifications in that project. We highly recommend that the same person migrates all projects.
To migrate server projects automatically
- Start the modeling tool and log in to the TWCloud server.
- From the Collaborate menu, select Migrate Project to Version X. The dialog Migrate Project to Version X opens.
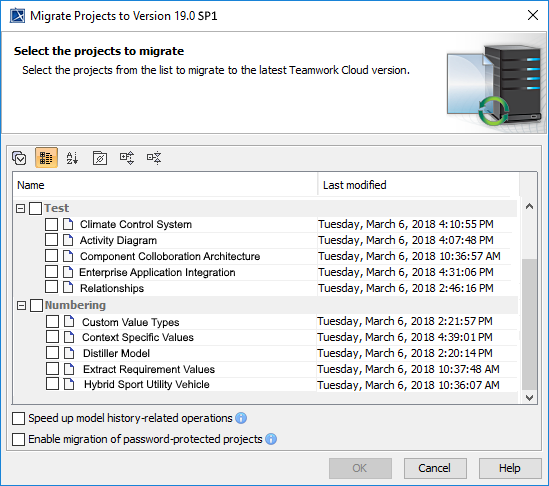
Select projects to migrate. Do one of the following:
- On the dialog toolbar, click
 to select all server projects.
 - Select category (or categories) to migrate with all projects inside it.
- Select separate projects from category (or categories).
- On the dialog toolbar, click
- Select Speed up model history-related operations if you want to upgrade caches of earlier model revisions on the server. This is useful if your modeling workflow includes using historical model versions; however, this option may slow down the migration process.
- Select Enable migration of password-protected projects to enable selection of password protected projects. During the migration process, you will be prompted to enter a password for each of the password-protected projects you selected to migrate. If this option is not selected, after the project migration is completed, you will get a message with a list of password-protected projects that were not migrated. You must migrate those projects manually.
After the project migration is completed, you will either get a message about successful project migration or a list of projects that were not migrated. You must migrate those projects manually.
To migrate server projects manually (for a user role with the Administer Resources permission)
- Start the modeling tool and log in to the TWCloud server.
- On the main menu, click Collaborate > Projects. The Manage projects dialog opens.
- Select a project and click Open. A dialog prompting you to update the System/Standard Profiles in the project to allow project editing opens.
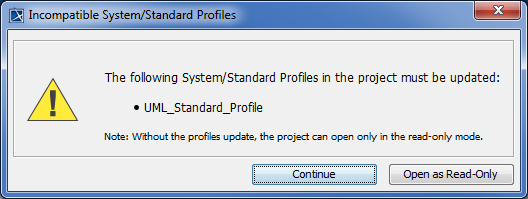
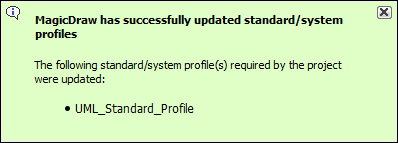
- Click Continue. After the System/Standard Profiles are updated, the modeling tool opens a notification showing that the model was successfully updated.
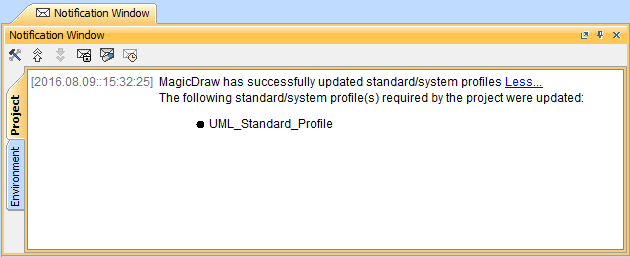
- You can also see the same notification in the Notification Window.
Note
You can open the Notification Window by pressing Ctrl + M or click Window > Notification Window.
Related pages
25 Comments
user-444a9
Mar 08, 2018"migrated... via following options:" Current formulation might imply that all the steps are mandatory
user-444a9
Mar 08, 2018upgrade option
user-444a9
Mar 08, 2018During the migration process, not in the beginning. A prompt for a password is given once a password-protected project is reached while iterating all of the projects selected for migration
user-444a9
Mar 08, 2018perhaps we should also mention at the end that if this option is not chosen, password-protected projects will have to be migrated manually
user-444a9
Mar 08, 2018Regarding the screenshot. In no way we should be using UI screenshots in official documentation with any random stuff in them. In this case, the project list should be in English with real-world project names. The same applies for the categories.
user-448c7
Mar 12, 2018user-448c7
Mar 12, 2018Usually we write login to the server, but please check with Kim.
user-448c7
Mar 12, 2018The dialog <dialog name> opens.
user-448c7
Mar 12, 2018Select projects to migrate. Do one of the following:
Projects shouldn't be capitalized.
user-448c7
Mar 12, 2018Please describe where the button is. On the dialog toolbar, click...
user-448c7
Mar 12, 2018This is nor UML element, nor GUI element, so it shouldn't be capitalized.
user-448c7
Mar 12, 2018I gues it should be earlier.
user-448c7
Mar 12, 2018the migration process
user-448c7
Mar 12, 2018The name of the image file should be meaningful.
user-448c7
Mar 12, 2018Please join to the one box having bullets inside.
user-448c7
Mar 12, 2018process,
user-448c7
Mar 12, 2018to migrate
user-448c7
Mar 12, 2018Please add a link to the page with a description of permission.
user-448c7
Mar 12, 2018Please check if the dialog description exist and link to the page.
user-448c7
Mar 12, 2018Please use the command names in bold instead of figures. The text is easier to read.
user-448c7
Mar 12, 2018The same as for Open.
user-448c7
Mar 12, 2018Please reconstruct the sentence.
user-448c7
Mar 12, 2018Please check if exists and add a link to the page having the procedure how to open a Notification window described.
user-66fe9
Mar 13, 2018I found this link Conversion messages , but I am not sure about it. Also in that page the Notification Window is named as a Messages window
user-448c7
Mar 13, 2018Conversion messages is not a right page. Please just add a notification smth like, If the window does not open automatically, press Ctrl+M or click Window > Notification Window.