On this page:
Scripts
The following are the authserver and installation script files used in this example:
This page shows how to install and configure Teamwork Cloud (TWCloud) Standard Edition on Centos 7.x, deployed on a single server. It also provides the configuration for installing the Teamwork Cloud node as well as the underlying Cassandra node on the same server.
TWCloud installation and configuration on Centos 7.x on a single server.
Recommended system requirements
System requirements are dictated by the intended deployment, taking into account the overall load which the environment will experience:
- Number of concurrent users
- Level of activity (commits) per day
- Overall number and size of the projects stored in Teamwork Cloud.
From a hardware perspective, the database (Cassandra) can be located on the same server as Teamwork Cloud, or separately into its own server. Storage requirements apply only to the node where the database is located.
Ideally, the node hosting Cassandra should be a physical node, since virtualization will introduce performance degradation. Nodes running Cassandra should have DAS SSD drives (direct-attached). The best performance will be achieved using NVMe drives. Presently, there are hardware limitations on the size of the NVMe drives as well as the number of NVMe drives that can be installed on a single machine. Therefore, if the expected number and size of projects are significant, SAS SSD backed by a high-speed caching controller may be a more suitable choice. For ease of maintenance and reduction of risk, we recommend that the volumes reside on RAID-1 or RAID-10. If RAID is not used, the failure of a drive will result in a downed node, impacting the enterprise. By opting to deploy on RAID volumes, a drive failure will not affect the application and will allow the replacement of a drive with zero downtime.
Nodes hosting Teamwork Cloud nodes can be virtualized without any issues, provided the host is not oversubscribed on its resources.
Nodes containing both Teamwork Cloud and Cassandra
- 96 -128 GB ECC RAM
- >=16 processor threads (such as E5-1660)
- >1TB SSD DAS storage
Nodes containing only Cassandra
- 48 - 64 GB ECC RAM
- >=8 processor threads (such as E5-1620)
- >1TB SSD DAS storage
Nodes containing only Teamwork Cloud
- 48 - 64 GB ECC RAM
- >=8 processor threads (such as E5-1620)
- >250GB storage
Multi-Node Clusters
Recommended minimum sizing stated above applies to each node in a multi-node cluster.
SAN Storage
SAN Storage should not be used on Cassandra nodes for data or commitlog volumes. This will result in severe performance degradation. There is absolutely no amount of SAN tuning and OS tuning which will mitigate this.
Minimum server system requirements
- 8 Processor Cores - i.e. Quad-Core Hyper-threaded CPU (such as Intel E3-1230 or faster).
- 32 GB RAM (Motherboard with an ECC RAM is always preferred on any critical database server).
- Linux (RedHat/CentOS 7), 64 bit. Scripts need to be modified slightly for Centos 6.6 - 6.9 due to different system daemon and firewall configurations.
Please read the article for additional server recommendations for capacity and performance in the following link:
https://docs.datastax.com/en/dse-planning/doc/planning/planningHardware.html
If you use SATA drives and not SSD's, we recommend using a caching controller with BBU, configured for write back. In this configuration (single node Cassandra), we recommend using RAID - the aforementioned link is referring to multi-node Cassandra deployments where native Cassandra replication is in place, which is not the case in this single node instance.
In order to install a full working environment, you would need:
- Oracle Java (Java Hotspot) 1.8.0_202
- A FlexNet License Server
- Cassandra 3.11.x
- Teamwork Cloud
Preparing the operating system
Partitioning the drives
Prior to installing Cassandra, it is important to understand how Cassandra utilizes disk space in order to properly configure the host server.
Disk space depends on usage, so it's important to understand the mechanism. The database writes data to disk when appending data to the commit log for durability and when flushing memtables to SSTable data files for persistent storage. The commit log has a different access pattern (read/writes ratio) than the pattern for accessing data from SSTables. This is more important for spinning disks than for SSDs.
SSTables are periodically compacted. Compaction improves performance by merging and rewriting data as well as discarding old data. However, depending on the type of compaction and size of the compactions, during compaction disk utilization and data directory volume temporarily increases. For this reason, be sure to leave an adequate amount of free disk space available on a node.
Cassandra's data and commit logs should not, under any circumstances, be placed on the drive where the operating system is installed. Ideally, a server would have 3-4 drives or partitions. The root partition, /, the OS partition, can be used as the target for the application. A /data partition should have adequate amounts of storage to accommodate your data. A /logs partition would hold your commit logs (and unless SSD, should be on a different physical disk than the data partition), and a /backup partition would be allocated for backups.
Please refer to http://cassandra.apache.org/doc/latest/operating/hardware.html for explanations on hardware selection.
In order to achieve adequate performance, separate partitions must be created, ideally on separate drives, to avoid i/o contention. We recommend 3 separate block devices (disks). The first block device will contain the operating system as well as a mount for the programs (/opt/local). The second block device (preferably SSD) will contain a mount point at /data - this is the device that must have high storage capacity for all of the data. The third block device will contain a mount point at /logs - this device should preferably be SSD but does not need to be of high capacity, since it will only store the commit logs, which are by default limited to 8GB (if using SSD, this can be a partition on the same block device as the data partition). All partitions should be formatted using the XFS file system, and there must not be a swap partition. The /backup partition can be a mount on a shared storage device, and should not be on the same physical drive as the /data partition.
The following is an example of the contents of /etc/fstab after partitioning, where the partitions were created using LVM (without a mount for the /backup partition).
#
# /etc/fstab
# Created by anaconda on Tue May  2 16:31:05 2017
#
# Accessible filesystems, by reference, are maintained under '/dev/disk'
# See man pages fstab(5), findfs(8), mount(8) and/or blkid(8) for more info
#
/dev/mapper/cl_twccentos7-root /                       xfs     defaults        0 0
/dev/mapper/cl_twccentos7-data /data                   xfs     defaults        0 0
/dev/mapper/cl_twccentos7-logs /logs                   xfs     defaults        0 0
/dev/mapper/cl_twccentos7-opt_local /opt/local         xfs     defaults        0 0
- Disk 1 will contain the following partitions: /opt/local (40GB) and / (rest of the drive capacity).
- Disk 2 (the disk with the highest capacity) will contain the /data partition - as a minimum, we recommend 250GB. Due to the way compactions are handled by Cassandra, in a worst-case scenario up to 50% of headroom may be needed.
- Disk 3 will contain the /logs partition (at least 10 GB).
- You should also create an additional mount for backups. Unlike the data and commit log partitions, which should be on SSD storage, this mount can be of any type (including centralized storage such as a SAN or NAS). It should have at least the same capacity as the /data partition.
The aforementioned partitioning scheme is an example. Internal security protocols in your organization may dictate that other directories not be located in the main partition. During the installation, all applications will be installed in /opt/local. Cassandra will install by default in /var/lib. Application logs will be written to /home/twcloud.
Installing Oracle Java (Option 1)
From the Java version list, please check that the recommended Oracle JVM version is compatible with the TWCloud version you are using. In order to consolidate all of the installed applications in a single location, we will be installing them under /opt/local/java. To facilitate deployment, you may deploy using the associated script (install_java_202.sh). Oracle no longer allows direct download of their JDK, so it must be downloaded offline and placed in the same location as the install scripts. The installation script extracts it into the proper location, invokes the alternative command to point the system to this instance (you may need to select it when prompted), and creates entries in /etc/environment. Upon completing the installation, issue the following command:
java -version
You should receive output such as the following:
java version "1.8.0_202"
Java(TM) SE Runtime Environment (build 1.8.0_202-b08)
Java HotSpot(TM) 64-Bit Server VM (build 25.202-b08, mixed mode)
If properly installed, you will see Java identified as Java HotSpot(TM)
#!/bin/bash
echo "=========================================="
echo "Installing Oracle Java 1.8.0_202"
echo "=========================================="
echo ""
echo "  Oracle Java can no longer be downloaded directly due to new authentication requirements"
echo ""
echo "  After manually downloading jdk-8u202-linux-x64.tar.gz, copy it to this directory"
echo ""
echo "  Latest version is available from https://www.oracle.com/java/technologies/javase/javase-jdk8-downloads.html"
echo ""
echo "  Archive downloads available from https://www.oracle.com/java/technologies/javase/javase8-archive-downloads.html"
echo ""
read -p -"Press any key to continue, Ctl-C to exit ...: " -n1 -s
echo ""
echo "=========================================="
sudo mkdir -p /opt/local/java
sudo tar xzf jdk-8u202-linux-x64.tar.gz -C /opt/local/java
cd /opt/local/java/jdk1.8.0_202/
sudo alternatives --install /usr/bin/java java /opt/local/java/jdk1.8.0_202/bin/java 2
sudo alternatives --config java
sudo alternatives --install /usr/bin/jar jar /opt/local/java/jdk1.8.0_202/bin/jar 2
sudo alternatives --install /usr/bin/javac javac /opt/local/java/jdk1.8.0_202/bin/javac 2
sudo alternatives --set jar /opt/local/java/jdk1.8.0_202/bin/jar
sudo alternatives --set javac /opt/local/java/jdk1.8.0_202/bin/javac
sudo echo 'JAVA_HOME=/opt/local/java/jdk1.8.0_202' > /etc/environment
sudo chown -R root:root /opt/local/java/jdk1.8.0_202
Installing OpenJDK 8 (Option 2)
Teamwork Cloud can also operate with OpenJDK. You can install OpenJDK using the script below.
#!/bin/bash
echo "Install OpenJDK 1.8"
yum -y install java-1.8.0-openjdk
Installing the FlexNet server (lmadmin)
A FlexNet license server is required for Teamwork Cloud to operate. It can be installed on the same system, or on a separate machine. The automated deployment script (install_flex_centos7.sh) downloads all required components, deploys the server, creates the systemctl service entry to control it, and creates the necessary firewall rules to allow the required traffic. The firewall rules are created for both the internal and public zones, and the script may require modification depending on which zone the interface is located in. Additionally, if the firewall is not running when the installation script is executed, the rules will not be created. The script creates a user, lmadmin, which runs the lmadmin service. The FlexNet server requires the Redhat LSB core files as well as the ld-linux library in order to execute. The script is configured for Centos 7, but can be modified for a different version. In order to identify which LSB Core library is required, the following command can be issued:
sudo yum provides /lib/ld-lsb.so.3
The application should be installed in /opt/local/FNPLicenseServerManager (the installer's default location is /opt/FNPLicenseServerManager - so make sure that you change the location when prompted). All other default values presented by the installer should be accepted.
After the lmadmin server has been installed it can be started by issuing the command:
sudo systemctl start lmadmin
To check if the service is running, issue the following command:
sudo systemctl status lmadmin
If the service failed to start, it is often because the built-in web server cannot resolve the hostname. To check if this is the case, issue the following commands:
cd /opt/local/FNPLicenseServerManager/logs
tail web.log
You will see output similar to the following:
[Tue May 02 18:43:27 2017] [alert] (EAI 2)Name or service not known:
mod_unique_id: unable to find IPv4 address of "yourhostname"
Configuration Failed
Where yourhostname is the name of the host. If this is the case, you will need to edit the /etc/hosts file and add an entry so the webserver can resolve the host. The line will be similar to the following:
192.168.130.10 yourhostname
#!/bin/bash
echo "==============="
echo "Installing wget"
echo "==============="
yum install -y wget
echo "=================="
echo "Installing lmadmin"
echo "=================="
echo "Creating temporary directory for install anywhere"
IATEMPDIR=$(pwd)/_tmp
export IAEMPDIR
mkdir $IATEMPDIR
getent group lmadmin >/dev/null || groupadd -r lmadmin
getent passwd lmadmin >/dev/null || useradd -d /home/lmadmin -g lmadmin -m -r lmadmin
yum install -y ld-linux.so.2
LSB=$(yum provides /lib/ld-lsb.so.3 | grep lsb-core | tail -1 | cut -f 1 -d ' ')
yum install -y $LSB
echo "lmadmin ALL=(ALL) NOPASSWD:ALL " >> /etc/sudoers
# If Web GUI to Flex licensing is not a must - lmgrd can be used, can be placed in rc.local to startup on boot
# usage - ./lmgrd -c PATH_TO_KEY_FILE -l PATH_TO_LOG_FILE
# RW rights needed to both files
echo "==========================================================="
echo "Getting Linux 32-bit IPv6 version 11.17 "
echo "==========================================================="
wget https://d1g91r27pzl568.cloudfront.net/Cameo_daemon/FlexNet_11_17/linux32/cameo.zip
unzip cameo.zip
chmod +x cameo
echo "========================================"
echo "Getting Linux 32-bit lmgrd version 11.17"
echo "========================================"
wget https://d1oqhepk9od1tu.cloudfront.net/Flex_License_Server_Utilities/v11.17.0/linux32/lmgrd.zip
unzip lmgrd.zip
chmod +x lmgrd
echo "======================================"
echo "Making flex log file named FlexLog.log"
echo "======================================"
touch FlexLog.log
chmod 664 FlexLog.log
echo "=========================================="
echo "Getting Linux 32-bit lmadmin version 11.17"
echo "=========================================="
wget https://d1oqhepk9od1tu.cloudfront.net/Flex_License_Server_Utilities/v11.17.0/linux32/lmadmin-i86_lsb-11_17_0_0.bin
chmod +x lmadmin-i86_lsb-11_17_0_0.bin
echo "========================================="
echo "Executing lmadmin version 11.16 installer"
echo "IMPORTANT: Install into directory /opt/local/FNPLicenseServerManager"
echo ""
echo " Note:  Accept all defaults for script to work properly!!!"
echo ""
read -p -"Press any key to continue ...: " -n1 -s
echo "=========================================="
./lmadmin-i86_lsb-11_17_0_0.bin -i console -DUSER_INSTALL_DIR=/opt/local/FNPLicenseServerManager
mkdir -p /opt/local/FNPLicenseServerManager/licenses/cameo/
cp cameo /opt/local/FNPLicenseServerManager/cameo
mv cameo /opt/local/FNPLicenseServerManager/licenses/cameo/cameo
mv lmgrd /opt/local/FNPLicenseServerManager/lmgrd
mv FlexLog.log /opt/local/FNPLicenseServerManager/FlexLog.log
chown -R lmadmin:lmadmin /opt/local/FNPLicenseServerManager/
chmod +x /opt/local/FNPLicenseServerManager/lib*
cp /opt/local/FNPLicenseServerManager/lib* /usr/lib/
echo "======================"
echo "Opening firewall ports"
echo "======================"
FWZONE=$(firewall-cmd --get-default-zone)
cat <<EOF > /etc/firewalld/services/lmadmin.xml
<?xml version="1.0" encoding="utf-8"?>
<service version="1.0">
    <short>lmadmin</short>
    <description>lmadmin</description>
    <port port="8090" protocol="tcp"/>
    <port port="1101" protocol="tcp"/>
</service>
EOF
sleep 30
firewall-cmd --zone=public --remove-port=8090/tcp --permanent &> /dev/null
firewall-cmd --zone=public --remove-port=1101/tcp --permanent &> /dev/null
firewall-cmd --zone=public --remove-port=27000-27009/tcp --permanent &> /dev/null
firewall-cmd --zone=internal --remove-port=8090/tcp --permanent &> /dev/null
firewall-cmd --zone=internal --remove-port=1101/tcp --permanent &> /dev/null
firewall-cmd --zone=internal --remove-port=27000-27009/tcp --permanent &> /dev/null
firewall-cmd --zone=$FWZONE --add-service=lmadmin --permanent
firewall-cmd --reload
IP_ADDRESS=$(ip route get 1 | awk '{print $NF;exit}')
HOSTNAME=$(hostname)
echo "$IP_ADDRESS     $HOSTNAME" >> /etc/hosts
echo "=========================================="
echo "Creating systemd service - lmadmin"
echo "=========================================="
echo "[Unit]" > /etc/systemd/system/lmadmin.service
echo "Description=Flexnet License Daemon" >> /etc/systemd/system/lmadmin.service
echo "After=network.target network.service" >> /etc/systemd/system/lmadmin.service
echo "" >> /etc/systemd/system/lmadmin.service
echo "[Service]" >> /etc/systemd/system/lmadmin.service
echo "User=lmadmin" >> /etc/systemd/system/lmadmin.service
echo "WorkingDirectory=/opt/local/FNPLicenseServerManager/" >> /etc/systemd/system/lmadmin.service
echo "ExecStart=/opt/local/FNPLicenseServerManager/lmadmin -allowStopServer yes" >> /etc/systemd/system/lmadmin.service
echo "Restart=always" >> /etc/systemd/system/lmadmin.service
echo "RestartSec=30" >> /etc/systemd/system/lmadmin.service
echo "Type=forking" >> /etc/systemd/system/lmadmin.service
echo "" >> /etc/systemd/system/lmadmin.service
echo "[Install]" >> /etc/systemd/system/lmadmin.service
echo "WantedBy=multi-user.target" >> /etc/systemd/system/lmadmin.service
echo "" >> /etc/systemd/system/lmadmin.service
chown root:root /etc/systemd/system/lmadmin.service
chmod 755 /etc/systemd/system/lmadmin.service
systemctl daemon-reload
systemctl enable lmadmin.service
echo "Removing installanywhere temporary directory"
rm -fr $IATEMPDIR
echo "=========================================="
echo "lmadmin service installation complete"
echo "  usage: systemctl start|stop lmadmin"
echo "=========================================="
Installing Apache Cassandra 3.11.x
The deployment script for Cassandra removes Datastax Community Edition 2.2.x as well as OpsCenter and the Datastax Agent (which are not compatible with Cassandra 3.x), downloads and installs Cassandra the Cassandra tools from the Apache Software Foundation repository, and creates the necessary firewall rules to allow proper operation both for a single node or a cluster installation. To install, execute the installation script (install_cassandra_3_11_centos7.sh).
#!/bin/bash
echo "=========================================="
echo "Installing Apache Cassandra 3.11.x"
echo "=========================================="
echo "Removing Datastax Community Edition"
yum remove -y datastax-agent
yum remove -y opscenter
yum remove -y cassandra22-tools
yum remove -y cassandra22
yum remove -y dsc22
rm -f /etc/yum.repos.d/datastax.repo
echo "Creating Apache Cassandra Repository File"
echo "[cassandra]" > /etc/yum.repos.d/cassandra.repo
echo "name=Apache Cassandra" >> /etc/yum.repos.d/cassandra.repo
echo "baseurl=http://www.apache.org/dist/cassandra/redhat/311x/" >> /etc/yum.repos.d/cassandra.repo
echo "gpgcheck=1" >> /etc/yum.repos.d/cassandra.repo
echo "repo_gpgcheck=1" >> /etc/yum.repos.d/cassandra.repo
echo "gpgkey=https://www.apache.org/dist/cassandra/KEYS" >> /etc/yum.repos.d/cassandra.repo
yum install -y epel-release
yum install -y cassandra
yum install -y cassandra-tools
yum install -y jemalloc
chkconfig --add cassandra
chkconfig cassandra on
echo "======================="
echo "Configuring firewall"
echo "======================="
FWZONE=$(firewall-cmd --get-default-zone)
echo "Discovered firewall zone $FWZONE"
cat <<EOF | tee /etc/firewalld/services/cassandra.xml
<?xml version="1.0" encoding="utf-8"?>
<service version="1.0">
    <short>cassandra</short>
    <description>cassandra</description>
    <port port="7000" protocol="tcp"/>
    <port port="7001" protocol="tcp"/>
	<port port="9042" protocol="tcp"/>
	<port port="9160" protocol="tcp"/>
	<port port="9142" protocol="tcp"/>
</service>
EOF
sleep 5
firewall-cmd --zone=$FWZONE --remove-port=7000/tcp --permanent  &> /dev/null
firewall-cmd --zone=$FWZONE --remove-port=7001/tcp --permanent  &> /dev/null
firewall-cmd --zone=$FWZONE --remove-port=7199/tcp --permanent  &> /dev/null
firewall-cmd --zone=$FWZONE --remove-port=9042/tcp --permanent  &> /dev/null
firewall-cmd --zone=$FWZONE --remove-port=9160/tcp --permanent  &> /dev/null
firewall-cmd --zone=$FWZONE --remove-port=9142/tcp --permanent  &> /dev/null
firewall-cmd --zone=$FWZONE --add-service=cassandra --permanent
firewall-cmd --reload
echo "====================================================="
echo "Changing ownership of data and commit log directories"
echo "====================================================="
mkdir /data &> /dev/null
mkdir /logs &> /dev/null
chown cassandra:cassandra /data &> /dev/null
chown cassandra:cassandra /logs &> /dev/null
echo "====================================================="
echo "Making configuration file changes"
echo "====================================================="
IP_ADDRESS=$(ip route get 1 | awk '{print $NF;exit}')
HOSTNAME=$(hostname)
cp /etc/cassandra/default.conf/cassandra.yaml /etc/cassandra/default.conf/cassandra.yaml.backup
cp /etc/cassandra/default.conf/cassandra.yaml ./cassandra.yaml.template
sed -i "s/ - seeds: \"127.0.0.1\"/ - seeds: \"$IP_ADDRESS\"/g" cassandra.yaml.template
sed -i "s/listen_address:.*/listen_address: $IP_ADDRESS/g" cassandra.yaml.template
sed -i "s/# broadcast_rpc_address:.*/broadcast_rpc_address: $IP_ADDRESS/g" cassandra.yaml.template
sed -i "s/broadcast_rpc_address:.*/broadcast_rpc_address: $IP_ADDRESS/g" cassandra.yaml.template
sed -i "s/# commitlog_total_space_in_mb:.*/commitlog_total_space_in_mb: 8192/g" cassandra.yaml.template
sed -i "s/commitlog_total_space_in_mb:.*/commitlog_total_space_in_mb: 8192/g" cassandra.yaml.template
sed -i "s/^rpc_address:.*/rpc_address: 0.0.0.0/g" cassandra.yaml.template
sed -i "s/start_rpc:.*/start_rpc: true/g" cassandra.yaml.template
sed -i "s/thrift_framed_transport_size_in_mb:.*/thrift_framed_transport_size_in_mb: 100/g" cassandra.yaml.template
sed -i "s/commitlog_segment_size_in_mb:.*/commitlog_segment_size_in_mb: 192/g" cassandra.yaml.template
sed -i "s/read_request_timeout_in_ms:.*/read_request_timeout_in_ms: 1800000/g" cassandra.yaml.template
sed -i "s/range_request_timeout_in_ms:.*/range_request_timeout_in_ms: 1800000/g" cassandra.yaml.template
sed -i "s/write_request_timeout_in_ms:.*/write_request_timeout_in_ms: 1800000/g" cassandra.yaml.template
sed -i "s/cas_contention_timeout_in_ms:.*/cas_contention_timeout_in_ms: 1000/g" cassandra.yaml.template
sed -i "s/truncate_request_timeout_in_ms:.*/truncate_request_timeout_in_ms: 1800000/g" cassandra.yaml.template
sed -i "s/request_timeout_in_ms:.*/request_timeout_in_ms: 1800000/g" cassandra.yaml.template
sed -i "s/batch_size_warn_threshold_in_kb:.*/batch_size_warn_threshold_in_kb: 3000/g" cassandra.yaml.template
sed -i "s/batch_size_fail_threshold_in_kb:.*/batch_size_fail_threshold_in_kb: 5000/g" cassandra.yaml.template
sed -i '/data_file_directories:.*/!b;n;c\ \ \ \ - \/data\/data' cassandra.yaml.template
sed -i "s/hints_directory:.*/hints_directory: \/data\/hints/g" cassandra.yaml.template
sed -i "s/commitlog_directory:.*/commitlog_directory: \/logs\/commitlog/g" cassandra.yaml.template
sed -i "s/saved_caches_directory:.*/saved_caches_directory: \/data\/saved_caches/g" cassandra.yaml.template
\cp -fR ./cassandra.yaml.template /etc/cassandra/default.conf/cassandra.yaml
# Apply fix to systemd vulnerability preventing service control of cassandra
cat << EOF > /etc/systemd/system/cassandra.service
[Unit]
Description=Apache Cassandra
After=network.target

[Service]
PIDFile=/var/run/cassandra/cassandra.pid
User=cassandra
Group=cassandra
ExecStart=/usr/sbin/cassandra -f -p /var/run/cassandra/cassandra.pid
Restart=always
LimitNOFILE=100000
LimitMEMLOCK=infinity
LimitNPROC=32768
[Install]
WantedBy=multi-user.target
EOF
chkconfig --del cassandra
systemctl daemon-reload
systemctl enable cassandra
Now, proceed to edit /etc/cassandra/default.conf/cassandra.yaml:
sudo nano /etc/cassandra/default.conf/cassandra.yaml
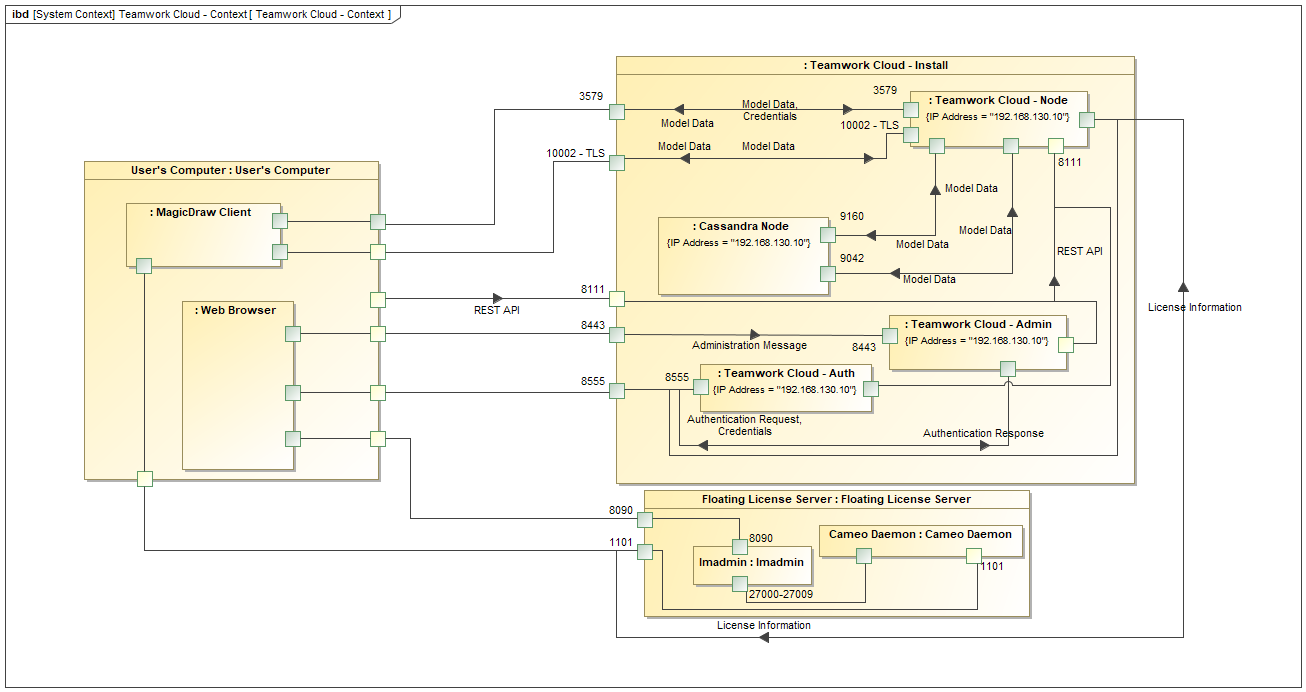
The first items we will be editing relate to the IP address of the Cassandra node and communication settings. In our diagram above, this IP address is 192.168.130.10. You will need to search for 3 keys in the configuration file and modify them accordingly. The seeds parameter is a comma-delimited list containing all of the seeds in the Cassandra cluster. Since our cluster consists of only a single node, it contains only one entry - our IP address. The other 2 parameters contain the IP address on which Cassandra listens for connections and the IP address to broadcast to other Cassandra nodes in the cluster. The broadcast_rpc_address may be commented out using a # character. If so, remove the "#" and make sure there are no leading spaces.
Additionally, we need to set rpc_address to 0.0.0.0 (meaning, it will listen to rpc requests on all interfaces), and start_rpc to true (so it will process rpc requests).
seeds: "192.168.130.10"
listen_address: 192.168.130.10
broadcast_rpc_address: 192.168.130.10
rpc_address: 0.0.0.0
start_rpc: true
The next set of parameters controls thresholds to ensure that the data being sent is processed properly.
thrift_framed_transport_size_in_mb: 100
commitlog_segment_size_in_mb: 192
read_request_timeout_in_ms: 1800000
range_request_timeout_in_ms: 1800000
write_request_timeout_in_ms: 1800000
cas_contention_timeout_in_ms: 1000
truncate_request_timeout_in_ms: 1800000
request_timeout_in_ms: 1800000
batch_size_warn_threshold_in_kb: 3000
batch_size_fail_threshold_in_kb: 5000
If you have installed your commit log in its own partition, the default commit log size will be the lesser of ¼ of the partition size of 8GB. In order to ensure that the recommended 8GB is used, you must uncomment the commitlog_total_space_in_mb, such that it will show as below. However, if you are uncommenting this value, please ensure that the partition has enough space to accommodate an 8GB commit log.
commitlog_total_space_in_mb: 8192
The next step is to point the data to the new locations. There are 4 entries that will be modified: data_file_directories, commitlog_directory, hints_directory, and saved_caches_directory. Search for these keys and edit them as follows:
data_file_directories:
- /data/data
commitlog_directory: /logs/commitlog
hints_directory: /data/hints
saved_caches_directory: /data/saved_caches
After you have made these changes, save the cassandra.yaml file. Now, start the related services, as follows:
systemctl start cassandra
Now, proceed to check if Cassandra is running. To do this, issue the following command:
nodetool status
If the service is running, you will receive output such as below:
Datacenter: datacenter1
=======================
Status=Up/Down
|/ State=Normal/Leaving/Joining/Moving
--  Address    Load       Tokens   Owns (effective)  Host ID                               Rack
UN  127.0.0.1  128.4 KB   256      100.0%            ea3f99eb-c4ad-4d13-95a1-80aec71b750f  rack1
If the service is fully operational, the first 2 characters on the last line will state "UN", indicating the node's status is Up, and its state is Normal.
Tuning Linux for Cassandra Performance
There are multiple tunings that can be performed on Linux to improve the performance of Cassandra. The first step is to configure the TCP settings by adding the following tuning parameters to /etc/sysctl.conf file:
net.core.rmem_max=16777216
net.core.wmem_max=16777216
net.core.optmem_max=40960
net.core.default_qdisc=fq
net.core.somaxconn=4096
net.ipv4.conf.all.arp_notify = 1
net.ipv4.tcp_keepalive_time=60
net.ipv4.tcp_keepalive_probes=3
net.ipv4.tcp_keepalive_intvl=10
net.ipv4.tcp_mtu_probing=1
net.ipv4.tcp_rmem=4096 12582912 16777216
net.ipv4.tcp_wmem=4096 12582912 16777216
net.ipv4.tcp_max_syn_backlog=8096
net.ipv4.tcp_slow_start_after_idle = 0
net.ipv4.tcp_tw_reuse = 1
vm.max_map_count = 1048575
vm.swappiness = 0
vm.dirty_background_ratio=5
vm.dirty_ratio=80
vm.dirty_expire_centisecs = 12000
To apply the setting without requiring a reboot issue the command:
# sysctl -p
For a full list of steps to take to tune Linux, go to:
Installing Teamwork Cloud
Initial Installation
The deployment script for Teamwork Cloud (install_twc19sp4_centos7.sh) creates a Teamwork Cloud user, under which the service will run, downloads all of the necessary files, and executes the installer.
#!/bin/bash
DOWNLOAD_URL="http://download1.nomagic.com/twcloud190sp4/twcloud_190_sp4_installer_linux64.bin"
INSTALLER="twcloud_190_sp4_installer_linux64.bin"
PRODUCT="Teamwork Cloud 19.0 SP4"
echo "=========================================="
echo "Installing $PRODUCT"
echo "=========================================="
echo "Installing unzip"
yum install -y unzip
echo "Installing fonts"
yum install -y dejavu-serif-fonts
echo "Installing Tomcat Native Libraries"
yum install -y tomcat-native
echo "Creating twcloud group and user"
getent group twcloud >/dev/null || groupadd -r twcloud
getent passwd twcloud >/dev/null || useradd -d /home/twcloud -g twcloud -m -r twcloud
echo "Creating temporary directory for install anywhere"
IATEMPDIR=$(pwd)/_tmp
export IATEMPDIR
mkdir $IATEMPDIR
echo ""
echo "IMPORTANT: "
echo "           When prompted for user to run service, use twcloud"
echo ""
read -p -"Press any key to continue ...: " -n1 -s
wget $DOWNLOAD_URL
chmod +x $INSTALLER
./$INSTALLER
chown -R twcloud:twcloud /opt/local/TeamworkCloud/
chown -R twcloud:twcloud /home/twcloud/
IP_ADDRESS=$(ip route get 1 | awk '{print $NF;exit}')
sed -i "s/\"localhost\"/\"$IP_ADDRESS\"/" /opt/local/TeamworkCloud/configuration/application.conf
sed -i "s/localhost/$IP_ADDRESS/" /opt/local/TeamworkCloud/AuthServer/config/authserver.properties
echo "======================="
echo "Configuring firewall"
echo "======================="
FWZONE=$(firewall-cmd --get-default-zone)
echo "Discovered firewall zone $FWZONE"
cat <<EOF > /etc/firewalld/services/twcloud.xml
<?xml version="1.0" encoding="utf-8"?>
<service version="1.0">
    <short>twcloud</short>
    <description>twcloud</description>
    <port port="8111" protocol="tcp"/>
    <port port="3579" protocol="tcp"/>
    <port port="10002" protocol="tcp"/>
	<port port="8555" protocol="tcp"/>
	<port port="2552" protocol="tcp"/>
	<port port="2468" protocol="tcp"/>
	<port port="8443" protocol="tcp"/>
</service>
EOF
sleep 30
firewall-cmd --zone=$FWZONE --remove-port=8111/tcp --permanent &> /dev/null
firewall-cmd --zone=$FWZONE --remove-port=3579/tcp --permanent &> /dev/null
firewall-cmd --zone=$FWZONE --remove-port=8555/tcp --permanent &> /dev/null
firewall-cmd --zone=$FWZONE --remove-port=2552/tcp --permanent &> /dev/null
firewall-cmd --zone=$FWZONE --remove-port=2468/tcp --permanent &> /dev/null
firewall-cmd --zone=$FWZONE --add-service=twcloud --permanent
firewall-cmd --reload
echo "Increase file limits for twcloud user"
echo "twcloud - nofile 50000 " > /etc/security/limits.d/twcloud.conf
echo "Applying post-install performance tuning"
echo "  /etc/sysctl.conf tuning"
cat <<EOF >> /etc/sysctl.conf

#  Preliminary tunings for Teamwork Cloud
net.core.rmem_max=16777216
net.core.wmem_max=16777216
net.core.optmem_max=40960
net.core.default_qdisc=fq
net.core.somaxconn=4096
net.ipv4.conf.all.arp_notify = 1
net.ipv4.tcp_keepalive_time=60
net.ipv4.tcp_keepalive_probes=3
net.ipv4.tcp_keepalive_intvl=10
net.ipv4.tcp_mtu_probing=1
net.ipv4.tcp_rmem=4096 12582912 16777216
net.ipv4.tcp_wmem=4096 12582912 16777216
net.ipv4.tcp_max_syn_backlog=8096
net.ipv4.tcp_slow_start_after_idle = 0
net.ipv4.tcp_tw_reuse = 1
vm.max_map_count = 1048575
vm.swappiness = 0
vm.dirty_background_ratio=5
vm.dirty_ratio=80
vm.dirty_expire_centisecs = 12000
EOF
sleep 30
sysctl -p
echo "  ... Creating disk, CPU, and memory tuning parameters in /home/twcloud/tunedisk.sh"
cat << EOF > /home/twcloud/tunedisk.sh
#!/bin/bash
## Added for disk tuning this read-heavy interactive system
sleep 30
#for DISK in sda sdb sdc sdd
for DISK in \$(ls -all /sys/block | egrep 'sd|xvd|dm' | awk '{for(i=1;i<=NF;i++){if(\$i == "->"){print \$(i-1) OFS}}}')
do
	echo \$DISK
	# Select noop scheduler first
    echo noop > /sys/block/\${DISK}/queue/scheduler
	echo scheduler: \$(cat /sys/block/\${DISK}/queue/scheduler)
	echo 1 > /sys/block/\${DISK}/queue/nomerges
	echo nomerges: \$(cat /sys/block/\${DISK}/queue/nomerges)
	echo 256 > /sys/block/\${DISK}/queue/read_ahead_kb
	echo read_ahead_kb: \$(cat /sys/block/\${DISK}/queue/read_ahead_kb)
	echo 0 > /sys/block/\${DISK}/queue/rotational
	echo rotational: \$(cat /sys/block/\${DISK}/queue/rotational)
	echo 256 > /sys/block/\${DISK}/queue/nr_requests
	echo nr_requests: \$(cat /sys/block/\${DISK}/queue/nr_requests)

	echo 2 > /sys/block/\${DISK}/queue/rq_affinity
	echo rq_affinity: \$(cat /sys/block/\${DISK}/queue/rq_affinity)
done
# Disable huge page defrag
echo never | tee /sys/kernel/mm/transparent_hugepage/defrag

#Disable CPU Freq scaling

for CPUFREQ in /sys/devices/system/cpu/cpu*/cpufreq/scaling_governor
do
    [ -f \$CPUFREQ ] || continue
    echo -n performance > \$CPUFREQ
done

#Disable zone-reclaim

echo 0 > /proc/sys/vm/zone_reclaim_mode
EOF
sleep 10
chmod +x /home/twcloud/tunedisk.sh
echo "  ... Setting parameters to be executed on server restart"
cat <<EOF >> /etc/rc.local

#  Perform additional tuning for TeamworkCloud
/home/twcloud/tunedisk.sh
EOF
chmod +x /etc/rc.d/rc.local
echo "  ... Applying tuning changes - there is a 30 second delay before execution"
/home/twcloud/tunedisk.sh
echo "Removing installanywhere temporary directory"
rm -fr $IATEMPDIR
When you are installing TWCloud
- Press ENTER until you will be asked to configure the machine IP.
- Configure the machine IP - enter the local IP address of the machine (e.g. 192.168.130.10).
- Configure the cluster seed node IP - enter the local IP address of the machine (e.g. 192.168.130.10).
- Configure the TWCloud service owner - enter twcloud.
- Configure JAVA_HOME - if you are using Oracle Java, using our installation script, you will be prompted with /opt/local/java/jdk1.8.0_202 - accept this default. If you are using OpenJDK from the RPM packages, use /etc/alternatives/jre_1.8.0, so that subsequent updates via yum will not affect the installation.
- Choose Install Folder - /opt/local/TeamworkCloud.
Next, TWCloud's Pre-Installation Summary will appear. It should look as follows:
===============================================================================
Pre-Installation Summary
------------------------
Please Review the Following Before Continuing:

Product Name:
    Teamwork Cloud

Install Folder:
    /opt/local/TeamworkCloud

Machine ip:
    "192.168.130.10"

Seed node ip:
    "192.168.130.10"

JAVA_HOME:
    "/opt/local/java/jdk1.8.0_202"

Disk Space Information (for Installation Target):
    Required:  395,614,661 Bytes
    Available: 31,608,475,648 Bytes
To start the authserver service, execute the following command:
sudo systemctl start authserver
To start the Teamwork Cloud service, execute the command:
sudo systemctl start twcloud
To start the WebApp service, execute the command:
sudo systemctl start webapp
To ensure the services start on reboot, execute the following commands:
sudo systemctl enable twcloud
sudo systemctl enable authserver
sudo systemctl enable webapp
Post-Install Configuration
The installer has now created the preliminary TWCloud configuration. Your system is now functional and you can log in to the Admin console. For security reasons, we highly recommend making additional changes as described below.
- /opt/local/TeamworkCloud/configuration/application.conf - the configuration file for the TWCloud service.
If Teamwork Cloud is installed behind a proxy or firewall with NAT, upon the initial connection the MagicDraw client must know the external IP address to which it must connect. Search for server-broadcast-host, and enter the public IP address instead of the local IP address. We now need to point Teamwork Cloud to the Cassandra database. Search for seeds = , which is located in the connection section. Edit the value inside the quotes to point to the listen_address you set in cassandra.yaml (i.e. seeds = ["192.168.130.10"]). A default password has been entered in the configuration file for its communication with the authorization server. It is recommended that it be changed. To do so, search for CHANGE_ME, which is associated with the field pswd, and replace it with a password of your choosing. - /opt/local/TeamworkCloud/AuthServer/config/authserver.properties - the configuration file for Authorization service.
- server.public.host=public IP address (same as server-broadcast-host in application.conf). If you are accessing the server via a FQDN, use it instead of the IP address.
- twc.server.host=local IP address.
- cassandra.contactPoints=local IP address.
- If you changed the pswd field in /opt/local/TeamworkCloud/configuration/application.conf from the default, you must modify this file accordingly. Search for authentication.client.secret. Remove the leading # (to uncomment the directive), and replace the CHANGE_ME value with the same value as that in application.conf.
If you are accessing the server by FQDN, you must edit the property authentication.redirect.uri.whitelist by adding an entry to whitelist the FQDN. For example: authentication.redirect.uri.whitelist=https://192.168.130.10:8443/webapp/,https://FQDN:8443/webapp/,https://md_redirect.
Make sure that you add the public IP for both 8443 and 8111 ports to the whitelist.
3. /opt/local/TeamworkCloud/WebAppPlatform/shared/conf/webappplatform.properties - the configuration file for TWCloud Admin Console.
- twc.admin.username - Set it to the username of a local account with Administrator privileges (default is Administrator).
- twc.admin.password - Set it to the password corresponding to the Administrator user (default is Administrator).
- If you changed the pswd field in /opt/local/TeamworkCloud/configuration/application.conf from the default, you must modify this file accordingly. Search for authentication.client.secret and replace the CHANGE_ME value with the same value as that in application.conf.
Once you have made the configurations, make sure to restart the affected services.
Additional information which may affect installations in restricted environments
Log Files
TWCloud executes under the TWCloud user, and by default will store log files under this user's profile (/home/twcloud). There are 3 configuration files that control the location of these log files:
- /opt/local/TeamworkCloud/configuration/logback.xml controls the location of the Teamwork Cloud log files, whereas
- /opt/local/TeamworkCloud/Authserver/config/logback-spring.xml controls the location of the Authserver log files.
- /opt/local/TeamworkCloud/WebAppPlatform/shared/conf/logback.xml controls the location of the WebAppPlatform log files.
/opt/local/TeamworkCloud/configuration/logback.xml
In this file, there are settings for 2 log files that must be edited.
<appender name="SERVER-FILE" class="ch.qos.logback.core.rolling.RollingFileAppender">
                <file>${user.home}/.twcloud/19.0 SP1/server.log</file>
                <rollingPolicy class="ch.qos.logback.core.rolling.FixedWindowRollingPolicy">
                        <fileNamePattern>${user.home}/.twcloud/19.0 SP1/server.%i.log.zip</fileNamePattern>
                        <minIndex>1</minIndex>
                        <maxIndex>1000</maxIndex>
                </rollingPolicy>

                <triggeringPolicy class="ch.qos.logback.core.rolling.SizeBasedTriggeringPolicy">
                        <maxFileSize>20MB</maxFileSize>
                </triggeringPolicy>
                <encoder>
                  <pattern>%-5.5level %date{YYYY-MM-dd HH:mm:ss.SSS} %message [%logger{200}, %thread{10}]%n</pattern>
                </encoder>
        </appender>

        <appender name="SECURITY-FILE" class="ch.qos.logback.core.rolling.RollingFileAppender">
                <file>${user.home}/.twcloud/19.0 SP1/security.log</file>
                <rollingPolicy class="ch.qos.logback.core.rolling.TimeBasedRollingPolicy">
                <!-- daily rollover -->
                <fileNamePattern>${user.home}/.twcloud/19.0 SP1/security.%d{yyyy-MM-dd}.log</fileNamePattern>

                <!-- keep 365 days' worth of history -->
                <!-- maxHistory>365</maxHistory -->
        </rollingPolicy>
                <encoder>
                  <pattern>%-5.5level %date{YYYY-MM-dd HH:mm:ss.SSS} %message [%logger{200}, %thread{10}]%n</pattern>
                </encoder>
        </appender>
In each section, there are 2 settings that must be modified: file and fileNamePattern. The first setting (file) controls the absolute path to the latest log file. The second setting (fileNamePattern) controls the naming convention for the archiving of the log files. In most cases, it will suffice to replace the ${user.home} token with a different location, but you must ensure that the TWCloud user has ownership of the target directories.
/opt/local/TeamworkCloud/Authserver/config/logback-spring.xml
This file contains one section which must be modified.
  <appender name="FILE" class="ch.qos.logback.core.rolling.RollingFileAppender">
                <file>${user.home}/.authserver/19.0.SP1/authserver.log</file>
                <rollingPolicy class="ch.qos.logback.core.rolling.FixedWindowRollingPolicy">
                        <fileNamePattern>${user.home}/.authserver/19.0.SP1/authserver.%i.log.zip</fileNamePattern>
                        <minIndex>1</minIndex>
                        <maxIndex>10</maxIndex>
                </rollingPolicy>

                <triggeringPolicy class="ch.qos.logback.core.rolling.SizeBasedTriggeringPolicy">
                        <maxFileSize>30MB</maxFileSize>
                </triggeringPolicy>
                <encoder>
                  <pattern>%-5.5level %date{YYYY-MM-dd HH:mm:ss.SSS} %message [%logger{0}, %thread{10}]%n</pattern>
                </encoder>
        </appender>
The same changes and permissions apply to the changes to this file as to those for /opt/local/TeamworkCloud/configuration/logback.xml.
Files installed on system locations
| Daemon control files | Environment files | Cassandra installation |
|---|---|---|
|
| The script will place the data files in /data/data and commit logs in /logs/commitlog |
Frequently Asked Questions
Q: When accessing https://ip_address:8443/webapp I am displayed with a Tomcat 404 error
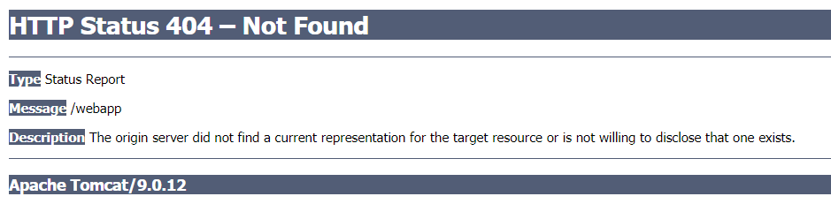
A: This error is typically caused by incorrect credentials for the authentication of webapp. This is accompanied by recurring error messages in web-app.log.
2019-10-12 14:49:14,625 [main] INFO com.nomagic.webappplatform.internal.version.TWCVersionValidator - Waiting for TWC/AuthServer to start, 120 of 120
2019-10-12 14:49:14,626 [main] ERROR com.nomagic.webappplatform.internal.version.TWCVersionValidator - Exception occurred during version checking
Verify that the credentials are correct in webappplatform.properties
Q: When Accessing the Teamwork Cloud Admin Console (webapp), I get a system error when redirected to the Authserver login screen
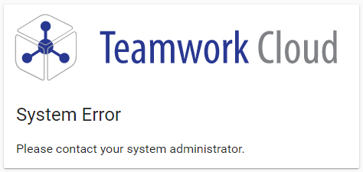
A: This error is typically caused by an omission of the referring URL in the authentication server's whitelist, authentication.redirect.uri.whitelist, located in authserver.properties.
You will see a corresponding error in authserver.log.
ERROR 2019-10-04 17:26:52.258 AuthorizeException: invalid_request, Invalid redirect_uri parameter [AuthorizeController, …]
Update the whitelist to include the referring URL. A common cause is accessing WebApp via a server name of FQDN when the whitelist only contains entries for the IP address.
Q: After entering my credentials in the Authserver login screen, I am not logged in, no error is displayed, and I am presented once again with the login screen

A: This error is typically caused by a mismatch in the client secret entries - authentication.client.secret located in authserver.properties and webappplatform.properties, and "pswd" in application.conf.
You will see a corresponding error in authserver.log
ERROR 2019-10-04 17:30:49.382 Invalid client secret …