Our modeling tool allows you to safely transfer data using a secured connection (SSL).
If the SSL connection is established in the server side, you should also use the SSL connection in the client side when connecting to the server.
To use the SSL connection, you need two types of certificates, one for the server and one for the client. Certificates must be in Java Key Store format.
The server certificate is automatically placed in the <Teamwork Server installation directory>\cert folder after the SSL configuration is done.
Locate the client certificate manually. You should create a folder named certs and place into it these two files:
- A client certificate named cert.jks.
- A file named cert.pass wherein the certificate password is typed.
In this case, a modeling tool and Teamwork Administrator’s Console applications are Teamwork server clients. Both should have the client certificate. Thus, the folder certs should be placed in two Configuration files locations:
- <Teamwork Administrator’s Console installation directory> for the Teamwork Administrator’s Console application
- <LOCAL_APPDATA1>\.magicdraw\<version number> on Windows OS or <user.home>\.magicdraw\<version number> on other OS for the MagicDraw application (It can be located in the folder <MagicDraw installation directory> either but the user home folder is the default one)
If the Teamwork Administrator’s Console is not installed in a separate location, its installation directory is the same as Teamwork Server installation directory or the MagicDraw installation directory (if installed together).
You can get certificates from your system administrator or generate certificates by yourself. To work with multiple servers without need to launch different modeling tools, create more than one public key and import it to the client certificate, named cert.jks.
To generate certificates
We recommend using the KeyTool IUI application for generating certificates. This is a free tool that can be downloaded from the Internet.
- Run the KeyTool IUI application.
- Create empty files for storing certificates:
- Select Create > Keystore.
- Create an empty keystore file for the server. Do the following:
- In the Keystore file dialog, set the location of the file and type a file name.
- In the Keystore password dialog, type the password for the server keystore file and click OK.
Create an empty keystore file for the client. Do the following:
Do not repeat this step, if you already have the keystore file for the client. Multiple public keys should be imported to the already existing client file cert.jks. Skip this step and go to the step #3
- In the Keystore file dialog, set the location of the file and type a file name. In the next steps, create a new folder certs and save the file named cert.jks in it for easier certificate transfer.
In the Keystore password dialog, type the password for the client keystore file and click OK.
- Create a RSA keypair for the server:
- Select Create > Keystore’s entry > Private key, with vers. #3 > RSA.
- In the Keystore file dialog, the Source section, open the created server keystore file and type a password.
- Provide the required information in the Target section and click OK.
- The dialog for creating a new alias will open. Type a new private key entry’s alias name and a password for it. Click OK.
- You will see the created alias. Close the dialog.
- Exclude a public key from the keypair to provide it to the client:
- Select Export > Private’s key first certificate in chain > As simple certificate file.
- In the Keystore file dialog, the Source section, open the server keystore file and type its password.
- Create a file where the key will be exported. In the Certificate file dialog, the Target section, set a location and type a file name for the client certificate. Click OK.
- The dialog for selecting an alias will open. From the list, select the alias created in step 3.d and type its password. You will be able to see the created certificate.
- Import a public key into the client certificate:
- Select Import > Keystore’s entry > Trusted certificate > Regular certificate.
- In the Source section set the certificate file created in step 4 as a regular certificate file.
- In the Target section:
- for one client, set the client keystore file cert.jks as a keystore file and click OK.
- for multiple clients, import multiple certificates to the already existing cert.jks file.
- The dialog will open asking you to enter a new alias name. Enter the alias name created in step 3 and click OK.
- Some pop-up windows about the generation process will open. Close all of them after reviewing.
Generated certificates are now ready to use. Paste them into the correct location. Enable the secured connection (SSL) for server server side.
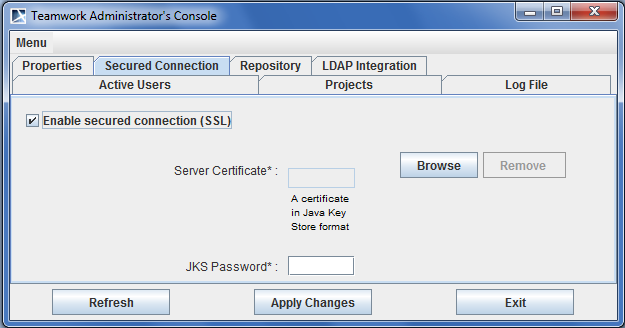
To enable the secured connection (SSL)
- Run the Teamwork Server Administrator’s Console.
- In the Secured Connection tab, select the Enable Secure Connection check box.
- Click Browse to add the server certificate.
- Enter the JKS password.
- Click the Apply Changes button.
Restart Teamwork Server.
Server users
Make sure all users are logged out before restarting the server.
If you want to change the password for the certificate, you need to regenerate the certificate with a different password.
Only the administrator can configure Teamwork Server options. The administrator should be disconnected from Teamwork in MagicDraw while using the Teamwork Administrator’s Console.
To remove a certificate, click the Remove button.