You can automatically or manually upgrade Teamwork Server. In the automatic upgrade, a new Teamwork Server version will be installed in place of the current one. Upgrade the server manually to keep the current server version without any changes. The manual upgrade allows you to install a new server version on a new location. You will be able to import your old projects and users and test the functionality of a new server version. After that you can remove a previous server version. Because version 16.9 commercial licenses are locked to a particular machine, you will be requested to activate the license and receive the commercial license dedicated to that machine after the upgrade. If you activated the license before upgrading with a new version, the license will be activated automatically.
You should have valid Software Assurance to upgrade Teamwork Server. For more about Software Assurance, see at https://www.nomagic.com/support/sales-and-licensing/software-assurance-maintenance-contracts.
Automatic upgrade of Teamwork Server
The easiest way to renew MagicDraw Teamwork Server is to upgrade it automatically. Using this feature, you will automatically receive upgrades with the newest versions and service packs.
Make sure server and the client versions are the same. We also recommend using the same JVM version for the server and client, as well as making a backup of the project folder before upgrading Teamwork Server.
To upgrade Teamwork Server automatically
- Stop Teamwork Server (see Stopping Teamwork Server) and close the Administrator’s Console.
- Deactivate the current license for the Teamwork Server.
For the Windows operating system, remove the Teamwork Server NT service, if it is added. See the procedure on how to remove Teamwork Server from the Windows services.
Skip step 3 for other operating systems.
- Start the Teamwork Server GUI version (see how to start the server using GUI).
When the dialog opens, click the Check for Updates button to check and download program upgrades and updates.
If the HTTP Proxy Server Connection dialog opens, click Use HTTP proxy server if you want to use a proxy server. Enter the required values and click OK when you are done. Checking for updates starts.
- The Update Information dialog opens, displaying information about available updates. Click the Update to New Version button to start upgrading the server.
When the automatic update finishes, the Import Configuration dialog opens. In this dialog, click the Import button to import all teamwork projects and users from the previous Teamwork Server version.
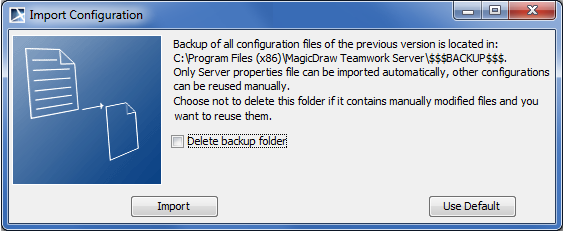
We strongly recommend that you store the backup folder.
- After upgrading the server to version 16.9 or later, you will be asked to apply the commercial license dedicated for that particular machine. Please visit Activating the Teamwork Server commercial license for instructions on getting the Teamwork Server license.
Teamwork Server and its client must be of the same version. Otherwise, clients will not be able to connect to the server.
Manual upgrade of Teamwork Server
Installing a newer version does not detect or remove the current server version. You can import all projects and users to the new server.
For a description of importing procedures, please see Importing projects and users from earlier versions of Teamwork Server.
The version of project server and client should be the same. We also recommend using the same JVM version for the server and client.
To upgrade Teamwork Server manually
- Stop Teamwork Server, see Stopping Teamwork Server.
- Deactivate the current license for the Teamwork Server.
- Remove Teamwork Server from Windows services, if it was added (see remove Teamwork Server from the Windows services).
- Run the installation file. For successful installation please use the following recommendations:
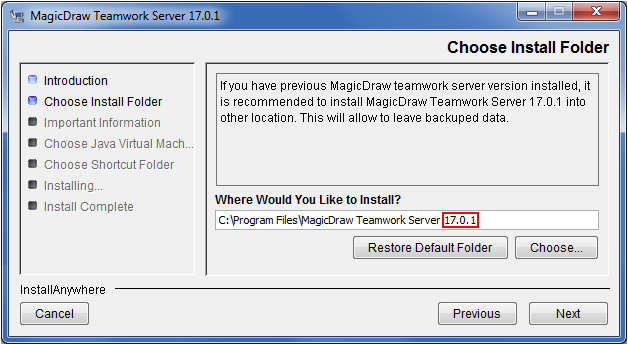
- For restoring backup data, install the new Teamwork Server version into a different location from the current Teamwork Server. For example, under Choose Install Folder add the number of the version you are installing to the end of the folder name.
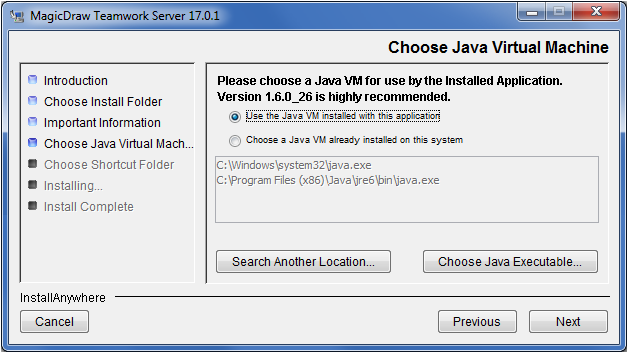
- Under Choose Java Virtual Machine, click Use the Java VM installed with this application.
- For restoring backup data, install the new Teamwork Server version into a different location from the current Teamwork Server. For example, under Choose Install Folder add the number of the version you are installing to the end of the folder name.
Start newly installed Teamwork Server. The Import Configuration dialog opens.
The import time may take 90 minutes or more, depending on the quantity and size of the imported projects.
In the Teamwork Server License Manager dialog, enter the license key.
For more information about node locked license activation, see https://www.nomagic.com/support/installation-and-use/teamwork-server-install#activating.
- The Teamwork Server License Configuration dialog with license information opens after you have entered a license key. Click OK. The Teamwork Server startup dialog opens.
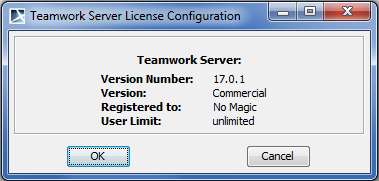
- Click the Start Server button. The server starts.
- If needed, add Teamwork Server to Window services (see how to add Teamwork Server to Windows services).
- Remove the old Teamwork Server version. Ensure the server and client versions are the same. We also recommend using the same JVM version for the server and client.
To upgrade Teamwork Server manually without GUI
We recommend making a backup of the project folder before upgrading the Teamwork Server.
- Stop Teamwork Server (see stop teamwork server).
- Deactivate the current license for the Teamwork Server. For more information, see https://www.nomagic.com/support/activation#deactivation_in_management.
- For the Windows operating system, remove the Teamwork Server NT service, if it was added (see how to remove Teamwork Server from the Windows services). Skip this step for other operating systems.
- Extract the MD_UML_<version number>_teamwork_server_no_installs.zip.
- Start the new Teamwork Server without GUI (see how to start Teamwork Server from the command line).
You can only use manual Teamwork Server upgrade without GUI. This is not available with automatic updates.