On this page
After you finish editing a model, you need to commit the changes to the server so that other team members can see these changes when editing other parts of the model. When you commit changes to the server, new data from your modeling tool is merged with the project on the server repository. As a result, a new version of that project is created. Other team members must update their projects from the server to see the committed changes.
The workflow of modifying and committing server projects.
To commit a project to Teamwork Cloud
- In the main menu. select Collaborate > Commit Changes To Server (or press Ctrl+K).
If you want to describe the changes you made, enter a comment in the Comment box of the Commit Changes to the Server dialog.
Click above the Comment box to choose a comment from the recently used comments list.
If you want to keep locks on model elements, select the Keep locks check box. Your choice will be remembered.
- Optionally, click More in the lower left corner of the dialog and do one or both the following:
- Click the Commit button.
While the project is being committed, you will see a dialog with a progress bar and your position in the commit queue as shown below.
When multiple projects are committed to the server simultaneously, all users are put in a First-In-First-Out (FIFO) line resulting in quicker and more predictable project commit execution. If putting project commits in a queue does not work for your organization, your system administrator can disable the commit queue mechanism for a particular Teamwork Cloud server.
The commit progress dialog with your position in the commit queue.
Creating version tags
You can create tags for a project version when you commit it to the server. Version tags provide valuable information when reviewing project history or creating project branches. You can also use tags to trigger notifications when used project versions with specific tags are committed to the server. To learn more, see Setting notifications about version changes.
To create a version tag and commit a project
- In the main menu. select Collaborate > Commit Changes To Server (or press Ctrl+K).
- In the lower left corner of the Commit Changes to the Server dialog, click More.
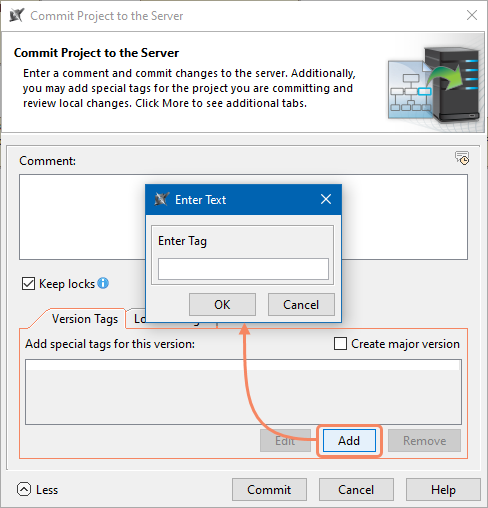
- In the Version Tags tab, click the Add button.
- In the open dialog, type the tag text and click OK. The tag is added to the Version Tags tab.
- You create several tags for one project version.
- Select the Create major version check box, to add the 'Major' tag to the project version.
- Click the Commit button.
Reviewing local changes before committing a project
You can review the local changes you have made to the project before committing it to the server.
To review local changes and commit a project
- In the main menu. select Collaborate > Commit Changes To Server (or press Ctrl+K).
- In the lower left corner of the Commit Changes to the Server dialog, click More.
- Select the Local Changes tab and review local changes made to the project.
Added elements are highlighted in green, deleted elements are highlighted in red, and modified or moved elements are highlighted in blue.
- If you want to explore the changes of a certain element in more detail, select an element, click on the right side of the Local Changes tab, then select one of the following options:
- Quick Diff - to quickly inspect the changes of element property values (such as documentation, type, or multiplicity).
- Full Diff - to inspect the changes made to diagrams or element property values in more detail, as well as look at the properties of new relationships and directly related elements (such as new or modified attributes and operations).
- Compare projects - to compare local project changes to the latest project version on the server. Learn how to analyze comparison results.
- Click the Commit button.
Disabling commit queues
If putting project commits in a First-In-First-Out (FIFO) line does not work for your organization, your system administrator can disable the commit queue mechanism for a particular Teamwork Cloud server.
To disable commit queues
- Open for editing the <install_root>/TeamworkCloud/configuration/application.conf file.
- Add the following line to the file:
esi.persistence.queuecommit.enable = false
- Restart the Teamwork Cloud server.


