The Hiding packages utility lets you specify which model Packages (and elements within them) should be hidden. Once specified, the non-hidden/public version of the model will be created by cutting/deleting the hidden parts. You may strip your project in order to reuse just a particular part of the project in another project. To strip your project, you need to hide packages you do not want to share.
To hide packages
- Open a server project.
- Do one of the following:
- Right-click the package you want to hide. On the shortcut menu, click Project Usages > Hide Packages.
- On the main menu, click Collaborate > Hidden packages.
The Hidden Packages dialog opens. From the All Data side, select packages you want to hide and add them to the Hidden Packages side. Move the selected package contrariwise to unhide it.

Click OK when you are done.
- The package dependency checking is suggested. Dependency checking may be time consuming but it is useful to prevent of cyclic usages causing infinite recursions in projects, so we suggest to perform it. After competing the elements to hide selection, a dedicated question appears. Click Yes to perform dependency checking. If any issues are found, they is displayed and described in the Package Dependencies panel.
- After dependency checking is completed or skipped, the selected elements are hided and stripped model version is created to be available to use in other projects. Hidden packages are marked with a lock sign
 in the Model Browser.
 - Commit the project.
A stripped model is stored in the dedicated branch which is created when element hiding is performed for the first time. By default, the branch is named Public Project. You can rename the branch if you need.
A stripped model is read-only. It can be used just for reusing in other projects purposes, not for editing. However, you can edit the main project. On committing, checking whether the changes affect hidden and stripped parts of the model are performed and version synchronization is initialized. In the Project Options dialog, you may define the versions synchronization mode. A default mode is Manual, that is, on the committing of project changes, you will be notified about local changes affecting a stripped model that is stored in a dedicated branch and you could decide either to synchronize changes or not.
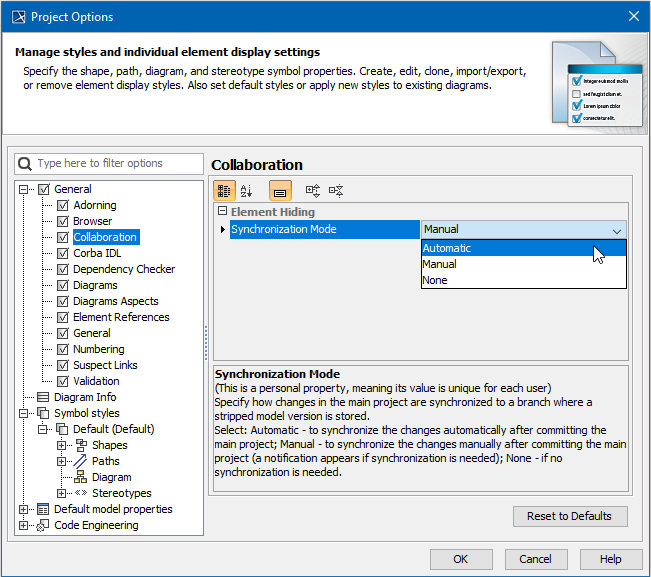
Selecting a synchronization mode to specify how changes in the main project are synchronized to a branch where a stripped model version is stored.
To select a synchronization mode
- On the main menu, click Options > Projects. The Project Options dialog opens.
- In the list of option groups, select General and then select Collaboration in the list of options.
- For the option Synchronization Mode, specify one of the following values:
- Automatic - to synchronize changes automaticaly on commiting the project changes.
- Manual (default) - to synchronize changes upon your decision.
- None - do not perform any synchronization.