On this page:
Generating a key pair using Java Keytool
To enable a secure connection between the client and the server, you need to generate two keystore files, each in their own keystores:
- KeyStore.jks (contains key and certificate) – server-side – upload it using TWCloud Admin console.
- cert.jks (contains public certificate) – client-side – place it in the <Application folder>\certs directory.
To generate a key pair
- Go to your Java directory and open the folder named bin.
Enter keytool -genkey -alias MyDomain -keyalg RSA -keystore KeyStore.jks -keysize 2048 and press Enter.
You can give any name to MyDomain and KeyStore.jks.
Enter a password for your keystore and answer the questions asked. A certificate with a key is generated and placed into the keystore.
To extract a certificate without a key, type keytool -export -alias MyDomain -file certificate.cer -keystore KeyStore.jks and press Enter.
To place a certificate into another keystore, e.g. cert.jks, type keytool -import -alias MyDomain -file certificate.cer -keystore cert.jks and press Enter.
You can give any name to cert.jks. However, by default, the tool searches for this exact name.
Two keystore files are generated: one for the server (KeyStore.jks) and one for the client (cert.jks). You can now proceed to enable a secure connection between the client (modeling tool) and the server (Teamwork Cloud).
Enabling a secure connection to Teamwork Cloud
To enable a secure connection to TWCloud, you must enable TLS (Transport Layer Security) on the TWCloud Admin's Server Settings page. This page also allows you to disable the option if you do not need to use a secure connection (see the following figure). You can always enable it whenever necessary.
The default port used for a secure connection is 10002.
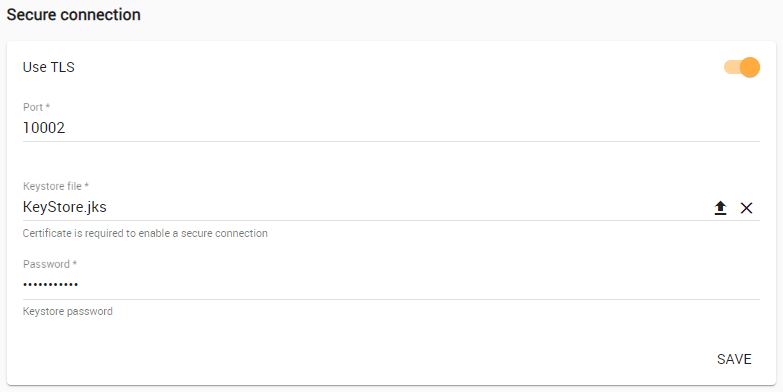
Enabling TLS protocol in TWCloud (when the option is turned on, the color changes to orange).
Self-signed TLS certificate warning
TWCloud Admin uses TLS (Transport Layer Security) as the security protocol to keep any information you enter on TWCloud Admin private and secure.
By default, your server generated a TLS certificate and signed it as being valid (self-signed certificate). The self-signed TLS certificate allows a secure connection to be established but does not verify the authenticity of the server like the TLS certificate issued by a valid Certificate Authority (CA) does.
Trusted root certificates are embedded into popular browsers such as Internet Explorer, Firefox, and Chrome. They are used to verify all TLS certificates that the browsers encounter. If a certificate is not signed by one of these roots, the browsers display an error or warning message stating that it is untrusted. Thus, when you try to access the server via the self-signed one, you will get an error or warning in your web browser. The following figure below shows an example of the "TLS certificate not trusted" warning in Chrome.
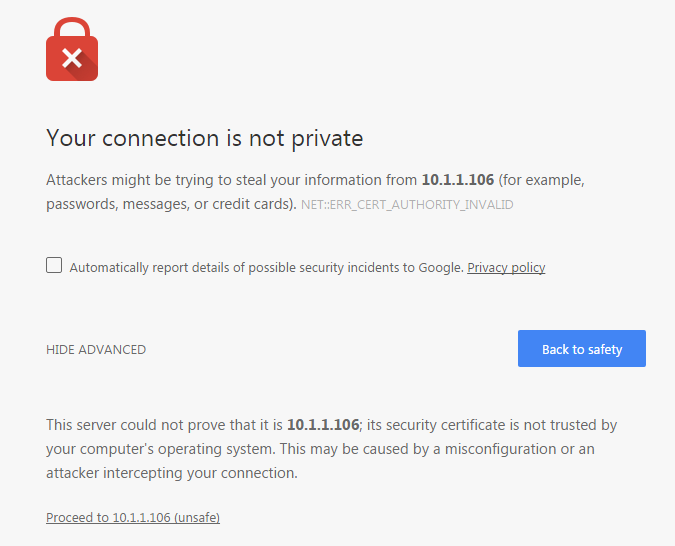
A self-signed TLS certificate error in Google Chrome.
This warning tells you the TLS certificate installed on your server was self-signed and cannot be verified by the browser. You may simply let your browser accept it and continue using the server. If you are using Firefox, you can accept it and the error or warning will no longer appear. If you are using Chrome, the error or warning will appear every time you try to access your server.
To permanently mitigate this situation to avoid having the self-signed TLS certificate error or warning appear when accessing your server via TLS, it is recommended that you either:
- Replace the self-signed TLS certificate with a dedicated one issued by a trusted certificate authority.
- Establish your own root certificate authority and manually import it to each browser on all workstations.
Setting up TLS in TWCloud Admin
To enable a secure connection using the TLS protocol in TWCloud Admin
- Go to the Settings app.
Change sliders position to the right to enable the TLS protocol.
- Type in the port, upload a Java Key Store file and type the password.
- Click Save.
At this point, you will be able to connect to TWCloud from the modeling tool via the TLS connection.
Setting up client-side TLS
To enable a secure connection using the TLS protocol on the client-side
- Locate the client certificate manually.
- Create a folder named certs under the modeling tool install folder. Place the following files into the newly created certs folder:
- A client certificate named cert.jks.
- A file named cert.pass wherein the certificate password is typed.