On this page
Adding the license key file
- In the Resource Plugin Manager dialog, click the Manage Licenses button.
- In the modeling tool License Manager dialog, click the Select License Key Files button. Then in the Select Key File dialog, select the license key file and click Open.
- In the License Configuration dialog, check the license information and click OK.
- When you receive the message to restart the modeling tool, click OK.
- Restart the modeling tool.
Activating at nomagic.com
Before starting the plugin license activation, make sure plugins are installed.
- Log in at nomagic.com as license owner.
- At the right side of the webpage, under Members, click License Activation Management.
In the License Activation Management page, click the Click to Edit button to edit the record of the modeling tool for which you want to activate plugins.
In the Edit license activation record dialog, select the plugins you want to activate.

- If you want to activate the license for the SysML Plugin bundle, you must add both commercial plugins included in that bundle to the activation record: SysML Plugin and Cameo Requirements Modeler Plugin.
- If you want to activate license for UPDM 2 Plugin bundle, you must add all commercial plugins included in that bundle to the activation record: UPDM 2 Plugin, SysML Plugin, and Cameo Requirements Modeler Plugin.
Click Save when finished. The activation record is updated.
- In the Activation Records table, in the Get key column, click the
 Send button to receive the license key by email or click the
  Download button to save the key locally.
 - Add the license key and restart the modeling tool.
Obtaining the floating license
- Make sure your floating license server contains the plugin license.
- Make sure the plugins are installed.
- Start the modeling tool.
- On the Help menu, click License Manager.
- In the modeling tool License Manager dialog, click the Use Floating License button.
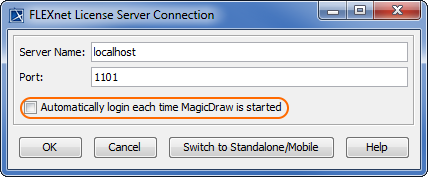
In the FLEXnet License Server Connection dialog, enter server name and port and click OK.
Your system administrator provides the server name and port.
In the Select Edition/Plugin dialog, select edition and plugins and click OK.
If the Automatically login each time <modeling tool> is started check box is selected, the FLEXnet License Server Connection dialog will not be displayed and the licenses will be obtained automatically. If you need to reset the licenses or select additional ones, do the following:
- In the main menu, click Options > Environment. The Environment Options dialog opens.
- In the Floating options group, set the Auto login to FLEXnet License Server option to false.
- Restart the modeling tool.