Managing projects in the local repository
See the procedures on this page for creating, opening, importing, removing, renaming, saving, and exporting local projects.
Creating projects in the local repository
Create projects in the local repository to create your models.
To create projects in the local repository
- Open the Manage Projects dialog.
- In the dialog, click the New button. The New Project dialog opens.
- In the dialog, specify the project name and category, then click OK.
Opening projects from the local repository
Open projects from the local repository to view and modify them in the tool.
To open projects from the local repository
- Open the Manage Projects dialog.
- In the dialog, do one of the following:
- Select the needed project and click the Open button.
- Double-click the needed projects.
Importing projects to the local repository

- The project from the file system is first imported into the local repository, and then opened from there. Therefore, the project file you open and work on in the tool is the project copy in the local repository, not the file in your file system.
- Imported projects are displayed in the local repository using the following structure: [<file_name>.mdszip imported @<date and time of the import>].
To import projects to the local repository
Do one of the following:
- Open the Manage Projects dialog. In the dialog, click the Import button. The Open dialog opens. Select the needed file from the file system and click OK.
- In the main menu, click File > Open Project. In the Open dialog, select the project and click Open.
- In the main toolbar, click the Open Project button.
- On the keyboard, press Ctrl+O.
- Drag the project from the open window of your file system to the modeling tool. The project opens.
Removing projects from the local repository
Removing the original project from the local repository removes all subsequent imports of the same project. Removing any subsequent import of the same project does not affect the original project. See the Managing project imports in the local repository page.
To remove projects from the local repository
- Open the Manage Projects dialog.
- In the dialog, select the needed project and click the Remove button. The question dialog opens. Click the Delete button to confirm the removal of the project.
Renaming projects in the local repository
Renaming the original project in the local repository renames all of its subsequent imports, and vice versa. See the Managing project imports in the local repository page.
To rename projects in the local repository
- Open the Manage Projects dialog.
- Select the needed project and click the Rename button. The Rename dialog opens.
- In the dialog, update the project name and click OK.
Saving projects in the local repository
To save a local project in the local repository
Do one of the following:
- In the main menu, click File > Save Project.
- On the keyboard, press Ctrl+S.
- In the main toolbar, click the Save Project button.
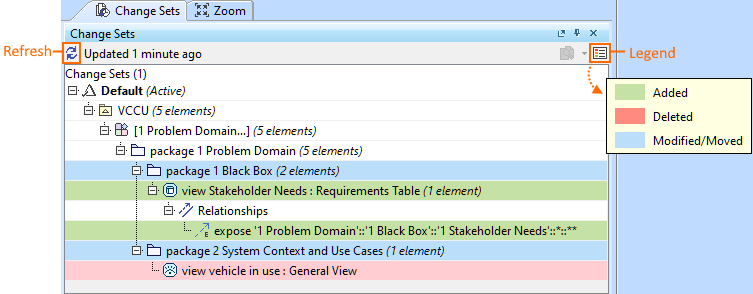
Use the Change Sets tab to track project modifications. The latest changes are compared against the latest project version saved in the local repository.
- The panel legend explains the modification markings.
- Click the Refresh icon to update the display.
Exporting projects from the local repository as .mdszip files
Export projects from the local repository as .mdszip files, which can be stored anywhere on your file system as a backup or shared with colleagues.
To export projects from the local repository as .mdszip files
- In the main menu, click File > Save Project As.
To export a project to a file, its changes must first be saved in the local repository. If it is not, clicking the Save As Project command opens a question dialog. Click Save in the dialog to save changes in the local repository and enable the project export to a file.
- The Save dialog opens. Select the file location in the file system and click Save.