Flow
A flow is a kind of connection that specifies a transfer from a source output to a target input (and, optionally, the payload). A flow is a transfer that continues while the source and target actions execute. The transferred payload can be anything (attribute value, item, part, etc.).
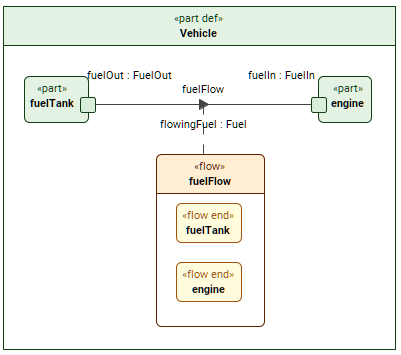 The image displays the fuelFlow flow connector from fuelTank.fuelOut to engine.fuelIn with the payload flowingFuel defined by Fuel. Additionally, the connector is also elaborated.
Creating flow usage and definition elements
Creating flow usage elements via the Textual Editor
To create flow usage elements via the Textual Editor
- In the Textual Editor, place the cursor where you want to create the element and declare the flow keyword.
- Specify the element name (optional), specialization (optional), payload (optional), then the from keyword and the name of the source element and output feature. Then follow with the keyword to and the name of the target element and input feature.

If the flow has no name and no specialization, the keyword from can be omitted.
- Click the Synchronize button.
flow fuelFlow : FuelFlow from fuelTank.fuelOut to engine.fuelIn; // named and specialized (feature typing) flow
flow : FuelFlow from fuelTank.fuelOut to engine.fuelIn; // unnamed specialized (feature typing) flow
flow fuelFlow from fuelTank.fuelOut to engine.fuelIn; // named unspecialized flow
flow fuelTank.fuelOut to engine.fuelIn; // unnamed unspecialized flow can omit the keyword from
Creating flow usage elements via the smart manipulator in a view
To create flow usage elements via the smart manipulator in a view
- In a view, select an element symbol, and in its smart manipulator, click the flow command.
- A dropdown menu appears. Select the output element in the menu.
- Click on the target element. A dropdown menu appears. Select the compatible input element in the menu. A flow usage is created between the elements.
Creating flow definition and usage elements via the view palette
To create flow definition and usage elements via the view palette
- To create a flow definition:
- In the view palette, under the Connectors group, click the flow def button to create a flow definition element.
- Click in the view pane where you want the flow definition symbol to be created.
- To create a flow usage:
- In the view palette, under the Connectors group, click the flow button to create a flow usage.
- In a view, click on the source element. A dropdown menu appears. Select the output element in the menu.
- Then click on the target element. A dropdown menu appears. Select the compatible input element in the menu. A flow usage is created between the elements.
If the needed button is not displayed, click the down-facing arrow next to either the flow or the flow def button and select the needed button in the dropdown menu.
Creating flow definition elements via the Textual Editor
To create flow definition elements via the Textual Editor
- In the Textual Editor, place the cursor where you want to create the element and declare the flow def keyword.
- Name the element, then specify the flow definition features in the element body:
- Specify the flow definition ends by declaring the end keyword, followed by the end name and/or specialization of the needed element.
- Click the Synchronize button.
flow def FuelFlow {
ref :>> payload : Fuel;
end port fuelIn : FuelIn;
end port fuelOut : FuelOut;
}
Creating flow definition elements via the Create Element command
To create flow definition elements via the Create Element command
In the Containment tree, right-click an element, and in the shortcut menu, click Create Element.
- In the Create Element dialog, click flow def for flow definition.
Auto-creating flow definition elements via the Extract Definition command
To auto-create a flow definition element via the Extract Definition command
- See the Extract Definition and Usage page.
Setting the payload for the flow
While the payload name and sign are displayed on the flow in a view by default, you can hide them using the Show Payload symbol style.
Setting the payload for the flow via the Textual Editor
To set the payload for the flow via the Textual Editor
In the Textual Editor, place the cursor before the keyword from within the flow for which you want to set a payload.
- Declare the keyword of followed by either of the following:
- The name of the payload specialized by a definition element.
- The name of the definition element you want to set as payload for the flow.
- Click the Synchronize button.
flow : FuelFlow of Fuel from fuelTank.fuelOut to engine.fuelIn; // specialized (feature typing) flow with payload set as a definition element
flow : FuelFlow of flowingFuel : Fuel from fuelTank.fuelOut to engine.fuelIn; // specialized (feature typing) flow with a named and specialized (feature typing) payload
flow of Fuel from fuelTank.fuelOut to engine.fuelIn; // unspecialized flow with payload set as a definition element
Setting the payload for the flow via the Drag and Drop handler in a view
To set the payload for the flow via the Drag and Drop handler in a view
- Drag and drop an element from the Containment tree or use its symbol's Drag and Drop handler on a flow element symbol executing the Set Payload command.