Managing local used projects
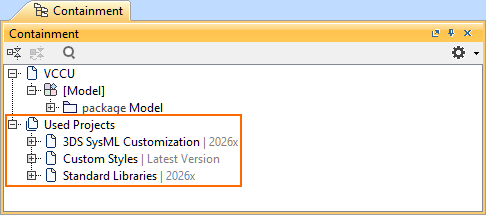
It is advisable to split large projects with loosely dependent parts into used projects. Project partitioning provides additional benefits, such as reusing model parts (e.g., libraries) across multiple projects and improving performance when working with very large models. The used projects are always added from the local repository; thus, the projects must first be added there to be used in other projects. Once added to the main project, you can view the used projects under the Containment tree's Used Projects node.
You can manage used projects via the Containment tree, the Project Usages dialog, and the Advanced Project Usages Configuration dialog.
There can be two kinds of used projects:
- Directly used projects: projects used directly by the main project.
- Indirectly used projects: projects used by other used projects. For more information, see the Indirectly used projects subsection.

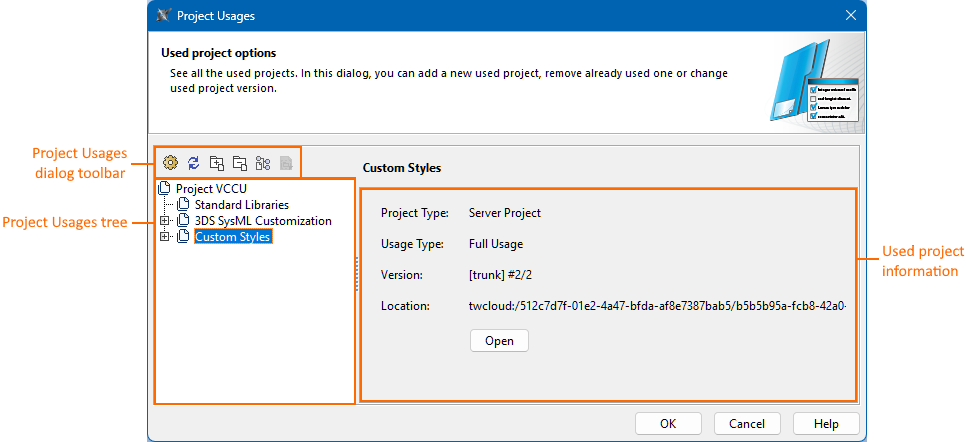
The Project Usages dialog
The Project Usages dialog allows you to manage projects used from the local repository. You can use, update, open, remove a used project, and switch between the original used project and its subsequent imports. Selecting a used project in the project usages tree displays the project's details (e.g., version, location) on the right side of the dialog.
Opening the Project Usages dialog
To open the Project Usages dialog
- Do one of the following:
- In the main menu, select Options > Project Usages.
- In the main menu, select Collaborate > Project Usages > Project Usages.
- In the Containment tree, expand the Used Projects node and right-click a used project. In the shortcut menu, click Options.
The Project Usages dialog opens.
The Advanced Project Usages Configuration dialog
The Advanced Project Usages Configuration dialog allows you to manage projects used from the local repository. You can use (and undo this command), remove (and undo this command) a used project, and switch between the original used project and its imports of a used project. You can also review all the used projects' version information.
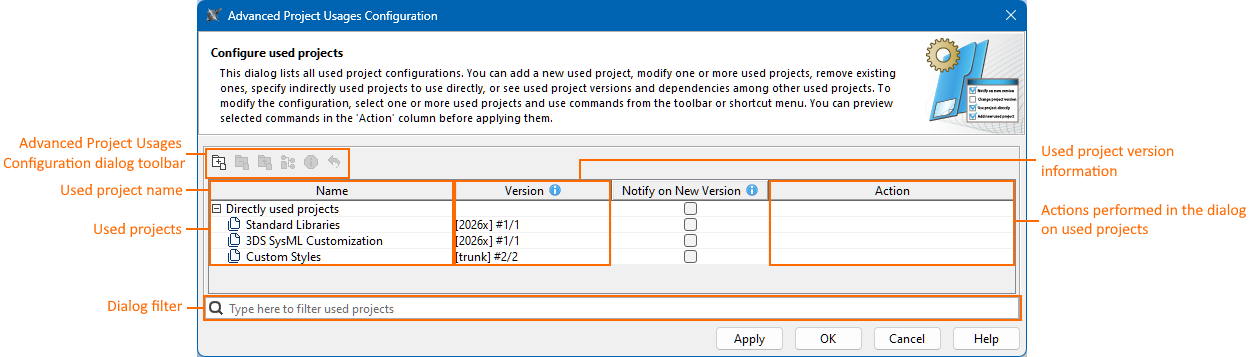
Some buttons in the Advanced Project Usages Configuration dialog are either disabled or not recommended for usage (e.g., Project Usage Information, Notify on New Version column functionality) as their functionality will be changed and/or removed in future releases.
Opening the Advanced Project Usages Configuration dialog
To open the Advanced Project Usages Configuration dialog
- Open the Project Usages dialog.
- In the Project Usages dialog's toolbar, click the Usages Configuration
 button.
The Advanced Project Usages Configuration dialog opens.
2026x HotFix1 version
This documentation page is for the 2026x HotFix1 version of the SysML v2 Plugin. If you are working with the 2026x version, expand the section above. However, we highly advise upgrading to the 2026x HotFix1 version.
It is advisable to split large projects with loosely dependent parts into used projects. Project partitioning provides additional benefits, such as reusing model parts (e.g., libraries) across multiple projects and improving performance when working with very large models. The used projects are always added from the local repository; thus, the projects must first be added there to be used in other projects. Once added to the main project, you can view the used projects under the Containment tree's Used Projects node.
You can manage used projects via the Containment tree, the Project Usages dialog, and the Advanced Project Usages Configuration dialog.
There can be two kinds of used projects:
- Directly used projects: projects used directly by the main project.
- Indirectly used projects: projects used by other used projects. For more information, see the Indirectly used projects page.
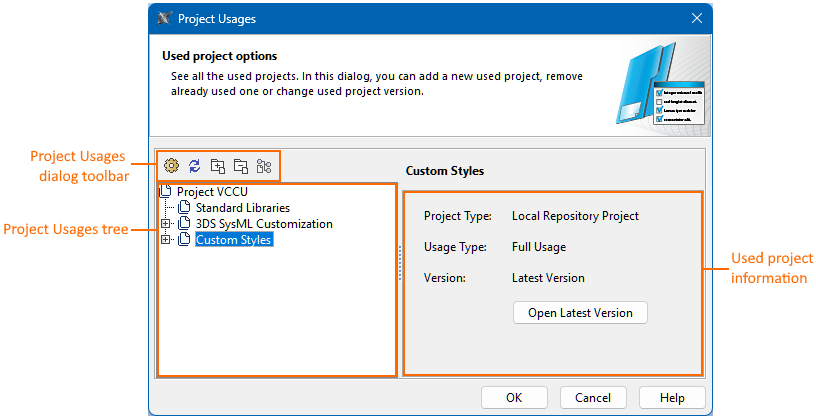
The Project Usages dialog
The Project Usages dialog allows you to manage projects used from the local repository. You can use, update, open, remove a used project, and switch between the original used project and its subsequent imports. Selecting a used project in the project usages tree displays the project's details (e.g., version, location) on the right side of the dialog.
Opening the Project Usages dialog
To open the Project Usages dialog
- Do one of the following:
- In the main menu, select Options > Project Usages.
- In the main menu, select Collaborate > Project Usages > Project Usages.
- In the Containment tree, expand the Used Projects node and right-click a used project. In the shortcut menu, click Options.
The Project Usages dialog opens.
The Advanced Project Usages Configuration dialog
The Advanced Project Usages Configuration dialog allows you to manage projects used from the local repository. You can use (and undo this command), update, remove (and undo this command) a used project, and switch between the original used project and its imports of a used project. You can also review the information about the version and the imports of all used projects.

Opening the Advanced Project Usages Configuration dialog
To open the Advanced Project Usages Configuration dialog
- Open the Project Usages dialog.
- In the Project Usages dialog's toolbar, click the Usages Configuration button.
The Advanced Project Usages Configuration dialog opens.