Specification panel
The Specification panel allows you to review and modify properties of specific elements, such as the declared name, declared short name, feature type and value, documentation, and others. You can also review inherited features and modify or create new owned elements in the appropriate compartments, which are equivalent to those displayed in view symbols. To review all element properties, see the Specification window page.
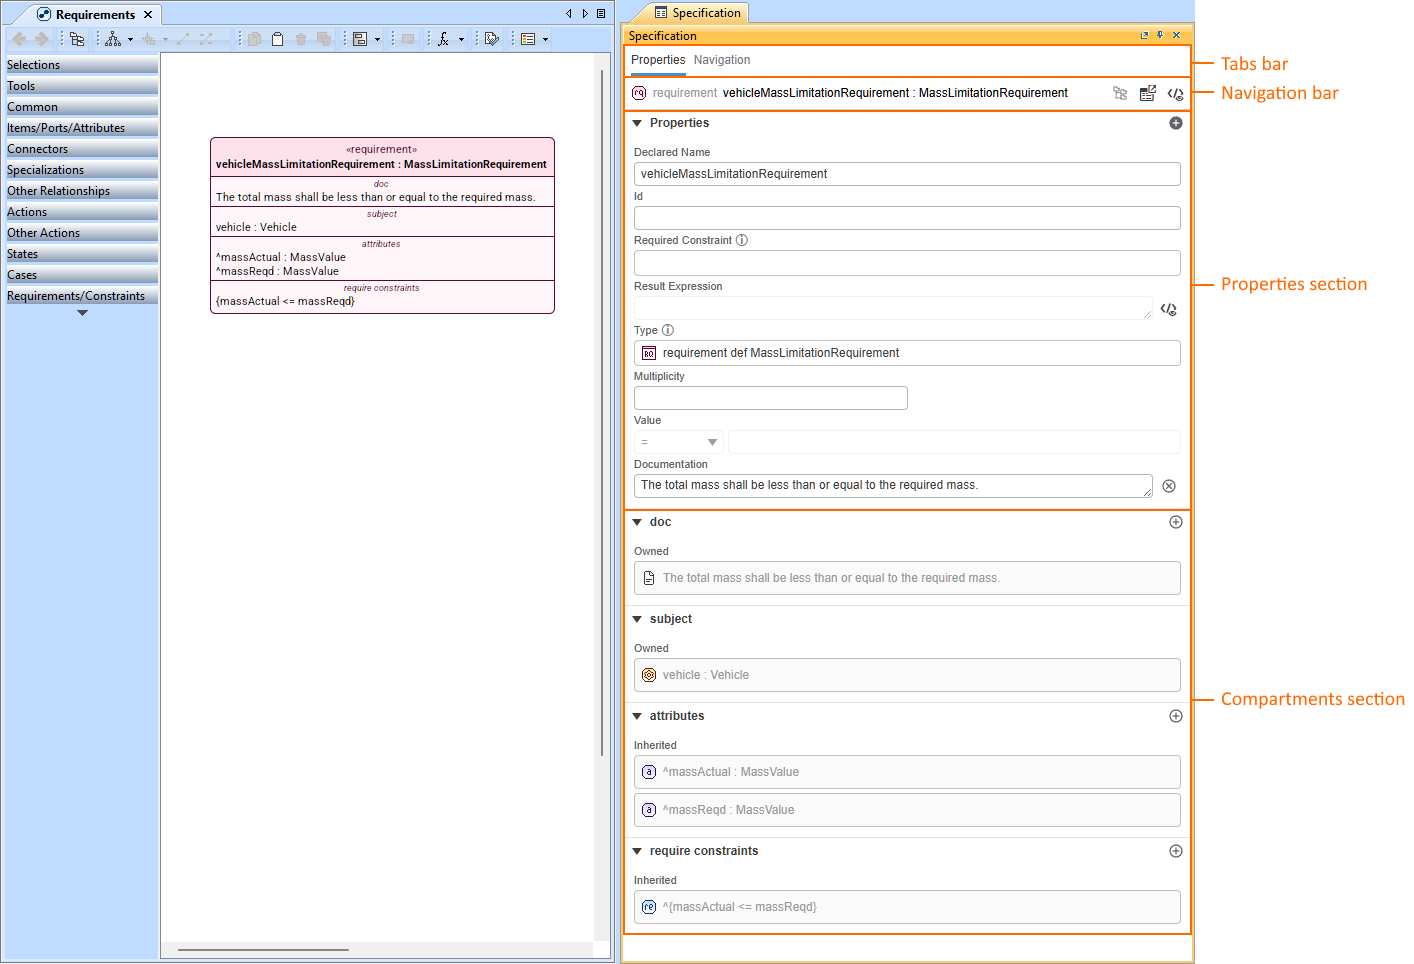
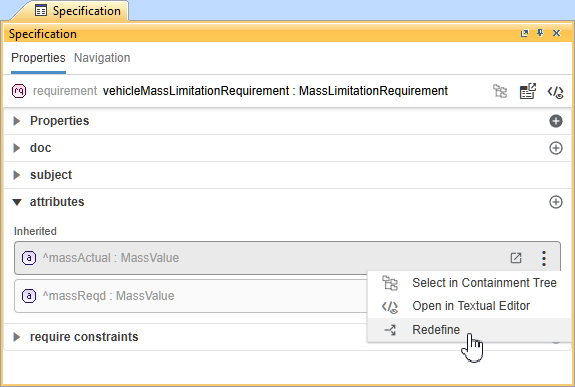
The Specification panel displays the vehicleMassLimitationRequirement element's specification information.
Working with the Specification panel
Opening the Specification panel
To open the Specification panel, do one of the following
- In the Textual Editor, right-click an element and in the shortcut menu, click Specification.
- Double-click an element in the Containment tree or its symbol in the View Pane.
- Select an element in the Containment tree or its symbol on the View Pane and press Enter.
- Right-click an element in the Containment tree or its symbol on the View Pane and click Specification in its shortcut menu.
- Select an element in the Containment tree or its symbol on the View Pane, then in the main menu, click Window > Specification.
- To open the Specification panel for a specific element displayed in the compartments section when the Specification panel is already open for another element, hover over the needed element and click the Navigate
 button.
 - Right-click an element cell in a tabular view and in its shortcut menu, click the Specification command.

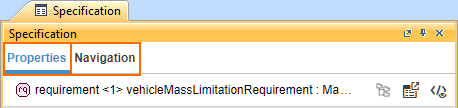
Switching between Specification panel tabs
Opening the Specification panel opens the Properties tab by default.
To switch between Specification panel tabs
- Click the needed tab in the tab bar.
Properties tab
The Properties tab allows you to modify the element properties and manage related element compartments.
Working with element properties via the Properties tab of the Specification panel
Modifying the declared name of the element via the Specification panel
To modify the declared name of the element via the Specification panel
- Open the Specification panel.
- In the Properties section, place the cursor on the Declared Name input field.
- Edit the declared name as needed.
- Click anywhere outside the edited input field for changes to take effect.
Modifying the declared short name of the element via the Specification panel
To modify the declared short name of the element via the Specification panel
- Open the Specification panel.
- In the Properties section, place the cursor on the Declared Short Name input field.
- Edit the declared short name as needed.
- Click anywhere outside the edited input field for changes to take effect.
Modifying the feature type via the Specification panel
To modify the feature type via the Specification panel
- Open the Specification panel.
- Do one of the following:
- Drag and drop the typing element from the Containment tree on the Type field in the Specification panel.
- Select the typing element symbol in a view and use its Drag and Drop handler to drag and drop it on the Type field in the Specification panel.

- If the type is already set, dragging and dropping the new type replaces the set type with the new one.
- To add additional types, hold the CTRL/Command key while dragging and dropping the additional type.
- To delete the set type, click the Delete
 button next to the Type input field. To delete one of the set types, click the Delete button next to the type you want to delete.
- Click anywhere outside the edited input field for changes to take effect.
Modifying additional properties via the Specification panel
Depending on the element, additional properties may be displayed in the Properties section of the Specification panel. These properties can be specified in the same way as for the feature type property.
- Result Expression - displays a read-only string of the constraint expression.
- Asserted Constraint - displays the asserted constraint's element name. See the (2026x Refresh1) Constraints page.
- Assumed Constraint - displays the assumed constraint's element name. See the (2026x Refresh1) Constraints page.
- Required Constraint - displays the required constraint's element name. See the (2026x Refresh1) Constraints page.
- Satisfied Requirement - displays the satisfied requirement's element name. See the (2026x Refresh1) Satisfy requirement page.
- Verified Requirement - displays the verified requirement's element name. See the (2026x Refresh1) Specifying requirement verification usages for verification case objective page.
- Exhibited State - displays the exhibited state's element name. See the (2026x Refresh1) Exhibit state page.
- Use Case Included - displays the included use case's element name. See the (2026x Refresh1) Include use case page.
- Performed Action - displays the performed action's element name. See the (2026x Refresh1) Perform action page.
- Referenced Rendering - displays the referenced rendering's element name. See the (2026x Refresh1) Rendering views basics page.
- Event Occurrence - displays the event occurrence's element name. See the (2026x Refresh1) Occurrences page.
- Framed Concern - displays the framed concern's element name. See the (2026x Refresh1) Frame concern page.
- Trigger - displays the transition's trigger element name. See the (2026x Refresh1) Transition page.
- Payload - displays the accept action's payload element name. See the (2026x Refresh1) Accept action page.
Modifying the feature value via the Specification panel
To modify the feature value via the Specification panel
- Open the Specification panel. In the Value subsection:
- You can only modify the field for already specified values. Otherwise, it is read-only.
- To delete the specified value, click the Delete button next to the field.
- To modify the value modifier, click the first dropdown button and click the needed modifier.
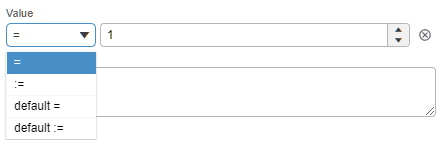
- A type-corresponding value editor is displayed:
- For integer-typed attributes, click the up or down arrow buttons in the second field to modify the feature value.
- For string-typed attributes, input the needed text.
- For real-typed attributes, input the needed number.
- For boolean or enumeration-typed attributes, select the needed value from the dropdown list.
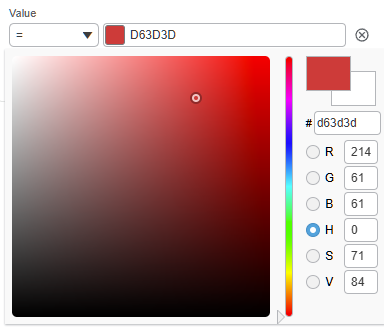
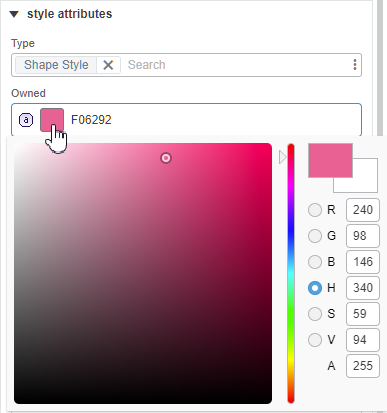
- For color-typed attributes, either click the color picker rectangle and pick the color, or input a 6 or 8-digit HEX color code.
- Click anywhere outside the edited field for changes to take effect.
Modifying the documentation of the element via the Specification panel
To modify the documentation of the element via the Specification panel
- Open the Specification panel.
- In the Properties section, place the cursor on the Documentation input field.
- Edit the declared name as needed.
To delete the specified documentation, click the Delete
button next to the Documentation input field. Deleting the field content (using Backspace or Delete keys) does not delete the documentation but rather specifies it as empty. - Click anywhere outside the edited input field for changes to take effect.
Modifying the multiplicity of the element via the Specification panel
To modify the multiplicity of the element via the Specification panel
- Open the Specification panel.
- In the Properties section, click the input field under the Multiplicity subsection and do one of the following:
- Select the needed multiplicity in the dropdown menu.
- Enter the needed multiplicity number.
- Click anywhere outside the edited input field for changes to take effect.
Modifying the direction of the element via the Specification panel
Direction modification is only available for items, attributes, and refs.
To modify the direction of the element via the Specification panel
- Open the Specification panel.
- In the Properties section, click the field under the Direction subsection and select the needed direction in the dropdown menu.
- Click anywhere outside the edited field for changes to take effect.
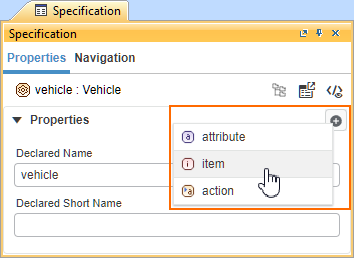
Creating an element via the Specification panel
To create an element via the Specification panel
- Open the Specification panel.
- In the Properties section bar, click the Create Element
 button. The shortcut menu appears.
 - Click the needed element kind in the shortcut menu. The selected element is created in the appropriate compartment.
Working with elements via compartments in the Properties tab of the Specification panel
Creating an element via the compartment in the Specification panel
To create an element via the compartment in the Specification panel
- Open the Specification panel.
- In the appropriate compartment section's bar, click the Create <element name>
 button (e.g., Create attribute). The element is created in the appropriate compartment.
Deleting an element via the compartment in the Specification panel
To delete an element via the compartment in the Specification panel
- Open the Specification panel.
- In the appropriate compartment's section, hover over the element you want to delete.
- Click the Delete
 button. The element is deleted from the appropriate compartment.
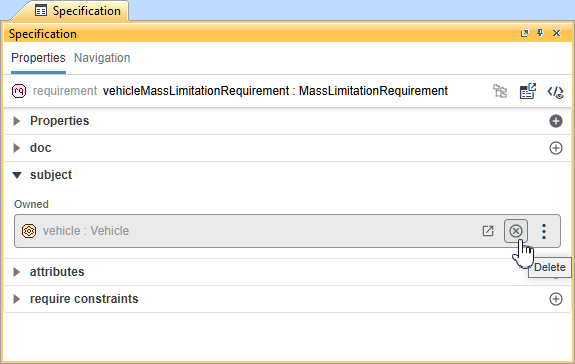
Modifying element values via the compartment in the Specification panel
- This procedure is applicable only for string, integer, real, boolean, color, or enumeration-typed attributes and ref elements.
- If the modification is done for an inherited feature, the inherited feature is redefined with a new value.
- For modifying other element values, navigate to the element's Specification panel, then see the Modifying the feature value via the Specification panel procedure.
- To delete the specified value, click the Delete button next to the field.
To modify element values via the compartment in the Specification panel
- Open the Specification panel.
- In the appropriate compartment's section, click the element whose value you want to modify. A type-corresponding value editor is displayed:
- For integer-typed attributes, click the up or down arrow buttons in the second field to modify the feature value.
- For string-typed attributes, input the needed text.
- For real-typed attributes, input the needed number.
- For boolean or enumeration-typed attributes, select the needed value from the dropdown list.
- For color-typed attributes, either click the color picker rectangle and pick the color, or input a 6 or 8-digit HEX color code.
- Click anywhere outside the edited field for changes to take effect.
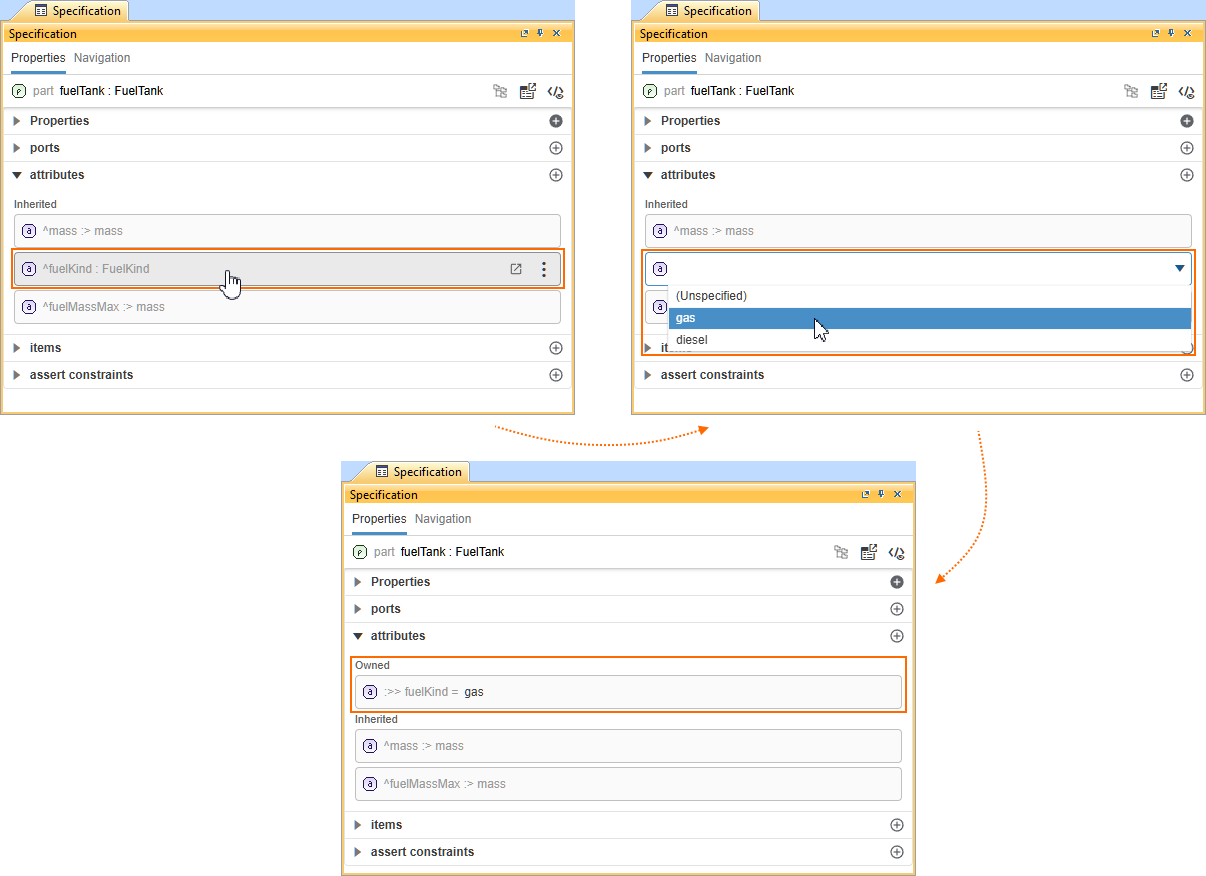
Redefining inherited features via the compartment in the Specification panel
The element features displayed in the compartments are grouped under labels indicating inherited and redefined features.
To redefine inherited features via the compartment in the Specification panel
- Open the Specification panel and do one of the following:
- To redefine a string, integer, real, boolean, color, or enumeration-typed inherited attributes or ref elements, see the Modifying element values via the compartment in the Specification panel procedure.
- To redefine any inherited feature, do one of the following:
- Hover over the inherited feature you want to redefine and click the More button
 , then in the dropdown menu, click Redefine.
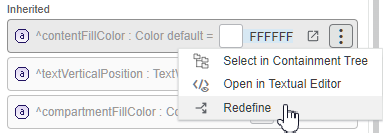
- Hover over the inherited feature you want to redefine and click the Navigate button to open the Specification panel for the selected feature. At the top of the Specification panel, click the Redefine button in the informational message.Once done, you can modify the redefined feature's values via the Modifying the feature value via the Specification panel procedure.
The properties in the panel are read-only until redefinition is done to prevent modification of non-redefined property values.
Redefining the inherited metadata feature without a set default value
To redefine the inherited metadata feature without a set default value, click the Add
button in the metadata compartment section's bar. In the submenu, hover over the needed metadata, and in its submenu, click the feature you want to redefine. The feature is redefined and displayed in the metadata compartment under the label of the applied metadata's name. NOTE: The Add button is not displayed if all features are already redefined or the element inherits a feature with a set default value.
- Hover over the inherited feature you want to redefine and click the More button
- To redefine a string, integer, real, boolean, color, or enumeration-typed inherited attributes or ref elements, see the Modifying element values via the compartment in the Specification panel procedure.
Navigation tab
The Navigation tab allows you to easily navigate from a selected element to its related elements based on their relations. The tab organizes related elements into categories, such as Subsetted Feature, Redefined Feature, Flow, Connection, Type, etc.
Navigating elements via the Navigation tab
To navigate elements via the Navigation tab
- Click the Navigation tab in the tabs bar.
- Hover over the needed element and do one of the following:
- Click the Navigate button to open the element's Specification panel.
- Click the
 button and in its submenu, click the Select in Containment Tree command.
- Click the Navigate button