Satisfy requirement
Requirement satisfaction is modeled via the satisfy requirement usage element, which asserts that a requirement is satisfied when a given feature is bound to the subject parameter of the requirement. Other parameters or features of the requirement may also be bound in the body of the satisfy requirement usage. A satisfy requirement usage can also be negated. A negated satisfy requirement usage asserts that some entity does not satisfy the given requirement.
There are two ways a requirement can be satisfied by another element:
- by referencing the requirement usage defined elsewhere in the model.
- The element symbol is displayed with the satisfy keyword (unnamed element) or the satisfy requirement keyword (named element).
- See the procedures:
- Satisfying a requirement by referencing a requirement usage defined elsewhere in the model:
- Satisfying requirements via the Textual Editor
- Satisfying requirements via the Drag and Drop handler in a view
- Satisfying requirements via the Specification panel
- Satisfying requirements via the view palette
- Satisfying requirements via the smart manipulator in a view
- Satisfying requirements via the Create Relation command
- Satisfying a requirement by referencing a requirement usage defined elsewhere in the model:
- The element symbol is displayed with the satisfy keyword (unnamed element) or the satisfy requirement keyword (named element).
- by containing an owned satisfy requirement usage, i.e., the satisfied requirement is the satisfy requirement usage itself.
- The element symbol is displayed with the satisfy requirement keyword.
- See the procedures:
- The element symbol is displayed with the satisfy requirement keyword.
Satisfying a requirement by referencing a requirement usage defined elsewhere in the model
Satisfying requirements via the Textual Editor
To satisfy a requirement via the Textual Editor
- In the Textual Editor, place the cursor within the curly braces of the part element and do one of the following:
- For an unnamed satisfy requirement usage, declare the satisfy keyword followed by the name of the requirement the part satisfies.
- For a named satisfy requirement usage, declare the satisfy requirement keyword, specify the element name, then reference subset the requirement the part satisfies.

To negate a satisfy requirement usage, specify the not keyword before the satisfy keyword, e.g., not satisfy.
- (Optional) To specify a requirement with an explicit satisfying feature, state the by keyword and the name of the subject element that satisfies the requirement.
- Click the Synchronize button.
requirement vehicleSpecification { // the referenced requirement
subject vehicle : Vehicle;
actor environment : Environment;
requirement fullVehicleMassLimit : MassRequirement {
subject vehicle : Vehicle;
attribute :>> massRequired = 2000 [kilogram];
}
}// step 1.a - unnamed satisfy requirement usage with an implicit satisfying feature
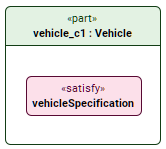
part vehicle_c1 : Vehicle {
satisfy vehicleSpecification.fullVehicleMassLimit; // the satisfying feature is implicitly the part vehicle_c1
}// step 1.b - named satisfy requirement usage with an implicit satisfying feature
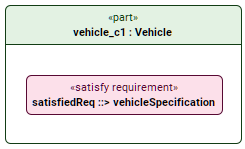
part vehicle_c1 : Vehicle {
satisfy requirement satisfiedReq ::> vehicleSpecification.fullVehicleMassLimit; // the satisfying feature is implicitly the part vehicle_c1
}// step 2 - unnamed satisfy requirement usage with an explicit satisfying feature
part vehicle : Vehicle {
part vehicle_c2 : Vehicle;
satisfy vehicleSpecification.fullVehicleMassLimit by vehicle_c2;
}// negated satisfy requirement usage
part vehicle_c1 : Vehicle {
not satisfy vehicleSpecification.fullVehicleMassLimit;
}
Satisfying requirements via the Drag and Drop handler in a view
To satisfy a requirement via the Drag and Drop handler in a view
- Drag and drop a requirement element from the Containment tree or use its symbol's Drag and Drop handler and drop it on:
- a part element symbol that you want to satisfy the requirement by referencing it using the Create Satisfy Requirement command.
- a satisfy requirement usage symbol that you want to satisfy by referencing it using the Set Satisfied Requirement command.
Satisfying requirements via the Specification panel
To satisfy a requirement via the Specification panel
- Drag and drop a requirement element from the Containment tree or use its symbol's Drag and Drop handler and drop it on the Satisfied Requirement field in the Properties section of the Specification panel for the satisfy requirement usage.
The appropriate requirement is specified for the element.
Satisfying requirements via the view palette
To satisfy requirements via the view palette
- In the view palette, under the Requirements group, click satisfy.
If the needed button is not displayed, click the down-facing arrow next to the satisfy requirement button and select the needed button in the dropdown menu.
- Do one of the following:
- To satisfy an existing requirement, in the view pane, click on the part element symbol, then on the requirement element symbol.
- To satisfy a new requirement, in the view pane, click on the part element symbol, then elsewhere in the view pane to create a requirement element symbol.
The satisfy path is drawn between the element symbols.
Satisfying requirements via the smart manipulator in a view
To satisfy requirements via the smart manipulator in a view
- In a view, do one of the following:
- To satisfy an existing requirement, select the part element symbol, and in its smart manipulator, click the satisfy command. Click on the requirement element symbol.
- To create a new satisfy requirement, select the part element symbol, and in its smart manipulator, click the satisfy command. Click elsewhere in the view pane to create a requirement element symbol.
The satisfy path is drawn between the element symbols.
Satisfying requirements via the Create Relation command
To satisfy requirements via the Create Relation command
- Right-click on the client (source) element.
- In the shortcut menu, click Create Relation, then in the submenu, under Outgoing, click satisfy. The Create... dialog opens.
- In the Create... dialog, do one of the following:
- In a view, click the element symbol you want to be the supplier (target). Hold Shift to select multiple elements.
- Click the Add
 button. The element selection dialog opens. In the element selection dialog, select the element you want to be the supplier (target) and click OK.
 - Drag and drop the needed element you want to be the supplier (target) from the Containment tree onto the Create... dialog.
- In the Create... dialog, click OK.
Satisfying a requirement via the owned satisfy requirement usage itself as the satisfied requirement
Satisfying requirements via the Textual Editor
To satisfy a requirement via the Textual Editor
- In the Textual Editor, place the cursor within the curly braces of the part element and do one of the following:
- To specify a requirement without the satisfying feature, declare the satisfy requirement keyword followed by the qualified name of the requirement the part satisfies.
- To specify a requirement with the satisfying feature declare the satisfy requirement keyword followed by the qualified name of the satisfied requirement, then state the by keyword and the name of the subject element that satisfies the requirement.
To negate a satisfy requirement usage, specify the not keyword before the satisfy keyword, e.g., not satisfy.
- Click the Synchronize button.
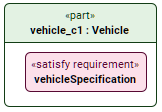
part vehicle_c1 : Vehicle {
satisfy requirement vehicleSpecification; // satisfied requirement is the defined satisfy requirement usage itself contained by the parent part that is the implicit satisfying feature
}
Satisfying requirements via the Create Element command
To satisfy a requirement via the Create Element command
In the Containment tree, right-click an element, and in the shortcut menu, click Create Element.
- In the Create Element dialog, select satisfy requirement.
- Name the element.
- (Optional) Specify the satisfy requirement.
Satisfying requirements via the view palette
To satisfy a requirement via the view palette
- In the view palette, under the Requirements/Constraints group, click satisfy requirement.
- Click in the view pane where you want to create the element symbol.
- (Optional) Specify the satisfy requirement.