On this page:
Messages allow displaying an interaction between objects. A Message is labeled with either the message name or the assigned Operation (signal) name and its arguments.
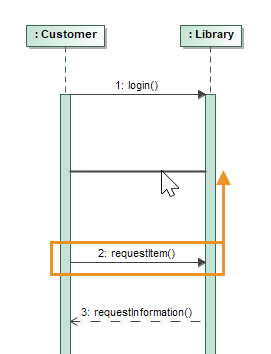
Drawing Message from/to Lifeline to/from diagram frame
Outgoing and incoming messages communicate with the outside environment by connecting to the border gates (the diagram frame).

In the example above, you can see the Message card inserted that is drawn from the diagram frame border to the Lifeline controller. The Message authorize is created from the Lifeline controller to the diagram frame.
For a Message to be correct, its receive end should be known. However, we never know who will connect to the gate from the outside. Thus, we are using the reply Message when creating the Message from the Lifeline to the diagram frame (see Message authorize in the figure).
Creating nested activation
Nested activations allow you to model:
- A parallel execution of operations that belong to a single Class.
- Callback messages.
The nested activation can be created between at least two messages that point to the same activation.
Nested activations can be created for the following messages:
- Synchronous Call Message (synchCall)
- Asynchronous Call Message (asynchCall)
- Asynchronous Signal Message (asynchSignal)
To create a nested activation
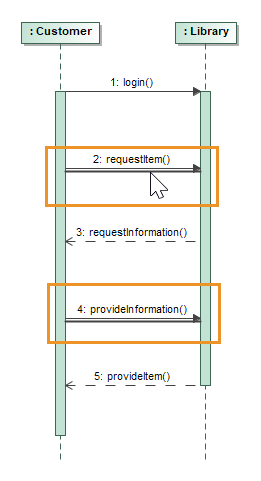
Ensure that you have at least two messages pointing to the same activation in your model.
- Select any subsequent Message.
- Do one of the following:
- From the Message shortcut menu, select Create Nested Activation.
- On the Message smart manipulator toolbar, click the Create Nested Activation button.
The Message will be connected to the nested activation.
To merge a nested activation with a parent activation
- Select a Message that has a nested activation.
- Do one of the following:
- From the Message shortcut menu, select Reduce Nesting Level.
- On the Message smart manipulator toolbar, click the Reduce Nested Activation button.
The Message will be connected to the parent activation.
Nested activations can be used in the following cases:
- To model parallel executions for a non-active Lifeline
- To model parallel executions for an active Lifeline
- To model a callback Message
Modeling parallel executions
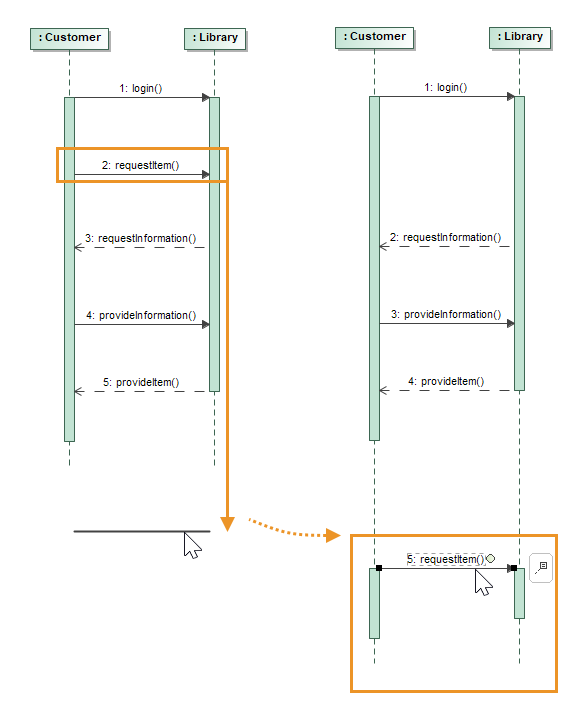
To model parallel executions for a non-active Lifeline
A non-active Lifeline is one that has a non-active Class as a type assigned. The non-active Class is the one whose Is Active property is set to false. This property is available in the Expert mode.
The figure below shows the creation of a simple nested activation, described in the procedure To create a nested activation.

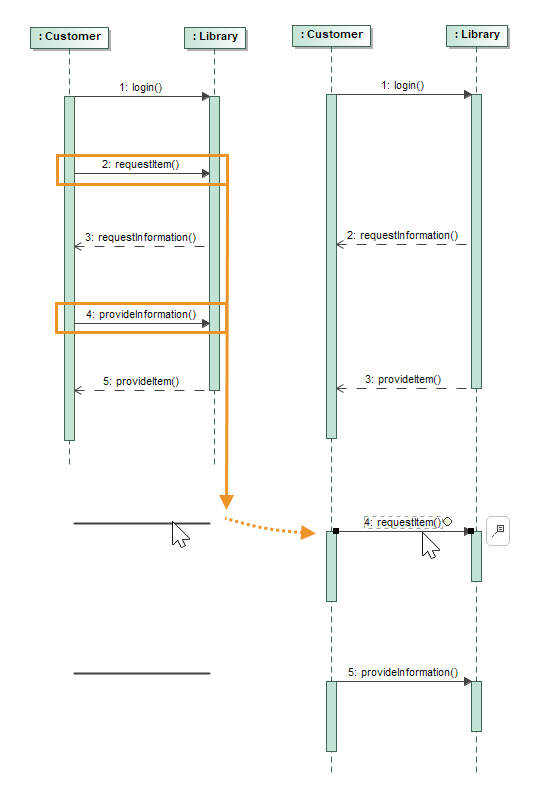
To model parallel executions for an active Lifeline
An active Lifeline is one that has an active Class as a type assigned. The active Class is the one whose Is Active property is set to true. This property is available in the Expert mode.
- Select a Lifeline and from its shortcut menu, select Show Entire Activation. All activations of the selected Lifeline become all-in-one.
- Create an outgoing Message or select an existing Message pointed to an active object. Be sure this is not the first one for the outgoing activation.
- From the Message shortcut menu, select Create Nested Activation.

Modeling callback Messages
To model a callback Message
- Create or select an incoming Message that is modeled as a callback Message.
- From the Message shortcut menu, select Create Nested Activation.

Moving Messages
Moving an individual Message
You can move an individual Message up or down the lifeline simply by dragging it along its execution specification. If the Message is dragged above or below its execution specification, the latter will break and the Message will be connected to a new execution specification.
To move an individual Message
- Select the Message and drag it up or down the execution specification to reposition it.
- (Optional) Drag the Message above or below its execution specification to break the Message off its execution specification and connect it to a new one.
Moving a Message together with subsequent Messages
If you want to move a Message up or down along with all of the subsequent Messages, as well as break the existing execution specification and connect the Messages to the new execution specifications, you can use Magnet and Pusher buttons.
Moving dependent Messages
You can also move a Message together with its dependent Messages up or down the lifeline by dragging it along its execution specification. If the Message is dragged above or below its execution specification, the latter will break and the Message, along with its dependent Messages, will be connected to the new execution specifications.
To move dependent Messages
- On the diagram palette, click the
 Move Dependent Messages button.
 - On the diagram pane, select the Message you want to move. Dependent Messages are then selected automatically.
- Drag the selected Messages up or down the execution specification to reposition them.
- (Optional) Drag the Messages above or below their execution specification to break the Messages off their execution specification and connect them to the new ones.
If a Message is moved below or above its execution specification to break the latter and connect the Message to a new execution specification, the Message no longer depends on a Message it was dependent on prior to the breaking of the execution specification.