On this page
This section outlines how to work with rows in the table: selection, clearing values, adding and removing rows.
Selecting an entire row
To select the entire row
- Click the number cell of the row you want to select.

Clearing values from an entire row
Data types
Only String, Boolean, Number, or Enumeration data types can be cleared from a cell.
To clear values from an entire row
- Right-click the number cell of the row.
- Do one of the following:
- From the shortcut menu, click the Clear command.
- Press Delete from the keyboard.
Adding a new row
You can create a new element in the model by adding a new row in the table. Each type of table requires a different procedure to add new row(s).
To add a new row in the Generic and Glossary tables
- On the table toolbar, click the Add New button.
More information
To add a new row in the Instance Table
- On the table toolbar, click
 >
>  Create.
More information
To add a new row in the Metric Table
- On the table toolbar, click Calculate Metrics > Add New Metric with Different Parameters.
Removing a row from table
To remove a row from a table
- Select the whole row or select one cell of the row you want to remove.
- Do one of the following:
- Click the Remove From Table button on the table toolbar.
- Press Ctrl+Delete from keyboard.
Removing a row from the model
You can delete an element from the model when removing the row from a table.
To remove a row from a table
- Select the whole row or select one cell of the row you want to remove.
- Do one of the following:
- Click the Delete button on the table toolbar.
- Press Ctrl+D from keyboard.
Sorting rows
You can change the order of rows in the following ways:
To sort rows by a selected column
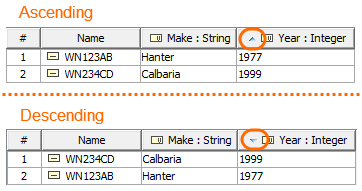
- Click the header of the column by which you want to sort the rows in the table. A small arrow showing the automatic sort order appears on the column header. Clicking the header once sorts the rows in ascending order. Clicking the header twice sorts the rows in descending order. All the rows in the table are automatically renumbered after sorting.
To sort rows by multiple columns
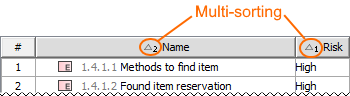
- Press Ctrl + click on the first column header you want to sort the rows in the table. Repeat this action for the next column header you want to sort the rows in the table. A minimum of two column headers should be selected to multi-sort rows. A small arrow with a number showing the automatic multi-sort order appears on the column header. All the rows in the table are automatically renumbered after multi-sorting.
Moving rows up and down
To move a row up or down
- Select the row.
- Do either:
- On the table toolbar, click the Up or Down button appropriately.
- Right-click the row and select the Up or Down command appropriately.
- Press Ctrl+Up Arrow or Ctrl+Down Arrow appropriately.
Displaying rows hierarchically
Hierarchical tables are very helpful when managing and reviewing any amount of data. Hierarchy in a table is a tree-like structure where all rows are listed according to the elements containment.
Important
The hierarchy in the Instance table is displayed according to an instance value that is a slot value of another Instance Specification. Composite instances are displayed.
To display elements hierarchically in a table
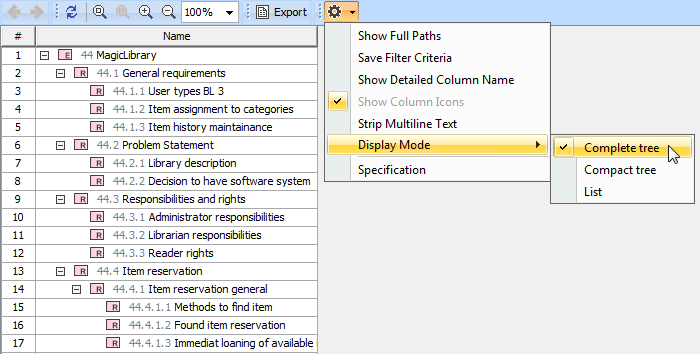
- In the table toolbar, click
 .
. - Under the Display Mode option choose:
- Complete tree to display elements with all their owners in the column header.
- Compact tree to display elements with their direct and common owners in the column header.
Expanding/collapsing nodes in a hierarchical table
To expand/collapse nodes in a hierarchical table
- Click
 /
/ in the name column.
 - Select the row and press the right arrow key/left arrow key.
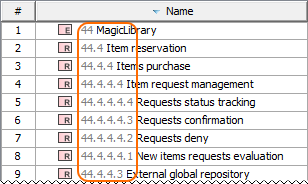
Displaying/hiding element numbers in a row
When creating a new table, rows are automatically numbered in the name column. The following procedure is important for those who modify existing tables created before Version 18.4.
To display/hide element numbers in the table
- Open the Specification window of the table.
Set the Show Element Number property value to true to display element numbers, or false to hide them.
The element numbers are displayed in the name columns before the element name (see the following example).